Extent Reports Selenium Version 4 – Software Testing Material
Earlier we posted “How To Generate Extent Reports Selenium” and “Generating Extent Reports Selenium with Screenshots“. This post will guide you on “How To Generate Extent Reports Version 4 in Selenium”. Check this if you have any issues with Extent Reports version 3.
We all know Extent reports are the advanced Selenium Reporting Tool. We can create beautiful, interactive and detailed reports using Extent framework. We can add any information (such as events, screenshots, tags, devices, authors or any other relevant information) which is important for us to create an informative and stunning report.
ExtentReport, once a popular choice for generating test reports, is now deprecated, leaving teams searching for a better ExtentReport alternative.
Let’s move forward and see step by step guide on how to setup extent reports version 4 in Selenium WebDriver Scripts.

Steps To Generate Extent Reports Selenium:
- Step 1: Firstly, create a TestNG project in eclipse
- Step 2: Now Download Extent reports Version 4 JAR file or to get Extent Reports Maven dependency 4.06 – Download Extent Reports
- Step 3: Add the downloaded library files (Jar file) to your project or add Extent Reports Maven Dependency
Here is extent reports maven dependency version 4.0.6
<!-- https://mvnrepository.com/artifact/com.aventstack/extentreports -->
<dependency>
    <groupId>com.aventstack</groupId>
    <artifactId>extentreports</artifactId>
    <version>4.0.6</version>
</dependency>
- Step 4: Create a java class say ‘ExtentReportsClass’ and add the following code to it
Let’s validate title and logo on Google home page.
package myExtentReport;

import java.io.File;
import java.io.IOException;
import java.text.SimpleDateFormat;
import java.util.Date;
import org.apache.commons.io.FileUtils;
import org.openqa.selenium.*;
import org.openqa.selenium.chrome.ChromeDriver;
import org.testng.Assert;
import org.testng.ITestResult;
import org.testng.annotations.*;
import com.aventstack.extentreports.ExtentReports;
import com.aventstack.extentreports.ExtentTest;
import com.aventstack.extentreports.Status;
import com.aventstack.extentreports.markuputils.ExtentColor;
import com.aventstack.extentreports.markuputils.MarkupHelper;
import com.aventstack.extentreports.reporter.ExtentHtmlReporter;
import com.aventstack.extentreports.reporter.configuration.Theme;

public class ExtentReportsClass {
	public WebDriver driver;
	public ExtentHtmlReporter htmlReporter;
	public ExtentReports extent;
	public ExtentTest logger;

	@BeforeTest
	public void startReport() {
		htmlReporter = new ExtentHtmlReporter(System.getProperty("user.dir") + "/test-output/STMExtentReport.html");
        	// Create an object of Extent Reports
		extent = new ExtentReports();
		extent.attachReporter(htmlReporter);
		extent.setSystemInfo("Host Name", "SoftwareTestingMaterial");
        	extent.setSystemInfo("Environment", "Production");
		extent.setSystemInfo("User Name", "Rajkumar SM");
		htmlReporter.config().setDocumentTitle("Title of the Report Comes here ");
                // Name of the report
		htmlReporter.config().setReportName("Name of the Report Comes here ");
                // Dark Theme
		htmlReporter.config().setTheme(Theme.STANDARD);
	}

	//This method is to capture the screenshot and return the path of the screenshot.
	public static String getScreenShot(WebDriver driver, String screenshotName) throws IOException {
		String dateName = new SimpleDateFormat("yyyyMMddhhmmss").format(new Date());
		TakesScreenshot ts = (TakesScreenshot) driver;
		File source = ts.getScreenshotAs(OutputType.FILE);
		// after execution, you could see a folder "FailedTestsScreenshots" under src folder
		String destination = System.getProperty("user.dir") + "/Screenshots/" + screenshotName + dateName + ".png";
		File finalDestination = new File(destination);
		FileUtils.copyFile(source, finalDestination);
		return destination;
	}

	@BeforeMethod
	public void setup() {
		System.setProperty("webdriver.chrome.driver","C://AutomationFramework//Drivers//chromedriver.exe");
		driver = new ChromeDriver();
		driver.manage().window().maximize();
		driver.get("https://www.google.com/");
	}

	@Test
	public void verifyTitle() {
		logger = extent.createTest("To verify Google Title");
		Assert.assertEquals(driver.getTitle(),"Google");
	}

	@Test
	public void verifyLogo() {
		logger = extent.createTest("To verify Google Logo");
		boolean img = driver.findElement(By.xpath("//img[@id='hplogo']")).isDisplayed();
		logger.createNode("Image is Present");
		Assert.assertTrue(img);
		logger.createNode("Image is not Present");
		Assert.assertFalse(img);
	}

	@AfterMethod
	public void getResult(ITestResult result) throws Exception{
		if(result.getStatus() == ITestResult.FAILURE){
			//MarkupHelper is used to display the output in different colors
			logger.log(Status.FAIL, MarkupHelper.createLabel(result.getName() + " - Test Case Failed", ExtentColor.RED));
			logger.log(Status.FAIL, MarkupHelper.createLabel(result.getThrowable() + " - Test Case Failed", ExtentColor.RED));
			//To capture screenshot path and store the path of the screenshot in the string "screenshotPath"
			//We do pass the path captured by this method in to the extent reports using "logger.addScreenCapture" method.
			//String Scrnshot=TakeScreenshot.captuerScreenshot(driver,"TestCaseFailed");
			String screenshotPath = getScreenShot(driver, result.getName());
			//To add it in the extent report
			logger.fail("Test Case Failed Snapshot is below " + logger.addScreenCaptureFromPath(screenshotPath));
		}
		else if(result.getStatus() == ITestResult.SKIP){
			logger.log(Status.SKIP, MarkupHelper.createLabel(result.getName() + " - Test Case Skipped", ExtentColor.ORANGE));
		}
		else if(result.getStatus() == ITestResult.SUCCESS)
		{
			logger.log(Status.PASS, MarkupHelper.createLabel(result.getName()+" Test Case PASSED", ExtentColor.GREEN));
		}
		driver.quit();
	}

	@AfterTest
	public void endReport() {
		extent.flush();
	}
}
extent-config.xml:
<?xml version="1.0" encoding="UTF-8"?>
<extentreports>
  <configuration>
    <!-- report theme -->
    <!-- standard, dark -->
    <theme>standard</theme>

    <!-- document encoding -->
    <!-- defaults to UTF-8 -->
    <encoding>UTF-8</encoding>

    <!-- protocol for script and stylesheets -->
    <!-- defaults to https -->
    <protocol>https</protocol>

    <!-- title of the document -->
    <documentTitle>ExtentReports 2.0</documentTitle>

    <!-- report name - displayed at top-nav -->
    <reportName></reportName>

    <!-- report headline - displayed at top-nav, after reportHeadline -->
    <reportHeadline>Automation Report</reportHeadline>

    <!-- global date format override -->
    <!-- defaults to yyyy-MM-dd -->
    <dateFormat>yyyy-MM-dd</dateFormat>

    <!-- global time format override -->
    <!-- defaults to HH:mm:ss -->
    <timeFormat>HH:mm:ss</timeFormat>

    <!-- custom javascript -->
    <scripts>
      <![CDATA[
        $(document).ready(function() {

        });
      ]]>
    </scripts>

    <!-- custom styles -->
    <styles>
      <![CDATA[

      ]]>
    </styles>
  </configuration>
</extentreports>
By using this external XML file (extent-config.xml), we could change the details such as Report Theme (either standard or dark), Report Title, Document Title etc.,
Console Output:
===============================================
Default suite
Total tests run: 2, Failures: 1, Skips: 0
===============================================
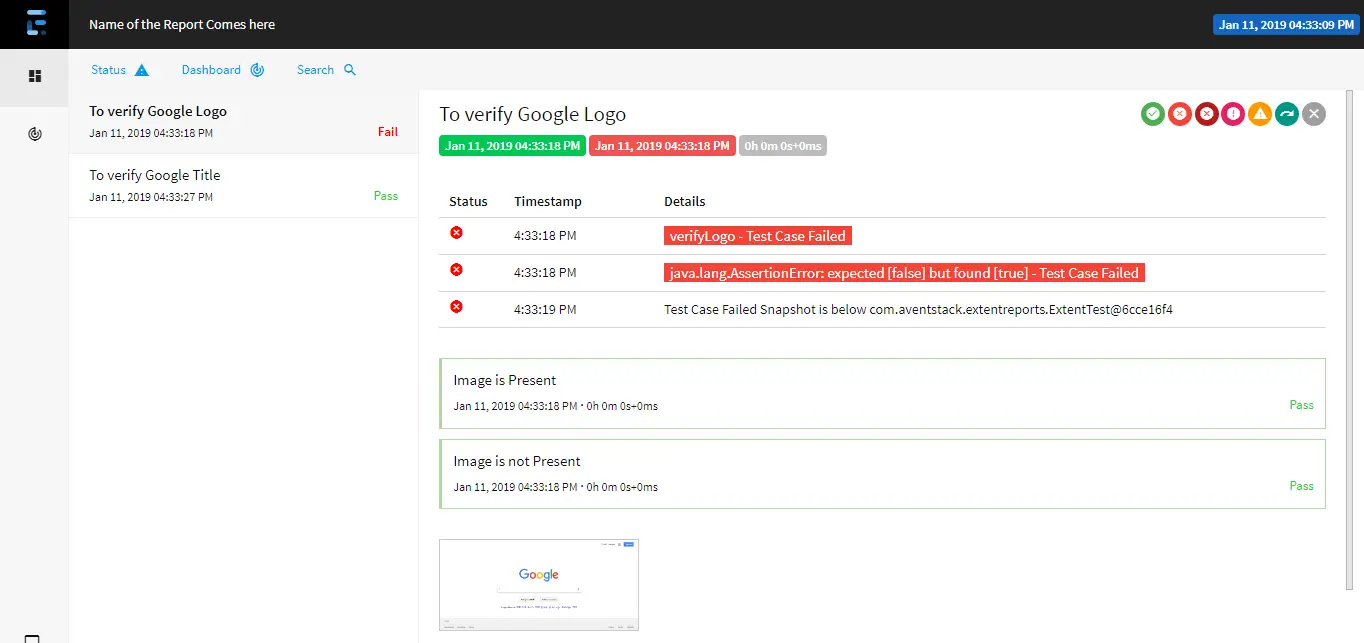
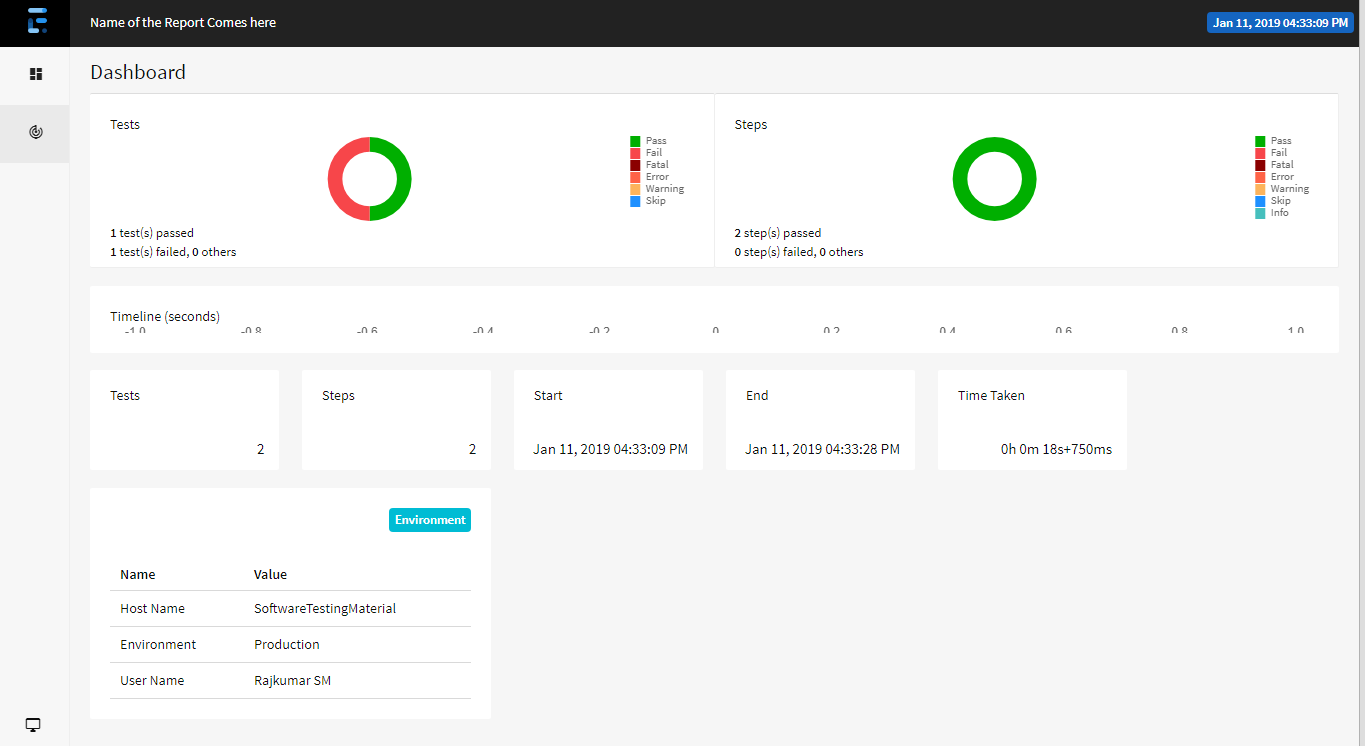
Refresh the project after execution of above ExtentReportsClass.java file. You could find an HTML file named “STMExtentReport.html” in your test-output folder. Copy the location of the STMExtentReport.html file and open it by using any browser. You could see beautiful high rich HTML reports as shown below.
Test Case Failed:

Test Case Passed:

Dashboard:

Popular Interview Questions Posts:
- Selenium Interview Questions
- TestNG Interview Questions
- Protractor Interview Questions
- Automation Framework Interview Questions
- How To Explain Selenium Framework In The Interview
- Where You Applied OOPs Concept in Selenium Framework
- Java Interview Questions
- API Testing Interview Questions
- Agile Interview Questions
- SQL Interview Questions
- Software Testing Interview Questions
- JIRA Interview Questions
- Tell Me About Yourself Interview Question
- What Are Your Strengths Interview Question
- What Are Your Weaknesses Interview Question
I have handpicked some other interesting posts for you.
- Why WebDriver driver = new FirefoxDriver();
- Selenium WebDriver Architecture – Detailed Post
- Selenium Continuous Integration – Detailed Post
- Cookie Testing – Complete Guide
- Learn API Testing in 10 mins


