How to Generate ChainTest Report in Selenium [2025 Move From ExtentReport To ChainTest Report]
Guide To Generate ChainTest Report In Selenium WebDriver. ExtentReport is deprecated. Moving ExtentReport to ChainTest Report for Selenium Reporting.
Reporting is a critical part of automation testing. It helps in understanding what tests were performed, what issues were found, and whether the software meets the expected quality standards.
A good report provides clear and actionable information about the health of the application, making it easier for teams to identify and fix problems.
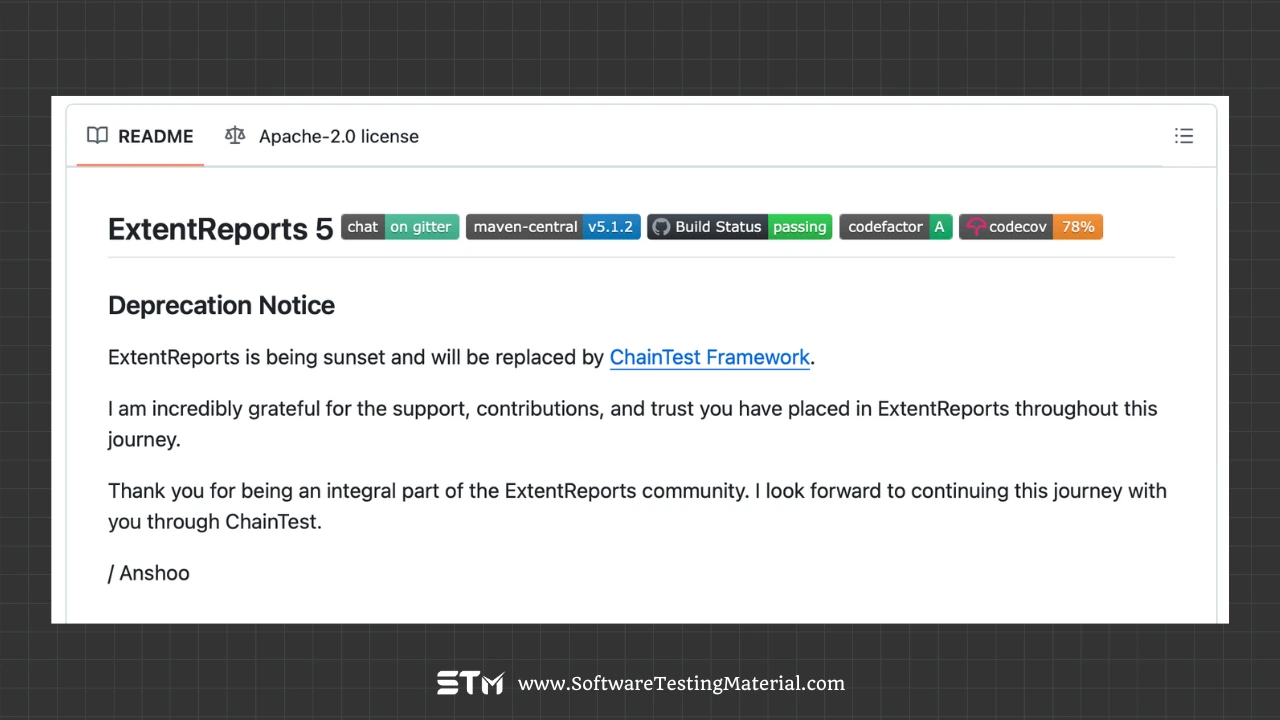
ExtentReport, once a popular choice for generating test reports, is now deprecated, leaving teams searching for a better ExtentReport alternative.
This is where ChainTest Report comes in.
This article will guide you through how to generate ChainTest Report in Selenium, explaining its benefits and how it can elevate your testing process.
What is ChainTest Report?
ChainTest Report is a powerful, modern reporting solution that provides real-time insights, interactive dashboards, and detailed analytics to enhance test automation workflows.
ChainTest helps you track Selenium test results, identify patterns, and make smarter decisions. With live updates, you can monitor tests as they happen, resolve issues faster, and accelerate releases for a better product.
Key Features of ChainTest Reporting
- Real-Time Reporting: ChainTest Report provides live updates on your test execution status, ensuring you can monitor progress and detect issues instantly.
- Interactive Dashboards: View your test results in visually appealing, customizable dashboards that simplify data analysis and enhance decision-making.
- Historical Data: ChainTest stores previous test runs, enabling teams to track trends, evaluate code changes, and refine their strategies for better results.
- Detailed Test Logs: Each test step is logged with precision, including pass/fail status, screenshots of failures, and detailed error messages.
- Seamless Integration with Selenium: ChainTest Report integrates smoothly with Selenium, making it easy to implement without extra effort.
- Test Framework Support: Supports popular frameworks such as JUnit, TestNG, and Cucumber.
- Advanced Analytics: Gain insights into test trends, performance metrics, and success rates to continuously improve your testing strategy.
- Collaboration-Friendly Reports: Share clear, comprehensive reports with your team or stakeholders to facilitate effective communication and quick issue resolution.
- Multi-Environment Support: Run your tests in different browsers, devices, or environments and consolidate results within a single report.
- Easy Configuration: With straightforward setup and configuration, even new team members can start using ChainTest Report with minimal learning curve.
- Docker Support: Docker streamlines the setup process, eliminating hassle and saving time, allowing teams to focus on writing and running tests rather than troubleshooting dependencies.
Setting Up Selenium Environment for ChainTest Reports
ChainTest integrates easily with your Selenium test suites, requiring minimal changes to your workflow. Simple to set up, it enhances your testing toolkit with advanced reporting features, helping you gain valuable insights.
Installing Necessary Dependencies
Follow this step-by-step guide to set up your test environment and generate ChainTest Reports seamlessly.
Begin by selecting a ChainTest repository that aligns with your testing framework.
Add the ChainTest dependency to your project. This integration enhances compatibility with the ChainTest server while simplifying the creation of detailed and insightful reports.
Finally, decide how to deploy the ChainTest server.
Note: Opting for a Docker image is a quick and efficient choice, offering a pre-configured environment to get you up and running in no time.
By following these steps, you’ll be fully equipped to unlock the full potential of ChainTest for all your testing needs.
Step 1: Integrating ChainTest into Your Selenium Project
To get started, integrate ChainTest into your Selenium project. For Maven users, simply add the following dependency to your pom.xml:
<?xml version="1.0" encoding="UTF-8"?>
<project xmlns="http://maven.apache.org/POM/4.0.0"
        xmlns:xsi="http://www.w3.org/2001/XMLSchema-instance"
        xsi:schemaLocation="http://maven.apache.org/POM/4.0.0 http://maven.apache.org/xsd/maven-4.0.0.xsd">
   <modelVersion>4.0.0</modelVersion>

   <groupId>org.example</groupId>
   <artifactId>Selenium-ChainTest-Demo</artifactId>
   <version>1.0-SNAPSHOT</version>

   <properties>
       <project.build.sourceEncoding>UTF-8</project.build.sourceEncoding>
       <selenium-version>4.17.0</selenium-version>
       <testng.version>7.10.2</testng.version>
       <maven.compiler.plugin.version>3.6.1</maven.compiler.plugin.version>
       <maven.compiler.source>8</maven.compiler.source>
       <maven.compiler.target>8</maven.compiler.target>
       <aspectj.version>1.9.6</aspectj.version>
       <maven.surefire.plugin.version>3.0.0-M5</maven.surefire.plugin.version>
   </properties>

   <build>
       <plugins>
           <!-- Compiler Plugin -->
           <plugin>
               <groupId>org.apache.maven.plugins</groupId>
               <artifactId>maven-compiler-plugin</artifactId>
               <version>${maven.compiler.plugin.version}</version>
               <configuration>
                   <source>${maven.compiler.source}</source>
                   <target>${maven.compiler.target}</target>
               </configuration>
           </plugin>

           <!-- Surefire Plugin for Test Execution -->
           <plugin>
               <groupId>org.apache.maven.plugins</groupId>
               <artifactId>maven-surefire-plugin</artifactId>
               <version>${maven.surefire.plugin.version}</version>
               <configuration>
                   <suiteXmlFiles>
                       <suiteXmlFile>TestNG.xml</suiteXmlFile>
                   </suiteXmlFiles>
                   <argLine>
                       -javaagent:"${settings.localRepository}/org/aspectj/aspectjweaver/${aspectj.version}/aspectjweaver-${aspectj.version}.jar"
                   </argLine>
               </configuration>
           </plugin>
       </plugins>
   </build>

   <dependencies>
       <!-- Selenium Java -->
       <dependency>
           <groupId>org.seleniumhq.selenium</groupId>
           <artifactId>selenium-java</artifactId>
           <version>${selenium-version}</version>
       </dependency>

       <!-- TestNG -->
       <dependency>
           <groupId>org.testng</groupId>
           <artifactId>testng</artifactId>
           <version>${testng.version}</version>
           <scope>test</scope>
       </dependency>

       <!-- AspectJ Weaver -->
       <dependency>
           <groupId>org.aspectj</groupId>
           <artifactId>aspectjweaver</artifactId>
           <version>${aspectj.version}</version>
       </dependency>

       <!-- ChainTest Library -->
       <dependency>
           <groupId>com.aventstack</groupId>
           <artifactId>chaintest-testng</artifactId>
           <version>1.0.9</version>
       </dependency>

       <!-- Apache Commons IO -->
       <dependency>
           <groupId>commons-io</groupId>
           <artifactId>commons-io</artifactId>
           <version>2.11.0</version>
       </dependency>

       <!-- Logging Dependencies -->
       <dependency>
           <groupId>org.slf4j</groupId>
           <artifactId>slf4j-api</artifactId>
           <version>2.0.16</version>
       </dependency>
       <dependency>
           <groupId>ch.qos.logback</groupId>
           <artifactId>logback-classic</artifactId>
           <version>1.5.9</version>
       </dependency>
   </dependencies>

</project>
Use the command `mvn clean install` to ensure all necessary files are properly installed.
Step 2: Creating a Selenium Test Using TestNG
Creating a simple Selenium script with TestNG to run test cases and log results is easy if you follow these steps:
- Set up your project in your preferred IDE.
- Add Selenium and TestNG libraries to your project.
- Write a basic test method using TestNG annotations.
- Use Selenium to navigate to a web page and perform the desired actions. Record and log the test results.
This straightforward script is a great starting point to streamline web testing and automate your workflows effectively.
Property Reader
package ChainTestDemo.Utils;

import org.openqa.selenium.WebDriver;
import org.openqa.selenium.chrome.ChromeDriver;

import java.io.FileInputStream;
import java.io.IOException;
import java.util.Properties;

public class PropertyReader {

   private static WebDriver driver;

   private static Properties properties;

   static {
       properties = new Properties();
       try {
           FileInputStream fis = new FileInputStream("src/test/resources/config.properties");
           properties.load(fis);
       } catch (IOException e) {
           e.printStackTrace();
       }
   }

   public static String getProperty(String key) {
       return properties.getProperty(key);
   }

   public static WebDriver getDriver() {
       if (driver == null) {
           driver = new ChromeDriver();
       }
       return driver;
   }

   public static void quitDriver() {
       if (driver != null) {
           driver.quit();
           driver = null;
       }
   }
}
Login Page
package ChainTestDemo.pages;

import org.openqa.selenium.WebDriver;
import org.openqa.selenium.WebElement;
import org.openqa.selenium.support.FindBy;
import org.openqa.selenium.support.PageFactory;

public class LoginPage {

   private WebDriver driver;

   @FindBy(id = "username")
   private WebElement usernameField;

   @FindBy(id = "password")
   private WebElement passwordField;

   @FindBy(id = "submit")
   private WebElement submitButton;

   public LoginPage(WebDriver driver) {
       this.driver = driver;
       PageFactory.initElements(driver, this);
   }

   public void enterUsername(String username) {
       usernameField.sendKeys(username);
   }

   public void enterPassword(String password) {
       passwordField.sendKeys(password);
   }

   public void clickSubmit() {
       submitButton.click();
   }

   public void login(String username, String password) {
       enterUsername(username);
       enterPassword(password);
       clickSubmit();
   }


}
Home Page
package ChainTestDemo.pages;

import org.openqa.selenium.WebDriver;
import org.openqa.selenium.WebElement;
import org.openqa.selenium.support.FindBy;
import org.openqa.selenium.support.PageFactory;

public class HomePage {

   private WebDriver driver;

   @FindBy(className = "post-title")
   private WebElement postTitle;

   public HomePage(WebDriver driver) {
       this.driver = driver;
       PageFactory.initElements(driver, this);
   }

   public String getPostTitle() {
       return postTitle.getText();
   }
}
Login Test
package ChainTestDemo.Tests;

import ChainTestDemo.Utils.PropertyReader;
import ChainTestDemo.pages.HomePage;
import ChainTestDemo.pages.LoginPage;
import com.aventstack.chaintest.plugins.ChainTestListener;
import org.apache.commons.io.FileUtils;
import org.openqa.selenium.OutputType;
import org.openqa.selenium.TakesScreenshot;
import org.openqa.selenium.WebDriver;
import org.testng.Assert;
import org.testng.ITestResult;
import org.testng.annotations.AfterMethod;
import org.testng.annotations.BeforeMethod;
import org.testng.annotations.Listeners;
import org.testng.annotations.Test;

import java.io.File;
import java.io.IOException;

@Listeners(com.aventstack.chaintest.plugins.ChainTestListener.class)
public class LoginTest {

   private LoginPage loginPage;
   private HomePage homePage;
   private PropertyReader propertyReader;
   private ChainTestListener chainTestListener;

   @BeforeMethod
   public void setUp() {
       try {
           propertyReader = new PropertyReader();
           WebDriver driver = propertyReader.getDriver();
           if (driver == null) {
               throw new RuntimeException("WebDriver is not yet initialized!");
           }

           loginPage = new LoginPage(driver);
           homePage = new HomePage(driver);
           driver.get(propertyReader.getProperty("url"));
           driver.manage().window().maximize();

           // Ensure chainTestListener is initialized or not. If not throw Runtime Exception
           chainTestListener = new ChainTestListener();
       } catch (Exception e) {
           throw new RuntimeException("Setup failed: " + e.getMessage());
       }
   }

   @Test
   public void testSuccessfulLogin() {
       try {
           chainTestListener.log("Entering username and password");
           loginPage.login(propertyReader.getProperty("username"), propertyReader.getProperty("password"));

           captureAndEmbedScreenshot("Entered username and password");

           chainTestListener.log("Verifying the home page title");
           Assert.assertEquals(homePage.getPostTitle(), "Logged In Successfully", "Home page title mismatch");

           captureAndEmbedScreenshot("Verified home page title");

           chainTestListener.log("Login test executed successfully");
       } catch (Exception e) {
           chainTestListener.log("Test failed due to exception: " + e.getMessage());
           Assert.fail("Test failed: " + e.getMessage());
       }
   }

   @AfterMethod
   public void tearDown(ITestResult result) {
       if (result.getStatus() == ITestResult.FAILURE) {
           String screenshotPath = captureScreenshot(propertyReader.getDriver(), result.getName());
           if (screenshotPath != null) {
               chainTestListener.embed(new File(screenshotPath), "image/png");
           }
           chainTestListener.log("Test failed: " + result.getName());
       }
       propertyReader.quitDriver();
   }

   private String captureScreenshot(WebDriver driver, String testName) {
       try {
           File screenshot = ((TakesScreenshot) driver).getScreenshotAs(OutputType.FILE);
           String screenshotPath = "screenshots/" + testName + "_" + System.currentTimeMillis() + ".png";
           FileUtils.copyFile(screenshot, new File(screenshotPath));
           return screenshotPath;
       } catch (IOException e) {
           e.printStackTrace();
           return null;
       }
   }

   private void captureAndEmbedScreenshot(String stepDescription) {
       try {
           // Take a screenshot at current test step
           File screenshot = ((TakesScreenshot) propertyReader.getDriver()).getScreenshotAs(OutputType.FILE);
           String screenshotPath = "screenshots/" + stepDescription.replaceAll("\\s+", "_") + ".png"; // Use step description as filename
           FileUtils.copyFile(screenshot, new File(screenshotPath));

           // Log the step
           chainTestListener.log(stepDescription);

           // Embed the screenshot in the report
           chainTestListener.embed(new File(screenshotPath), "image/png");
       } catch (IOException e) {
           e.printStackTrace();
       }
   }


}
Step 3: Executing Tests and Creating Reports
- Execute the test suite using TestNG via the testng.xml file.
- The ChainTest framework automatically captures logs, screenshots, and execution steps for detailed tracking.
- Upon completion, an HTML report (TestReport.html) is generated in the project directory for easy review.
Chaintest Properties
# general
chaintest.project.name=chaintest-testng-example

# storage
chaintest.storage.service.enabled=false
## [azure-blob, aws-s3]
chaintest.storage.service=
## s3 bucket or azure container name
chaintest.storage.service.container-name=

# generators:
## chainlp
chaintest.generator.chainlp.enabled=false
chaintest.generator.chainlp.class-name=com.aventstack.chaintest.generator.ChainLPGenerator
chaintest.generator.chainlp.host.url=http://localhost/
chaintest.generator.chainlp.client.request-timeout-s=30
chaintest.generator.chainlp.client.expect-continue=false
chaintest.generator.chainlp.client.max-retries=3

## simple
chaintest.generator.simple.enabled=true
chaintest.generator.simple.document-title=chaintest
chaintest.generator.simple.class-name=com.aventstack.chaintest.generator.ChainTestSimpleGenerator
chaintest.generator.simple.output-file=Report/chaintest/QAResults.html
chaintest.generator.simple.offline=true
chaintest.generator.simple.dark-theme=true
chaintest.generator.simple.datetime-format=yyyy-MM-dd hh:mm:ss a
chaintest.generator.simple.js=
chaintest.generator.simple.css=

## email
chaintest.generator.email.enabled=true
chaintest.generator.email.class-name=com.aventstack.chaintest.generator.ChainTestEmailGenerator
chaintest.generator.email.output-file=target/chaintest/Email.html
chaintest.generator.email.datetime-format=yyyy-MM-dd hh:mm:ss a
Testng.xml
<!DOCTYPE suite SYSTEM "https://testng.org/testng-1.0.dtd">
<suite name="TestSuite">
<test name="SampleTest">
<classes>
<class name="ChainTestDemo.Tests.LoginTest" />
</classes>
</test>
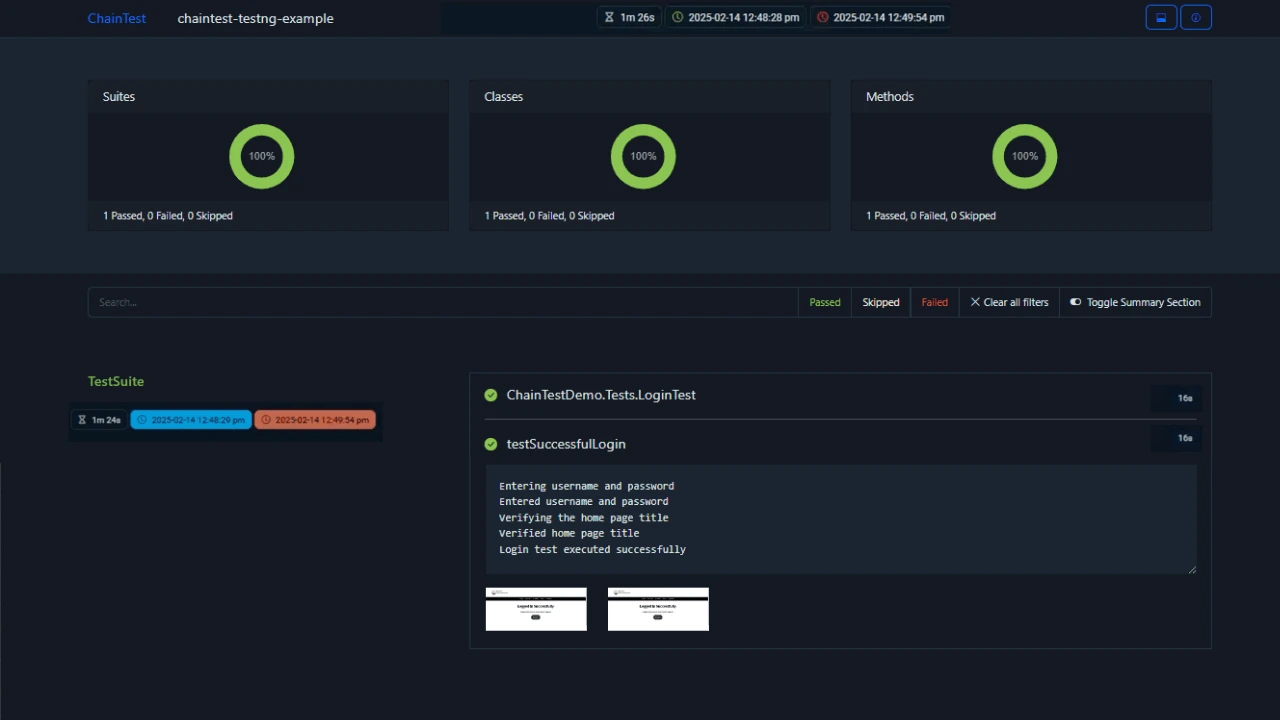
</suite>Step 4: Viewing the ChainTest Report
- Open the TestReport.html file in your web browser.
- The report provides detailed insights, including:
- Test steps with corresponding timestamps
- Pass/Fail results for each step
- Screenshots captured during execution
- Overall execution time and detailed logs
Understanding Chain LP Generator in Chain Test Report
What is Chain LP?
Chain LP, or Chain Linear Programming, is a module designed to optimize and streamline the generation of test reports in a structured and scalable manner. It leverages linear programming techniques to process large datasets and compile them into formats that are both comprehensive and user-friendly. By focusing on efficiency and versatility, Chain LP ensures that the reporting process can accommodate a wide range of testing environments while maintaining consistency across multiple report outputs. This makes it an essential tool for managing and analyzing complex test frameworks.
How Does Chain LP Work?
ChainLP is a powerful server built with Spring Boot, featuring a front-end conveniently packaged as a Docker image. To create Chain Test Reports using the Chain LP Generator, ensure the Chain LP server is up and running.
Download Docker Image here
Preserving Test Execution History in Chain LP
Chain LP efficiently manages test execution history by integrating with a server-based database (DB). It supports a range of RDBMS options, such as H2 Databse, MySQL, and PostgreSQL.
How To Set Up Chain LP Server
To set up the Chain LP server, you can either use the Docker Compose files provided by the developers or customize your own to meet specific database requirements.
Running the Chain LP Server with an H2 Database
To launch the Chain LP server using an H2 database, simply execute the following command:
docker compose -f docker-compose-h2.yml up
Setting Up the Chain LP Generator in the BDD Framework
Once the Chain LP server is running, the next step is to integrate and configure the Chain LP Generator for your Behavior-Driven Development (BDD) tests.
Updating the `chaintest.properties` File
To proceed, include the following properties in the `chaintest.properties` configuration file:
chaintest.generator.chainlp.enabled=true

chaintest.generator.chainlp.class-name=com.aventstack.chaintest.generator.ChainLPGenerator

chaintest.generator.chainlp.host.url=http://localhost/
Executing Test Cases with Chain LP
Once Chain LP is configured, you can begin executing test cases. The results are automatically generated, stored, and displayed in the Chain Test Report.
How to View Test Results in Chain LP
To access the test execution reports, open a web browser and navigate to the URL specified in chaintest.generator.chainlp.host.url.
Adding Screenshots to Chain LP Reports on Test Failures
To include screenshots of test failures in your Chain LP reports, utilize a reliable cloud storage service such as: Azure Blob Storage, AWS S3 Bucket
FAQs
Why ExtentReport is Deprecated?
ExtentReport was deprecated due to the emergence of more efficient and feature-rich reporting tools that better align with current development practices. Additionally, maintaining compatibility and keeping up with modern frameworks became challenging, prompting a shift toward newer solutions.
Is It Possible to Integrate ChainTest with Existing Selenium Projects?
Yes, ChainTest can be easily integrated with existing Selenium projects. It works with your current Selenium scripts without needing major changes. You just have to install it, configure it with your test framework, and it starts generating reports. This makes it simple to add advanced reporting to your automation workflow.
How Does ChainTest Enhance Selenium Test Reporting?
ChainTest improves Selenium test reports by making them more detailed, organized, and easy to understand. It automatically collects data from your tests and presents it in clear, visual formats. This helps you quickly identify issues and saves time in analyzing results. With ChainTest, you can create professional reports without extra effort.
Why Choose ChainTest for Selenium Reporting?
Easy to Use: ChainTest is simple to set up and works seamlessly with any Selenium project.
Detailed Reports: It generates clear and professional reports, making it easy to understand test results.
Flexible Integration: It supports popular frameworks like Java Spring Boot and fits into different testing workflows.
Saves Time: By automating reporting, it reduces manual effort and improves efficiency in your testing process.
Does Mastering ChainTest with Selenium Involve a Learning Curve?
Yes, there is a small learning curve to master ChainTest with Selenium, but it is very manageable. ChainTest is designed to be user-friendly, and its intuitive interface makes it easy to get started. With some basic knowledge of Selenium and a little practice, you can quickly learn how to use ChainTest effectively. Additionally, there are helpful tutorials and documentation available to guide you through the process.
Is Docker required for all ChainTest reports?
No, Docker is not required for all ChainTest reports. While Docker can simplify testing and setup processes, ChainTest reports can still be generated without it. Users can choose other methods based on their specific needs and environment. However, Docker is required to host ChainLP, as it is exclusively available as a Docker image.
What is a ChainTest generator?
A generator creates output files by processing test results and configuration settings. It handles templates, stores essential resources, and produces reports in the desired format with precision and efficiency.
How to enable generators?
Currently, only Java unit test frameworks are supported. Generators can be activated using property files found on the classpath.
Conclusion
With ChainTest, generating detailed and structured test reports in Selenium becomes a simple and efficient process. By leveraging its features, you can not only save time but also gain valuable insights into the behavior of your tests. Whether you are debugging failures or sharing results with your team, ChainTest ensures clarity and consistency. Its seamless integration with tools like Selenium makes it an essential part of any tester’s toolkit. By following the steps outlined in this guide, you’ll be well-equipped to produce reliable and professional reports for all your automation testing needs.