Selenium Continuous Integration with Jenkins [Selenium – Maven – Git – Jenkins] – Step By Step Guide
Selenium Continuous Integration with Jenkins using GIT
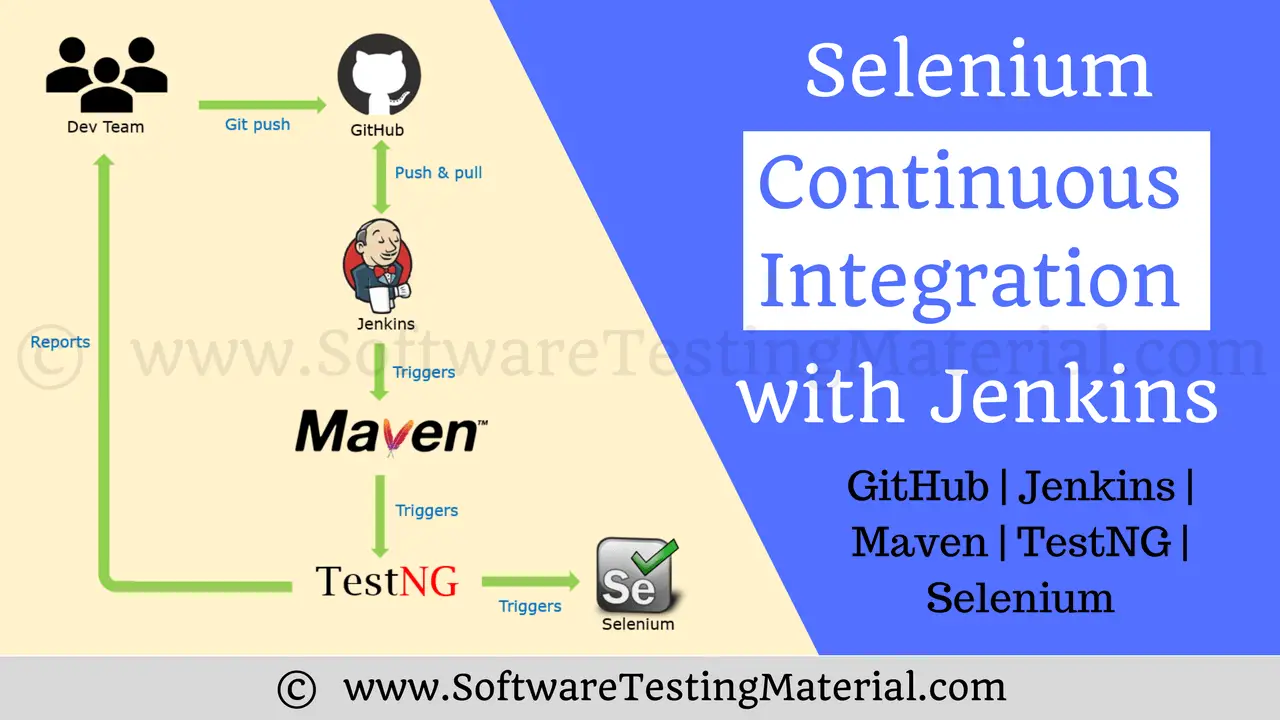
In this post, I am trying to keep complete guide of Selenium Continuous Integration (End to End Integration) with Jenkins. This is a guide to implementing Continuous Integration with Jenkins, Maven, and TestNG with GitHub. There are lots of tools and techniques that can be integrated in a CI environment. Here I am using Selenium WebDriver, Java, TestNG, Maven, and I integrate these with Jenkins. To implement continuous integration, follow the 9 steps which I mentioned below.
- 1. What is Continuous Integration
- 2. What is Maven
- 3. Building A Maven Project In Eclipse
- 4. What is GIT
- 5. What is Jenkins
- 6. Installation of Jenkins
- 7. Configuring Jenkins for a Maven Project
- 8. Configure GIT Plugin in Jenkins
- 9. Running Maven Project From Jenkins
What is Continuous Integration
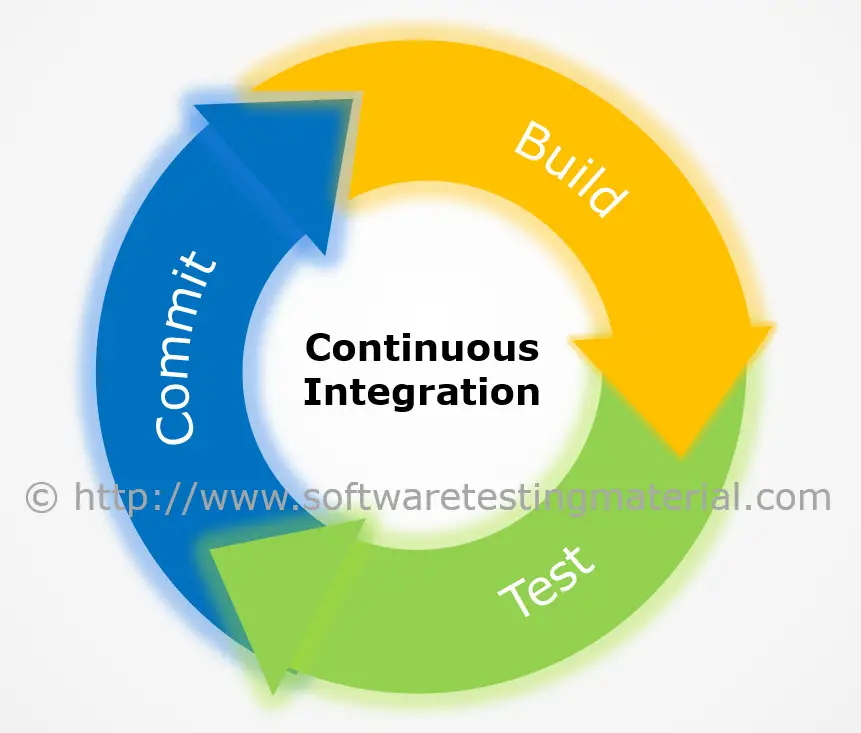
Continuous Integration is abbreviated as CI. Continuous Integration is a development practice which aims to make sure the correctness of a software. After each commit, a suite of tests run automatically and tests a software to ensure whether the software is running without any breaks. If any test fails, we will get immediate feedback say “build is broken”.
In simple words, continuous integration is a process of verifying the correctness of a software.
Some of the continuous integration tools are Jenkins, TeamCity, Bamboo, Travis, CircleCi, Bitbucket, CruiseControl
What is Maven
Maven, a Yiddish word meaning “accumulator of knowledge”. Maven is a build automation tool used primarily for Java projects. It helps in building software, it describes how software is built and it describes its dependencies. It dynamically downloads Java libraries and Maven plug-ins from one or more repositories such as the Maven 2 Central Repository, and stores them in a local cache. We use maven in Selenium as a build tool or project management tool. It helps in managing all project dependencies and ensure an easy build process.
Main Objectives of Maven are as follows:
- Making the build process easy
- Providing a uniform build system
- Providing quality project information
- Providing guidelines for best practices development
- Allowing transparent migration to new features
So far we have learned what is Continuous Integration and what is Maven. If you are sitting at your system and trying to implement then let’s get started to implement the below mentioned 9 Steps.
STEP 1: Open your Eclipse IDE to start building a maven project
Building A Maven Project In Eclipse
Installing Maven Project in Eclipse:
STEP 2: Installing Maven in Eclipse: Check this link
So, now we have Maven installed in Eclipse. Now let’s create Maven Project in Jenkins.
Creating Maven Project In Jenkins:
STEP 3: Create a new Maven Project in Eclipse – Follow below steps
3.1 To create a project – Right click on Package Explorer and navigate through New – Other
Make sure TestNG is already installed. Check this out to see “How To Install TestNG In Eclipse” and this check this link for “TestNG Complete Tutorial”
Select Maven Project and click on Next
Select ‘Create a simple project‘ checkbox and click Next Fill the Group Id, Artifact Id and click the Finish button
 Structure of the project looks as shown in the below image
3.2 Configure pom.xml file, that was automatically created, to include other plugin jars to the build process. It can be found in the root of the Maven project as shown in the below image.
In the maven project, we use POM file to add the required dependencies. Double click on pom.xml file and click on pom.xml tab
Add the below maven dependency (Selenium and TestNG) to allow maven to download the necessary jars for your project.
<dependencies>
  <!-- Selenium -->
  <dependency>
     <groupId>org.seleniumhq.selenium</groupId>
     <artifactId>selenium-java</artifactId>
     <version>2.53.1</version>
  </dependency>

  <!-- TestNG -->
  <dependency>
     <groupId>org.testng</groupId>
     <artifactId>testng</artifactId>
     <version>6.8</version>
     <scope>test</scope>
  </dependency>
</dependencies>
3.3 Adding TestNG jars to the dependency will enable TestNG in your project.
Create a TestNG class and generate testng.xml file. Check the below link to do this step.
How to create a TestNG class and generate testng.xml file
Copy the below code and place it in your NewTest class
package tests;

import org.openqa.selenium.WebDriver;
import org.openqa.selenium.firefox.FirefoxDriver;
import org.testng.annotations.Test;
import org.testng.annotations.BeforeClass;
import org.testng.annotations.AfterClass;

public class NewTest {

	public WebDriver driver;

  @Test
  public void openMyBlog() {
	driver.get("https://www.softwaretestingmaterial.com/");
  }

  @BeforeClass
  public void beforeClass() {

	  System.setProperty("webdriver.gecko.driver", "D:\\Selenium\\Drivers\\geckodriver.exe");
	  driver = new FirefoxDriver();

  }

  @AfterClass
  public void afterClass() {
	  driver.quit();
  }

}
testng.xml: testng.xml file looks like below. Copy and place it in your testng.xml
<?xml version="1.0" encoding="UTF-8"?>
<suite name="Suite" parallel="false">
  <test name="Test">
    <classes>
      <class name="tests.NewTest"/>
    </classes>
  </test> <!-- Test -->
</suite> <!-- Suite -->
To run the project using testng.xml, right click on ‘testng.xml’ file and go to Run As – TestNG Suite
3.4 Adding ‘maven-compiler-plugin’ and ‘maven-surefire-plugin’ to the pom.xml file
To run the project using pom.xml, we need to add some more entries in the pom.xml file. We need to add ‘maven-compiler-plugin’ and ‘maven-surefire-plugin’
pom.xml
<project xmlns="http://maven.apache.org/POM/4.0.0" xmlns:xsi="http://www.w3.org/2001/XMLSchema-instance" xsi:schemaLocation="http://maven.apache.org/POM/4.0.0 http://maven.apache.org/xsd/maven-4.0.0.xsd">
  <modelVersion>4.0.0</modelVersion>
  <groupId>mavenPackage</groupId>
  <artifactId>MavenProject</artifactId>
  <version>0.0.1-SNAPSHOT</version>

  <dependencies>

	<!-- Selenium -->
	<dependency>
	  <groupId>org.seleniumhq.selenium</groupId>
	  <artifactId>selenium-java</artifactId>
	  <version>2.53.1</version>
	</dependency>

	<!-- TestNG -->
	<dependency>
	  <groupId>org.testng</groupId>
	  <artifactId>testng</artifactId>
	  <version>6.8</version>
	  <scope>test</scope>
	</dependency>

  </dependencies>

  <build>
  	<plugins>
  		<plugin>
  			<groupId>org.apache.maven.plugins</groupId>
           	<artifactId>maven-compiler-plugin</artifactId>
           	<version>3.6.1</version>
           	<configuration>
           		<source>1.8</source>
           		<target>1.8</target>
           	</configuration>
  		</plugin>

  		<plugin>
  			<groupId>org.apache.maven.plugins</groupId>
           	<artifactId>maven-surefire-plugin</artifactId>
           	<version>2.20</version>
           	<configuration>
           	 	<suiteXmlFiles>
           			<suiteXmlFile>testng.xml</suiteXmlFile>
           			<!-- <suiteXmlFile>src/main/resources/testng.xml</suiteXmlFile> -->
           		</suiteXmlFiles>
           	</configuration>
  		</plugin>
  	</plugins>
  </build>

</project>
Note: The build process will build your Maven project and run the base testng.xml during a Maven test. Once you have setup Maven and downloaded all the corresponding jars, right click on the project and go to run – Maven Clean and then try install & build. If you’re able to build/clean/install your Maven projects then you have successfully installed/configured Maven.
What is GIT
Git is the most widely used modern version control system in the world today for tracking changes in any set of files. Git is an open source project. It is aimed at speed, data integrity, and support for distributed, non-linear workflows. It allows you to commit your work locally and then sync your copy of the repository with the copy on the server.
STEP 4: Install GIT in Eclipse and Adding (Uploading) Maven Project to GitHub
Here is a video tutorial on “How To Install GitHub in Eclipse and How To Upload Project to GitHub”:
Please be patient. The video will load in some time.
What is Jenkins
Jenkins is an open source automation server. It supports us to automate all sorts of tasks related to building, deploying and automating any project. It is cross-platform and can be used on Windows, Mac OS, Linux etc., As a part of Selenium, we use it to build and test our software continuously. It is used for automatic test executions and scheduled builds. Using Jenkins we could also publish results and send email notifications to all the team members. Jenkins provides continuous integration and continuous delivery service for software development.
Here is the official link to Jenkins documentation.
So far we have installed Maven, created Maven Project in Eclipse and installation of GIT in Eclipse and uploading Maven Project to GitHub. Also, we learned what is Continuous Integration, Maven, GIT, and Jenkins. Now we will install Jenkins and configure it.
Installation of Jenkins
STEP 5: Install Jenkins – Check this link
Earlier we published a post on installation of Jenkins, see this post on how to install Jenkins
Configuring Jenkins for a Maven Project
STEP 6: Configuring Jenkins for a Maven Project – Check this link
Earlier we published a post on configuring Jenkins for a maven project, see this post on configuring Jenkins for a maven project
So far we have installed and created Maven Project in Eclipse, Installed and uploaded Maven Project to GitHub and installed and configured Jenkins for Maven Project. Now we will configure GIT plugin in Jenkins.
Configure GIT Plugin in Jenkins
STEP 7: Configuring GIT Plugin in Jenkins – Follow below steps
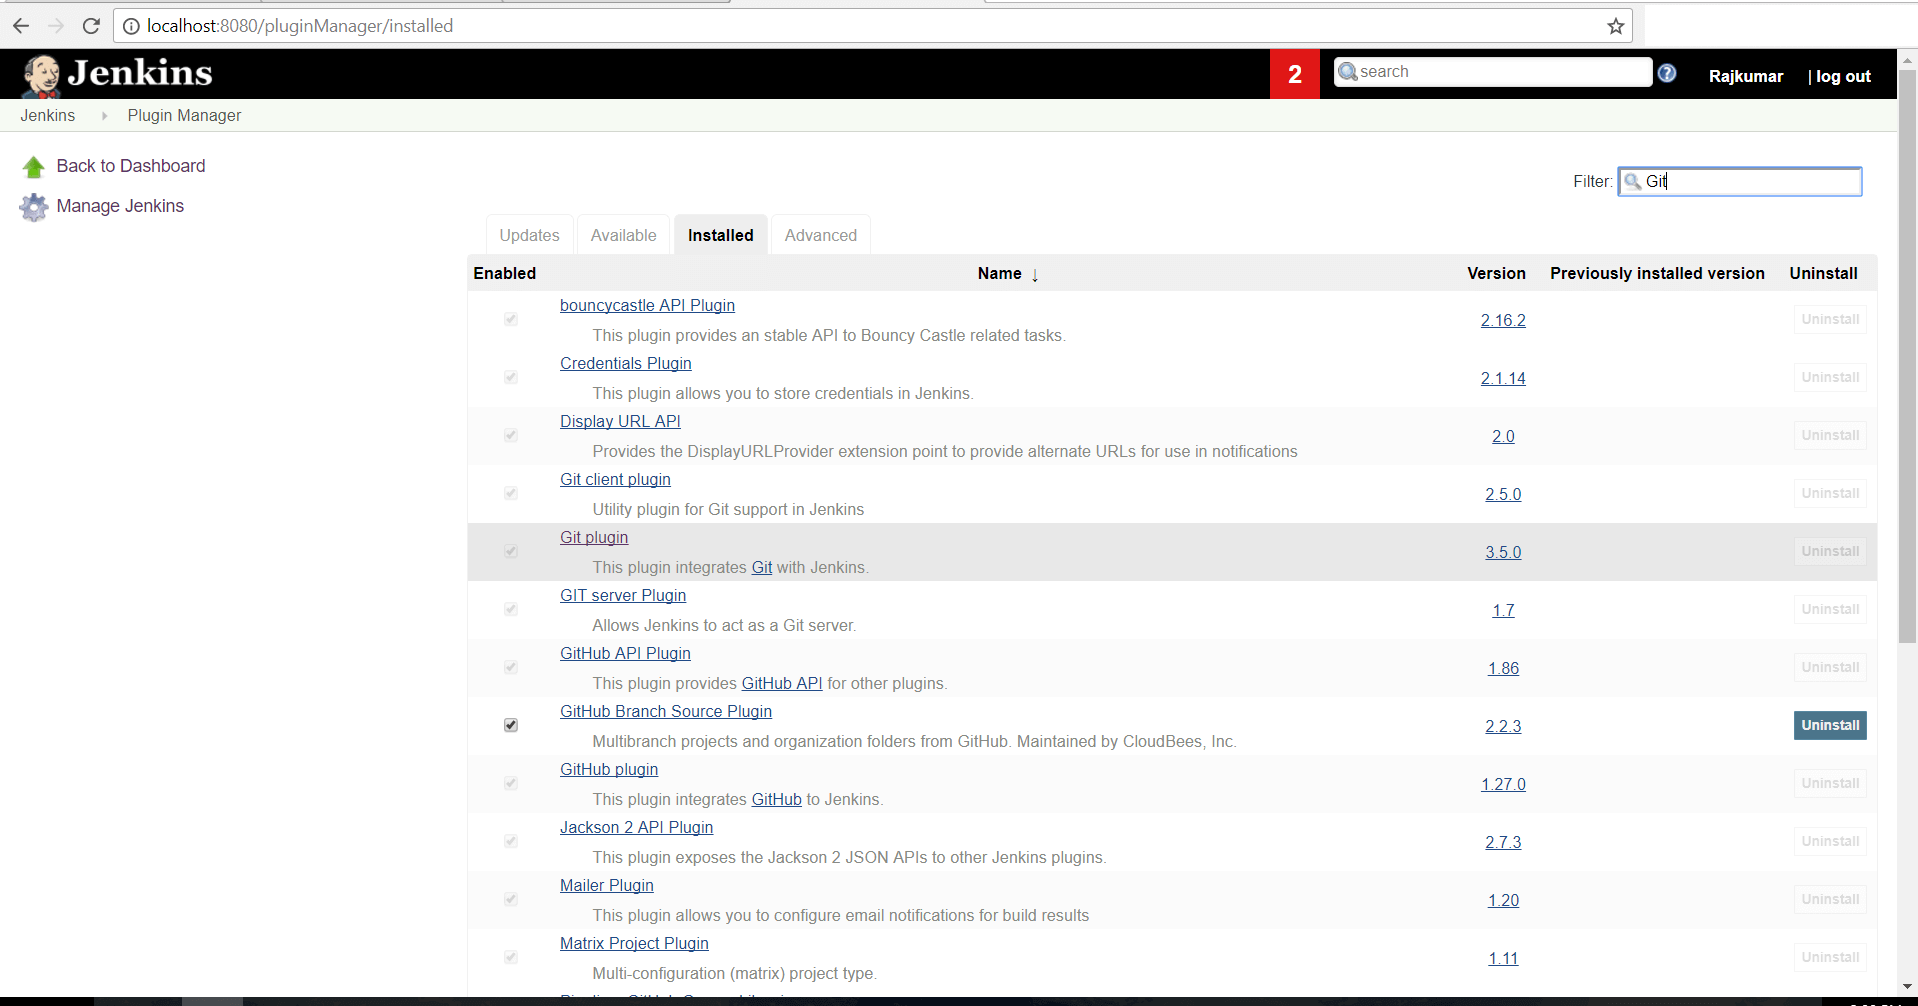
7.1 Go To Manage Plugins –> Filter list of plugins available with ‘Git Plugin’.
Read more on Git Plugin
7.2 Check the Git Plugin and click on the button ‘Install without restart’
In the below screenshot, you could see that I have already installed it.
7.3 After the installation is done, restart Jenkins by using the command in the browser. http://localhost:8080/jenkins/restart
Once Jenkins is restarted, Git option should be available under Source Code Management when configuring a job in Jenkins and this we will see in Step 8.
7.4 Go to Manage Jenkins –> Configure System, please provide the right Path to Git executable
STEP 8: Create Maven Project in Jenkins and build a job from Git Project – Follow below steps
We have configured GIT plugin in Jenkins. Now let’s create a Maven Project and build a job from Git project
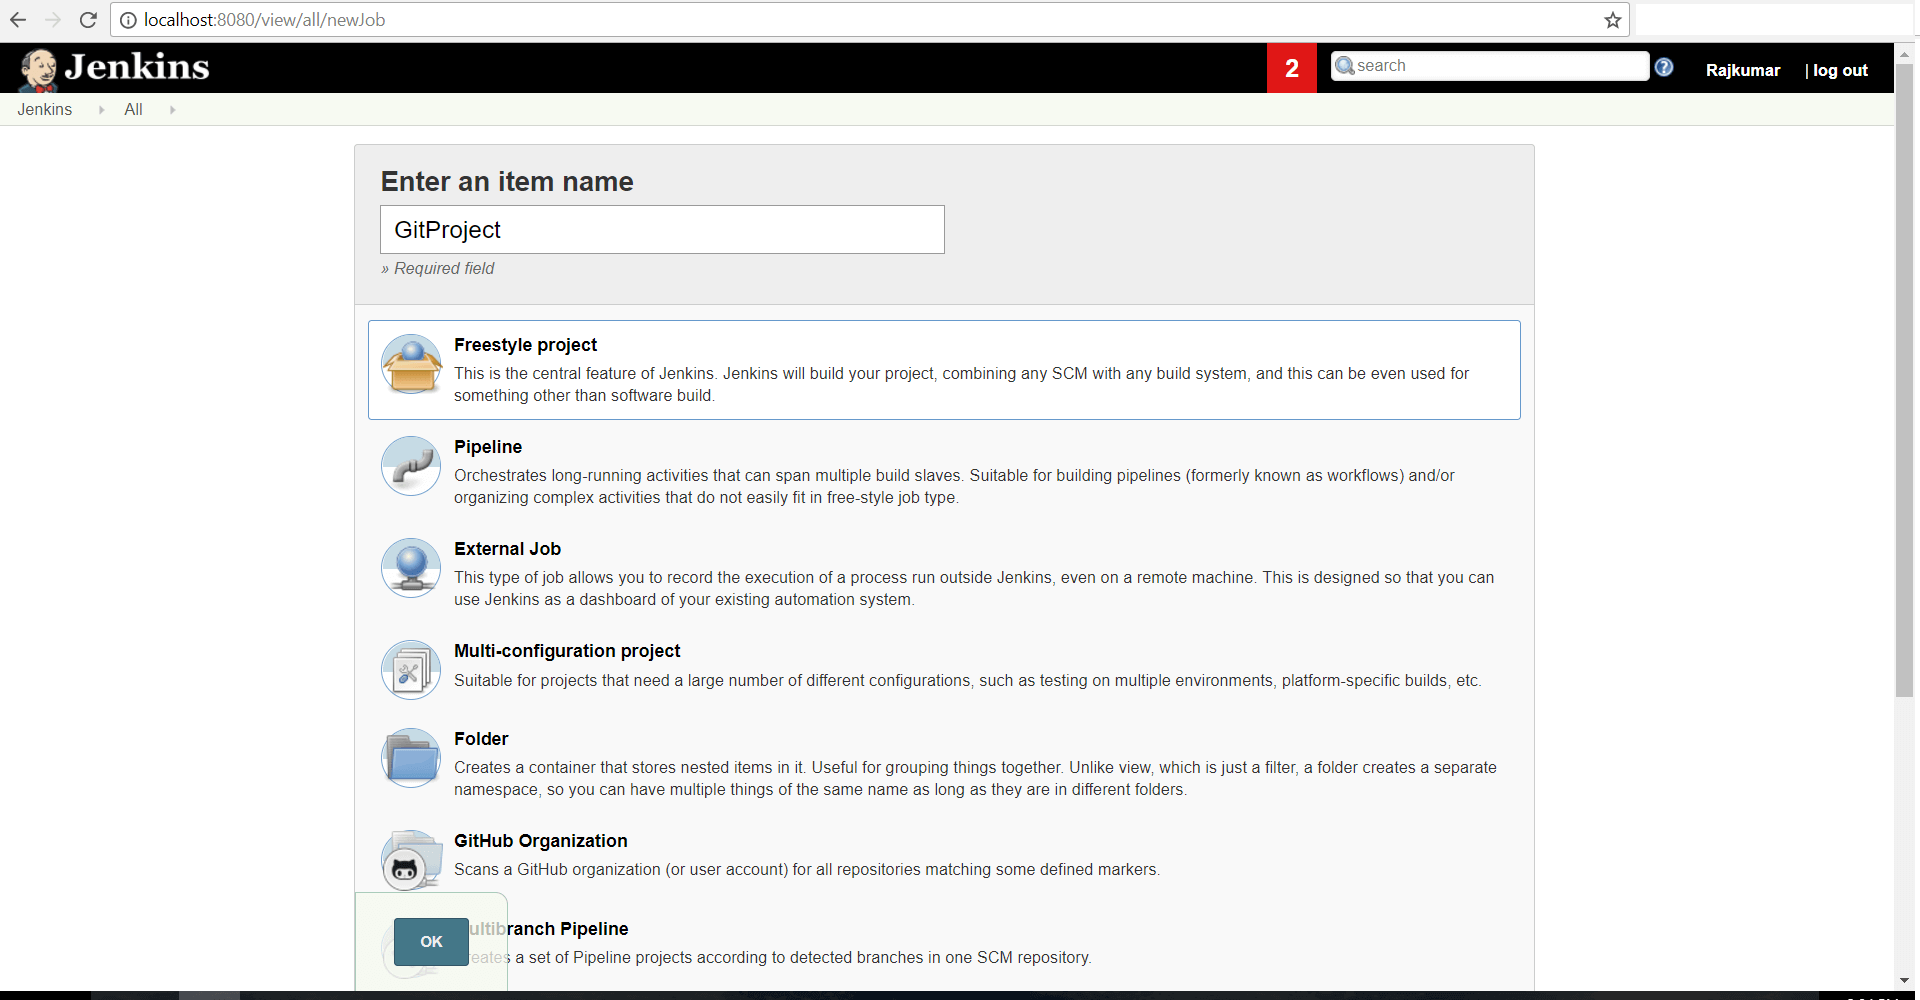
8.1 Click on New Items –> Enter Project Name (say GitProject) –> Select Freestyle Project –> Click OK
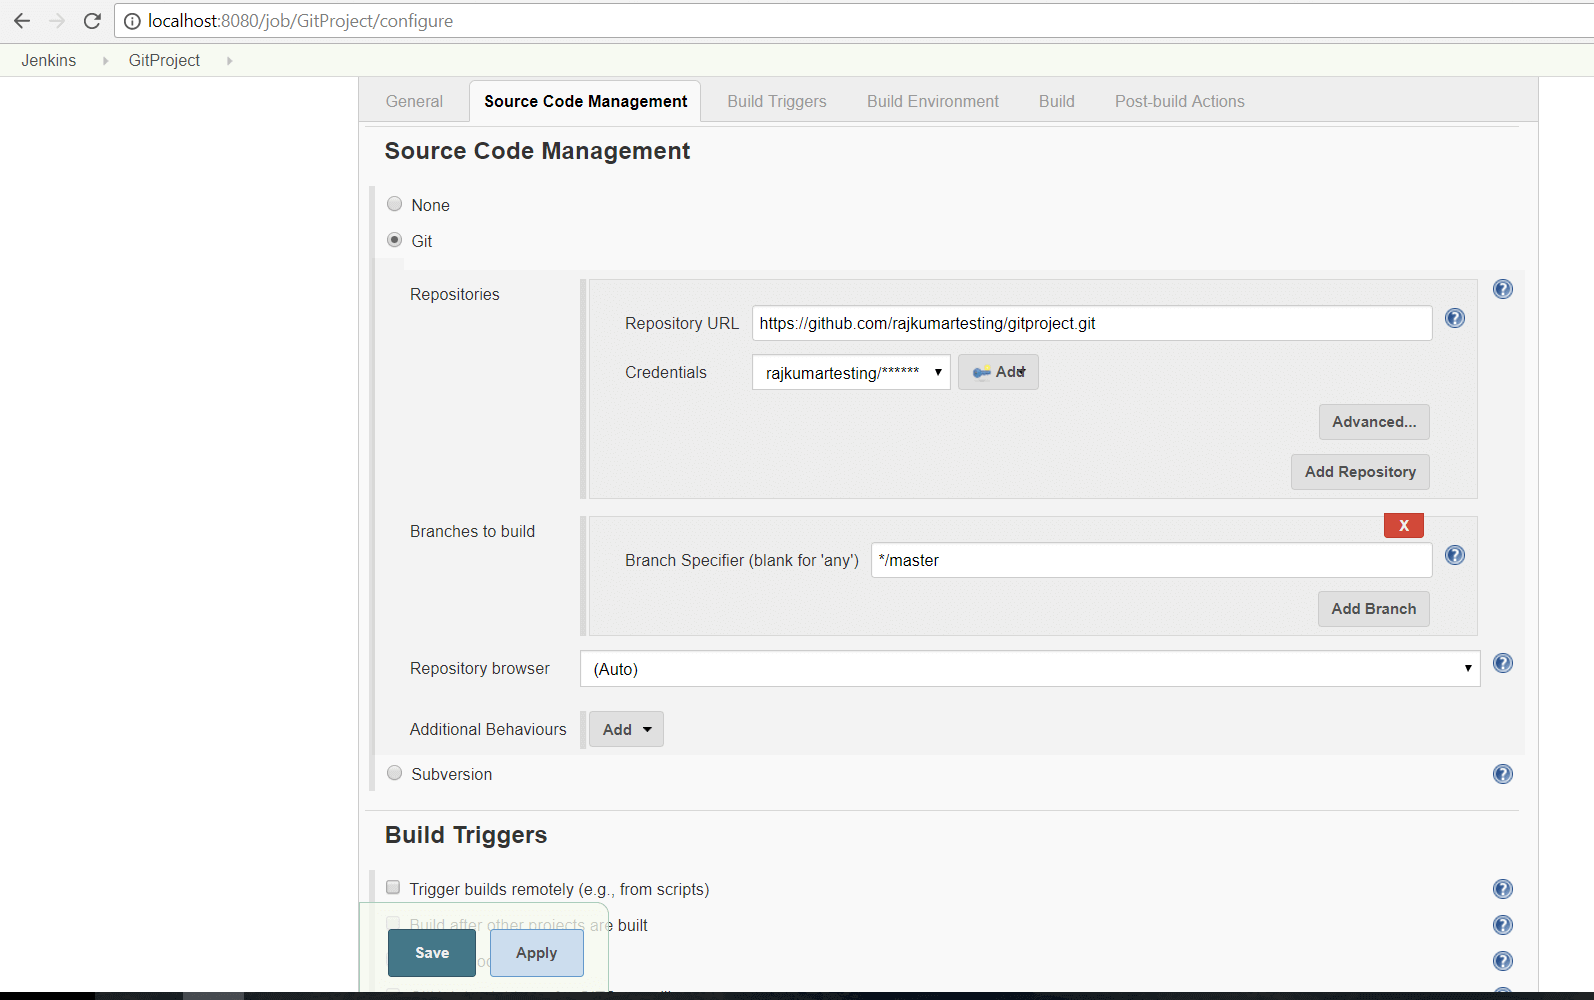
You will be redirected to the Configuration page. Click on Source Code Management Tab
8.2 In Source Code Management, Select ‘Git’ option. (This should be visible once you have successfully installed Git Plugin – Which we have done in Step 7.3).
8.3 Give your Git Repository URL (which we have captured in Step 4 – Watch video on how to Create Repository in Git and Copy the Git Repository URL) and choose your Credentials and save your changes
Jenkins will pull the project’s source code from the remote Git Server based on the Repository URL which we have passed.
8.4 In Build – click on Add build step and choose Invoke top-level Maven targets and pass ‘clean install‘ as Goals. Click on Advanced button and pass POM value as ‘pom.xml‘
Note: Under Git Plug-in, Set the global git user.name and user.email to match your global config options
Also, you could pass Post-build actions to generate reports. To generate TestNG HTML reports, choose Publish TestNG reports by clicking on Add post-build action and pass value as ‘**/testng-results.xml‘
And finally, click on Save.
Learn how to configure simple maven project in Jenkins
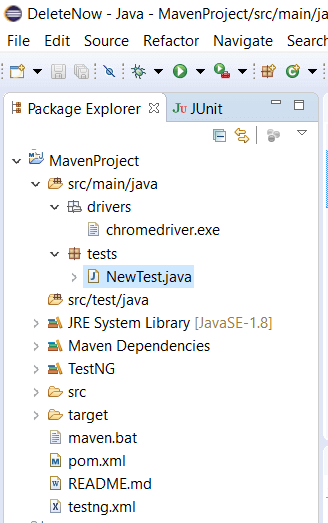
Jenkins Continuous Integration Project Structure in Eclipse looks as shown below:
Running Maven Project From Jenkins
STEP 9: Executing Maven Project From Jenkins – Follow below steps
Let’s execute it now.
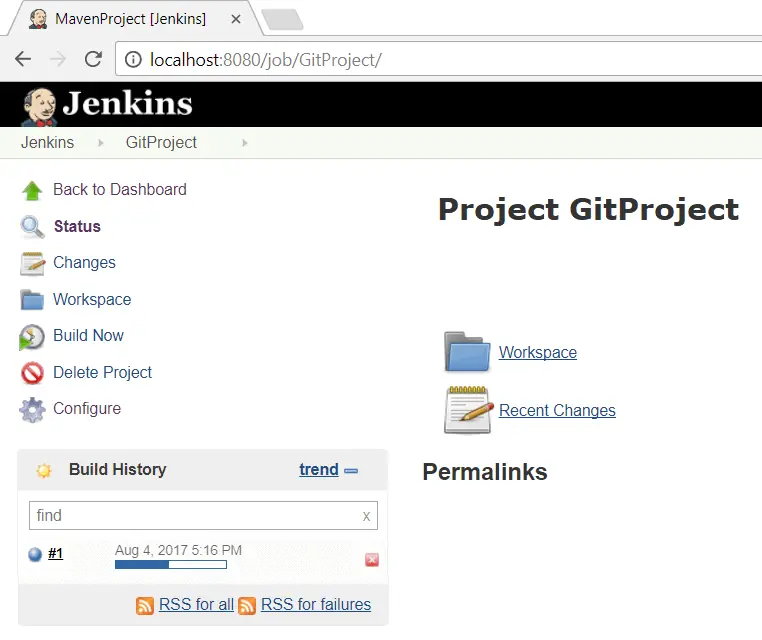
9.1 Click on ‘Build Now‘ link. It will invoke the pom.xml.
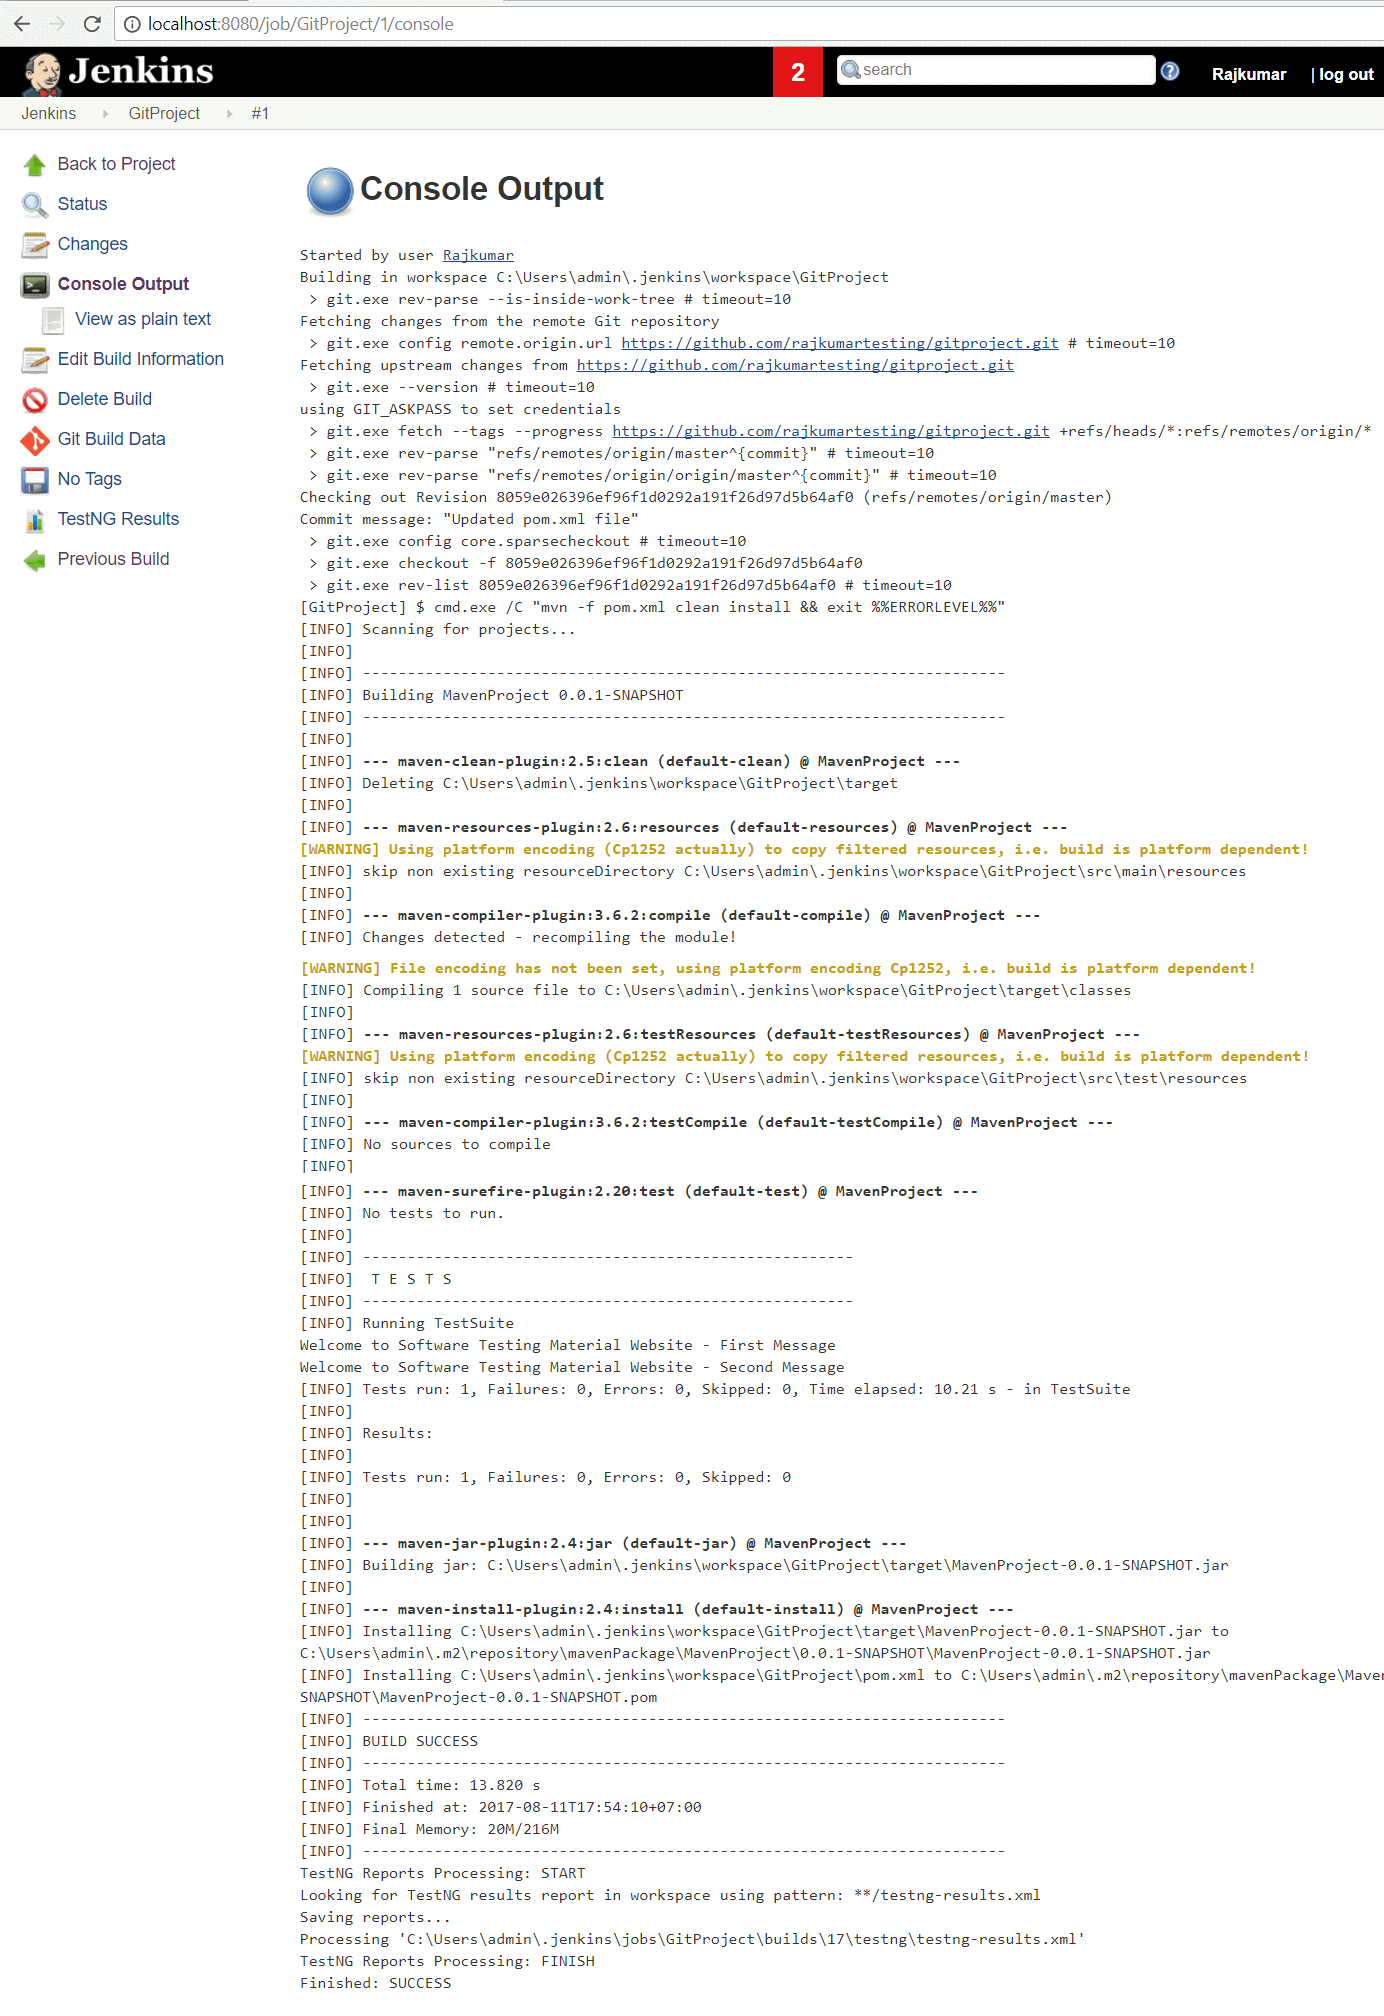
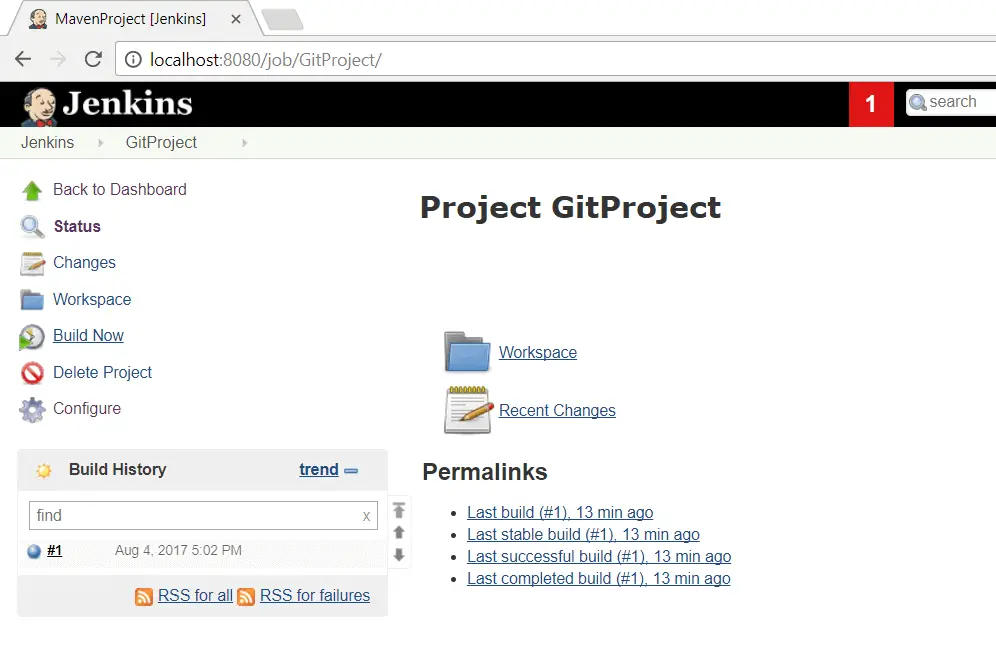 9.2 Right click on Build Number (here in my case it is #1) and click on Console Output to see the result.
You could see Build Status ‘Success’ on Console Output.
Also, you could Schedule Jenkins jobs and send an email notification after build run.
For scheduling Jenkins job:
Open your Jenkins job – Configure – Build triggers – Select Build periodically checkbox and enter your Cron job pattern
For example: To run your job every minute, you need to enter * * * * *
Jenkins works on Cron pattern. Learn more about the Cron job pattern – wiki link
For sending email notification:
Go to Manage Jenkins – Configure – Select Email notification – Set SMTP configuration.
You will receive an email notification whenever the build passes or fails.
Conclusion:
Selenium Continuous Integration with Jenkins allows us to run our scripts on each deployment. Jenkins allows us to save execution history and reports. I hope this post assisted you in achieving your goals. Hope you have successfully implemented Selenium Continuous Integration. Please do not hesitate approaching if you have any questions.
Here are a few hand-picked articles for you to read next:
- How To Run Selenium Scripts Using BrowserStack
- Learn Cross Browser Testing Tool
- Complete Guide – GUI Automation Tool – Froglogic Squish
- Most Popular – Selenium Interview Questions
- TestNG Interview Questions
- Why You Choose Software Testing As A Career
- General Interview Questions






Dear RajKumar,
Very well explained. Screenshots are not attached. Kindly attached
Hi Sunitha, Thanks for your kind words. Can you pls let me know on which step?
Hi Raj,
I have a doubt , do we need to set the maven and JDK path under Manage Jenkins–> Global tools configuration. Is it mandatory
Hi Sulthan, not necessary for latest versions of Jenkins. Try it out once and let me know.
Hi Rajkumar,
Very well explained. But I have a very basic doubt. When it comes to test whether the build failed or passed after deployment, here build refers to our automation project or project which we test?
Because I think continuous can be both ways. Run the automation suite when any deployment is done for Project Under Test or any deployment in automation framework.
Hi Vinay, build refers to software which was released by dev team. They keep your pom.xml file in the Jenkins post build actions..
Hi Raj,
I am not able to see any options under post build actions to provide the Pom.xml path. I have options only under Build—>Invoke Top level maven projects–>Advanced. Please clarify
Thanks RajKumar!
Hi Raj,
To make the execution visible you have advised to Tick the Allow service to interact with desktop. in Jenkins service in another post comment section in which i am unable to comment..
I tried the steps but unfortunately i am still unable to see the execution. After the change,there is a windows popup which is trying to display a message and requesting attention related to jenkins and Chrome.dll
I guess due to this issues i am unable to see the browser. Kindly clarify
OS : Windows 7
Browser : Latest Chrome version
Jenkins Latest Version
Hello Sir,
Can you please tell us about the steps to trigger the build automatically whenever there is a code push in Github