Common validation statements with Katalon Studio
Katalon Studio supports two methods to validate. One is using built-in keywords to verify the states of certain test objects. Another is to use checkpoints to verify a specific data set against a previously captured data set. This tutorial explains how to make use of these methods when designing your automation test.
Validation with Captured Objects
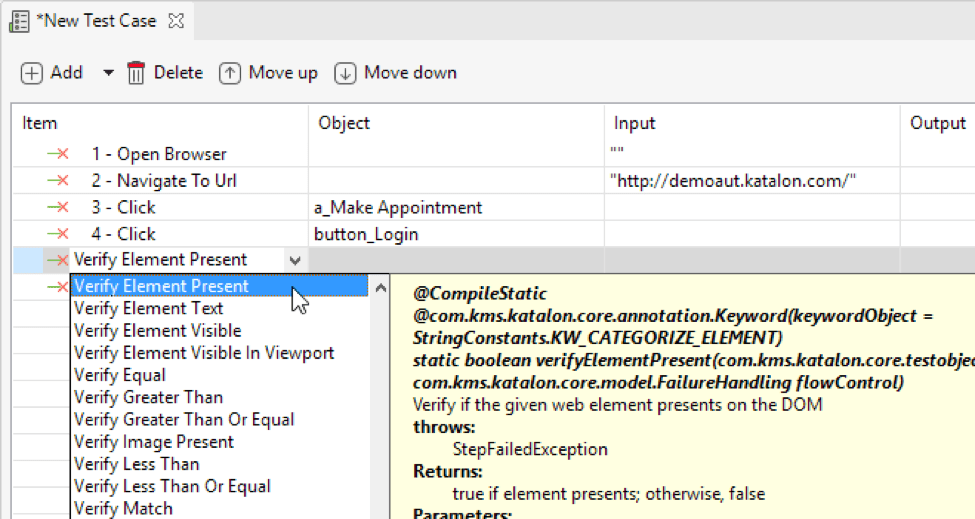
All Katalon Studio built-in keywords used for validating will have a prefix “Verify…”. For example, in order to check whether a certain control presents on the page, Katalon uses Verify Element Present keyword.
On the test case editor, you can add a validation keyword to validate a captured object. Follow these steps to add a validation point to your Katalon Test case:
1. From the Manual view, add a new keyword for your test case.

2. When the new keyword is added, scroll down to see all available Verify keywords and select a suitable one.

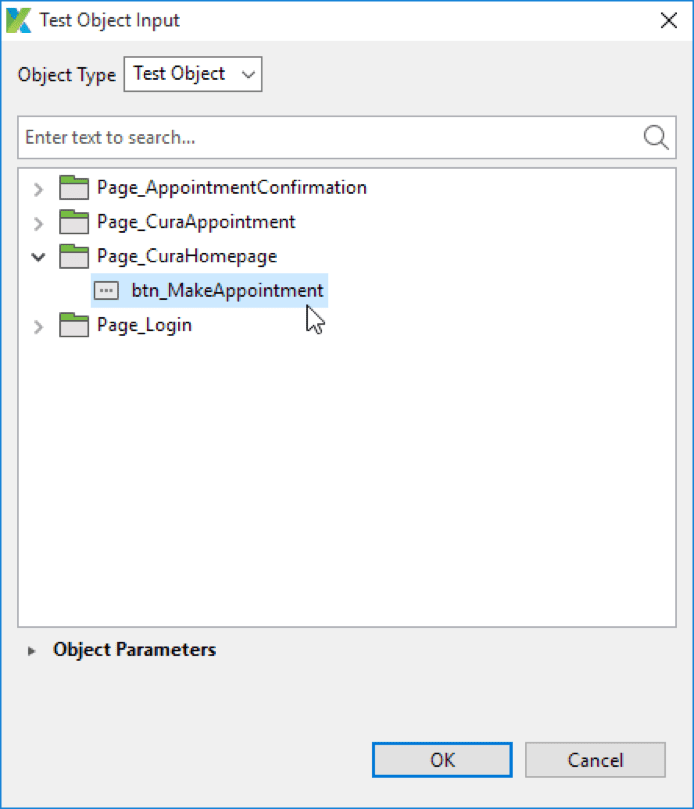
3. Specify a test object for the validation. The following dialog appears to allow selecting a relevant element.

4. Your validation point with Verify Element Present keyword will look similar to the following example:

Validation with Checkpoints
If you want to verify whether a data set is still the same, you can use checkpoints.
First, you need to create a checkpoint instance. Refer to Manage Checkpoint for more details.
Katalon Studio supports many types of data source for checkpoints such as Excel, CSV, Database and checkpoint description.
Then, you can use the Verify Checkpoint keyword to validate the state of the data. This keyword verifies if the data of a checkpoint matches its source data. The keyword’s parameters, returns and usage are described as follows:
Parameters
- checkpoint – Checkpoint (required): specifies the input checkpoint.
- logChangedValues – boolean (required): specifies whether changed values between the checkpoint data and the source will be logged.
- flowControl – FailureHandling (optional): specifies failure handling schema to determine whether the execution should be allowed to continue or stop. More details can be found in Failure handling.
Returns
- true: if the data of checkpoint matches its source data.
- false: if the data of checkpoint does not match its source data.
Example
The following example provides a manual specification and script to verify the checkpoint:
The following example will demonstrate how to add Verify Checkpoint keyword in Manual and Script mode. When users want to validate the current state of data, verify checkpoint keyword will come in handy to compare it with a snapshot of original data source taken at a certain state.
Manual Mode:

Script Mode:
import static com.kms.katalon.core.checkpoint.CheckpointFactory.findCheckpoint

'Use WebUI keyword'

WebUI.verifyCheckpoint(findCheckpoint('Checkpoints/chk_DataSnapshot'), false)

'Use Mobile keyword'

Mobile.verifyCheckpoint(findCheckpoint('Checkpoints/chk_DataSnapshot'), false)

'Use Web Service keyword'

WS.verifyCheckpoint(findCheckpoint('Checkpoints/chk_DataSnapshot'), false)
Now that you have been introduced to two methods for validation in Katalon Studio, each with its own purpose. You can use them when composing test scripts to verify data.


