TestCaseLab Test Case Management Tool | Review | Software Testing Material
Manage Test Cases using TestCaseLab Test Case Management Tool
A Test Case Managment tool is a software used by QA Engineers to manage the tests. The traditional way of documenting and managing test cases on excel sheets or any document management systems quickly reaches its limits. TestCaseLab enables you to create, manage and organize test cases and suites within an optimized user interface and application structure. TestCaseLab Test Case Management Tool is a cutting-edge web tool for manual QA engineers. It allows you to follow most of the testing activities such as creating test cases, grouping test cases in test plans, and executing test runs. It is easy to use and understand and extremely quick to deploy. TestCaseLab automatically sends email notifications to the members of the project to make sure that every team member knows his tasks at all times. It helps coordinating test runs and increase the productivity of QA engineers. Even though there are some other test case management tools in the market, TestCaseLab provides a nice user interface (UI) and also provides unlimited user account plans for affordable prices. In this post, we learn the following.
- 1. Features of TestCaseLab Tool
- 2. TestCaseLab Tool Plans & Pricing
- 3. Installation of TestCaseLab Tool
- 4. Create a Project in Test Case Lab Tool
- 5. Settings of TestCaseLab Test Case Management Tool
- 6. Integrate TestCaseLab Tool with Defect Tracking Tools
- 7. Creating Test Cases
- 8. Creating Test Plan
- 9. Creating Test Run
Features of TestCaseLab Tool
- Easy to create test cases and grouping them into categories
- Efficiently manage test cases, test plans, and test runs
- Well defined search functionality allows us to search test cases using name, description, and tags
- Real-time synchronization between peers in the project. If another user is editing the same test case, then you will get a notification
- Every test case has a unique link which allows other users to open it directly
- Allows to edit or delete multiple test cases at the same time
- All the fields of test cases are editable directly on view page
- Allows to drag and drop selected test cases
- Reuse of existing test cases or test plans by copying them
- Integrates with issue tracker tools such as Jira, Redmine, Pivotal, YouTrack, Asana
- Easily import, and export your data
- Allows to track edit history and ensures transparency
- Automatic email notifications to the members of assigned project
- Get started in minutes by simply registering without IT support
TestCaseLab Tool Plans & Pricing
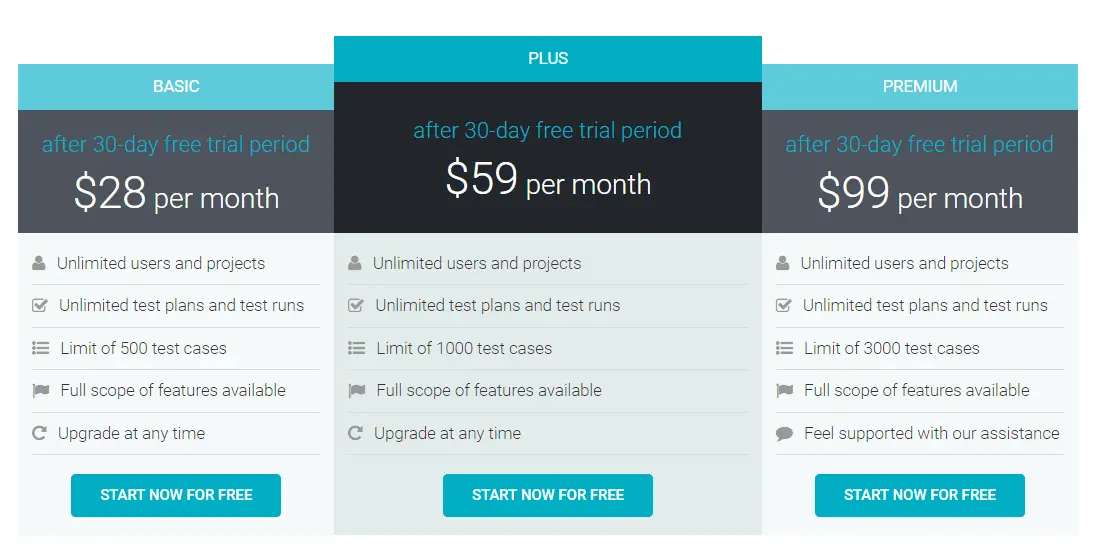
It offers multiple plans such as Basic, Plus, and Premium. Also, TestCaseLab provides enterprise solutions to their customers who expect more than what TestCaseLab is providing within the existing plans. Choose a plan based on your requirement. Prior to this, you could try their 30 days free trial. It is inexpensive compared to other Test Case Management Tools. Let’s have a look at the plans provided by TestCaseLab.
All the three plans come with unlimited users and projects. No additional pricing for the users, it means that you can invite as many users as needed for free of cost. Also, you could utilize unlimited test plans and test runs. Whereas there is a limit of test cases on each plan. Basic plan provides 500 test cases, Plus plan provides 1000 test cases and Premium plan provides 3000 test cases. You could see the pricing on the below screenshot.
TestCaseLab provides enterprise solutions to their customers with 50000 test cases for $249/month.
Installation of TestCaseLab Tool
Step 1: Open this Signup link.
Step 2: Give valid details in the registration form and click on ‘Register’
Enter required account details in the ‘Register your Company on TestCaseLab’ section:
- Company Name
- Company subdomain
- Name
- Password
- Re-type password
Choose site address based on your preference. Here I choose ‘stm’.
My site name will be https://stm.testcaselab.com
Click on ‘Register’ button. Once you do this, you will be registered and a message will be displayed saying “A message with a confirmation link has been sent to your email address. Please follow the link to activate your account.”
Step 3: Enter your login credentials (such as ‘Username’ and ‘Password’) and click on ‘Login’, once registration is completed
After logging in to TestCaseLab, the first page you usually see is the dashboard. The dashboard provides you with an overview of available projects and recent activities.
Step 4: Open any project by clicking on an existing project. If you are an admin user and setting up basic settings, then you will be redirected to Homepage after login. Here, you could do following things
- Create Project
- Create Test Cases
- Categories your test cases
- Create Test Plans
- Assign Test Cases to Test Plans
- Create Test Runs
- Manage Users
- Invite your team members
- Integrate issue trackers
- Export or Import Test Cases
Create a Project in Test Case Lab Tool
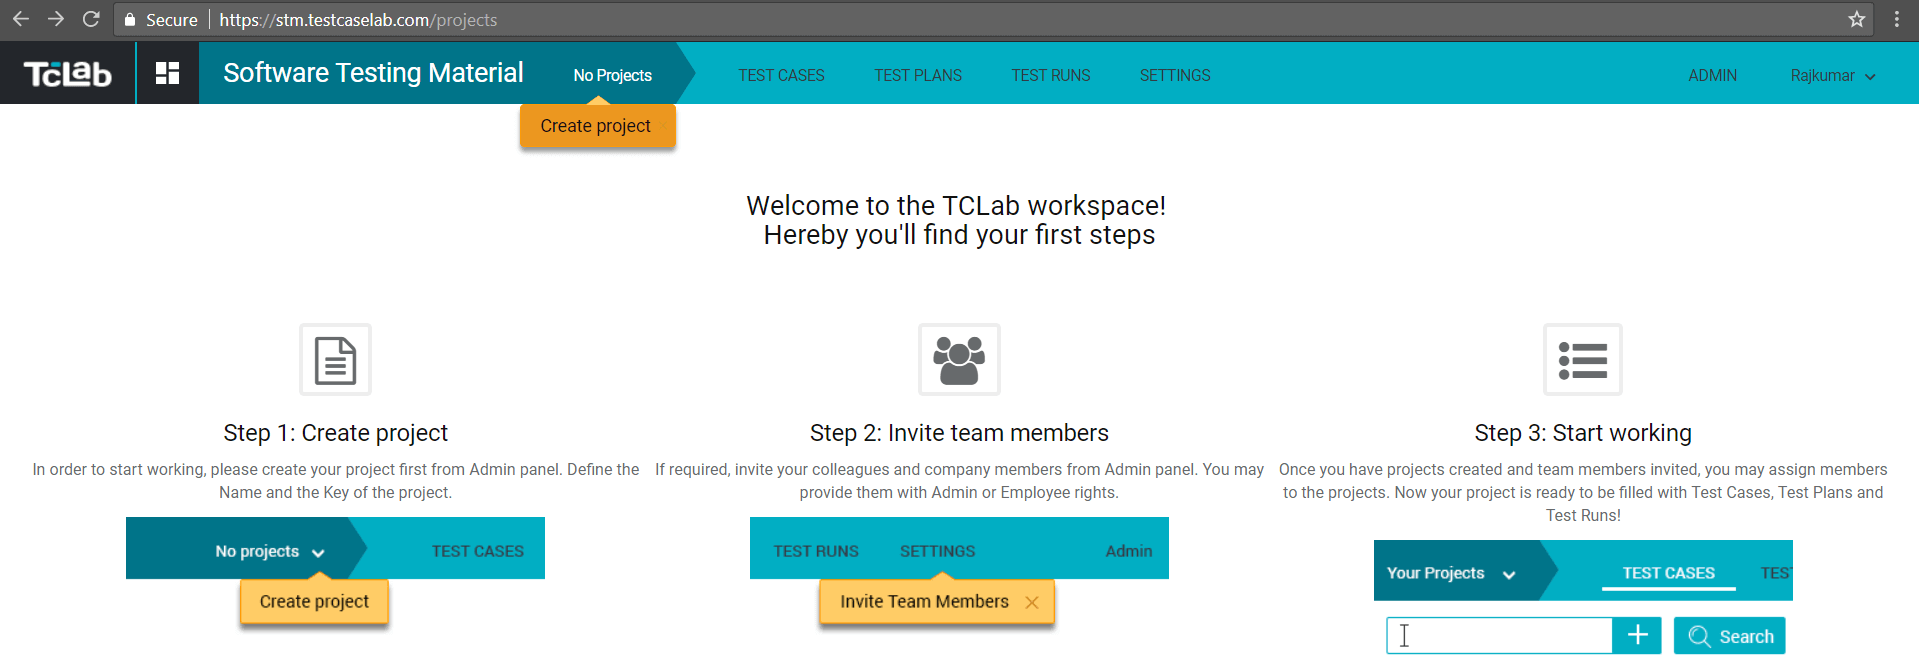
Create a Project by entering a ‘Name’ and ‘Key’ and click on ‘Create‘ button
Here I give my Project Name as ‘STMProject’ and Key as ‘001’
A message will be displayed as ‘Project PROJECT_NAME created’
Settings of TestCaseLab Test Case Management Tool
Members: We could create and invite users
Test Case Types: By default, there are some Test Case Types available. We could also add Test Cases Types as per our requirement.
Export: We could export test cases from any project to CSV format. Exported file contains the following columns:
- Title
- Description
- Steps
- Expected Results
- Priority
- Types
- Execution
- Key
- Category
- Tags
- Created At
- Created By
- Last Edit At
- Last Edit By
Import: You could upload test cases from CSC file. To do this, you need to follow the below steps:
- Download CSV file sample from TestCaseLab Import section
- Open the downloaded file and fill the test cases in that
- Upload the file in the TestCaseLab Import section
Integrate TestCaseLab Tool with Defect Tracking Tools
Go to Settings – Integrations. Test Case Lab Tool supports issue tracker tools such as Jira, Redmine, Pivotal, YouTrack, Asana
Choose your preferred issue tracker and follow the steps. Here I have chosen JIRA and integrated with TestCaseLab as shown in the below screenshot.
It allows you to link test cases with defects.
Creating Test Cases
Once everything is set up and you’re done with user invitations, you may start working with test cases.
Creating categories and test cases are such a simple thing to do. When you have the structured list of required categories, you may start filling them with test cases.
- Create category by clicking on ‘Create’ button from the left sidebar
- Create test cases by clicking on ‘Create’ button which is next to search bar once you have created categories.
Available Test cases fields:
- Name
- Test case key
- Category
- Tags
- Created by
- Last edit by
- Type
- Priority
- Execution
- Test Plans
- Description
- Steps
- Expected results
- Attachment
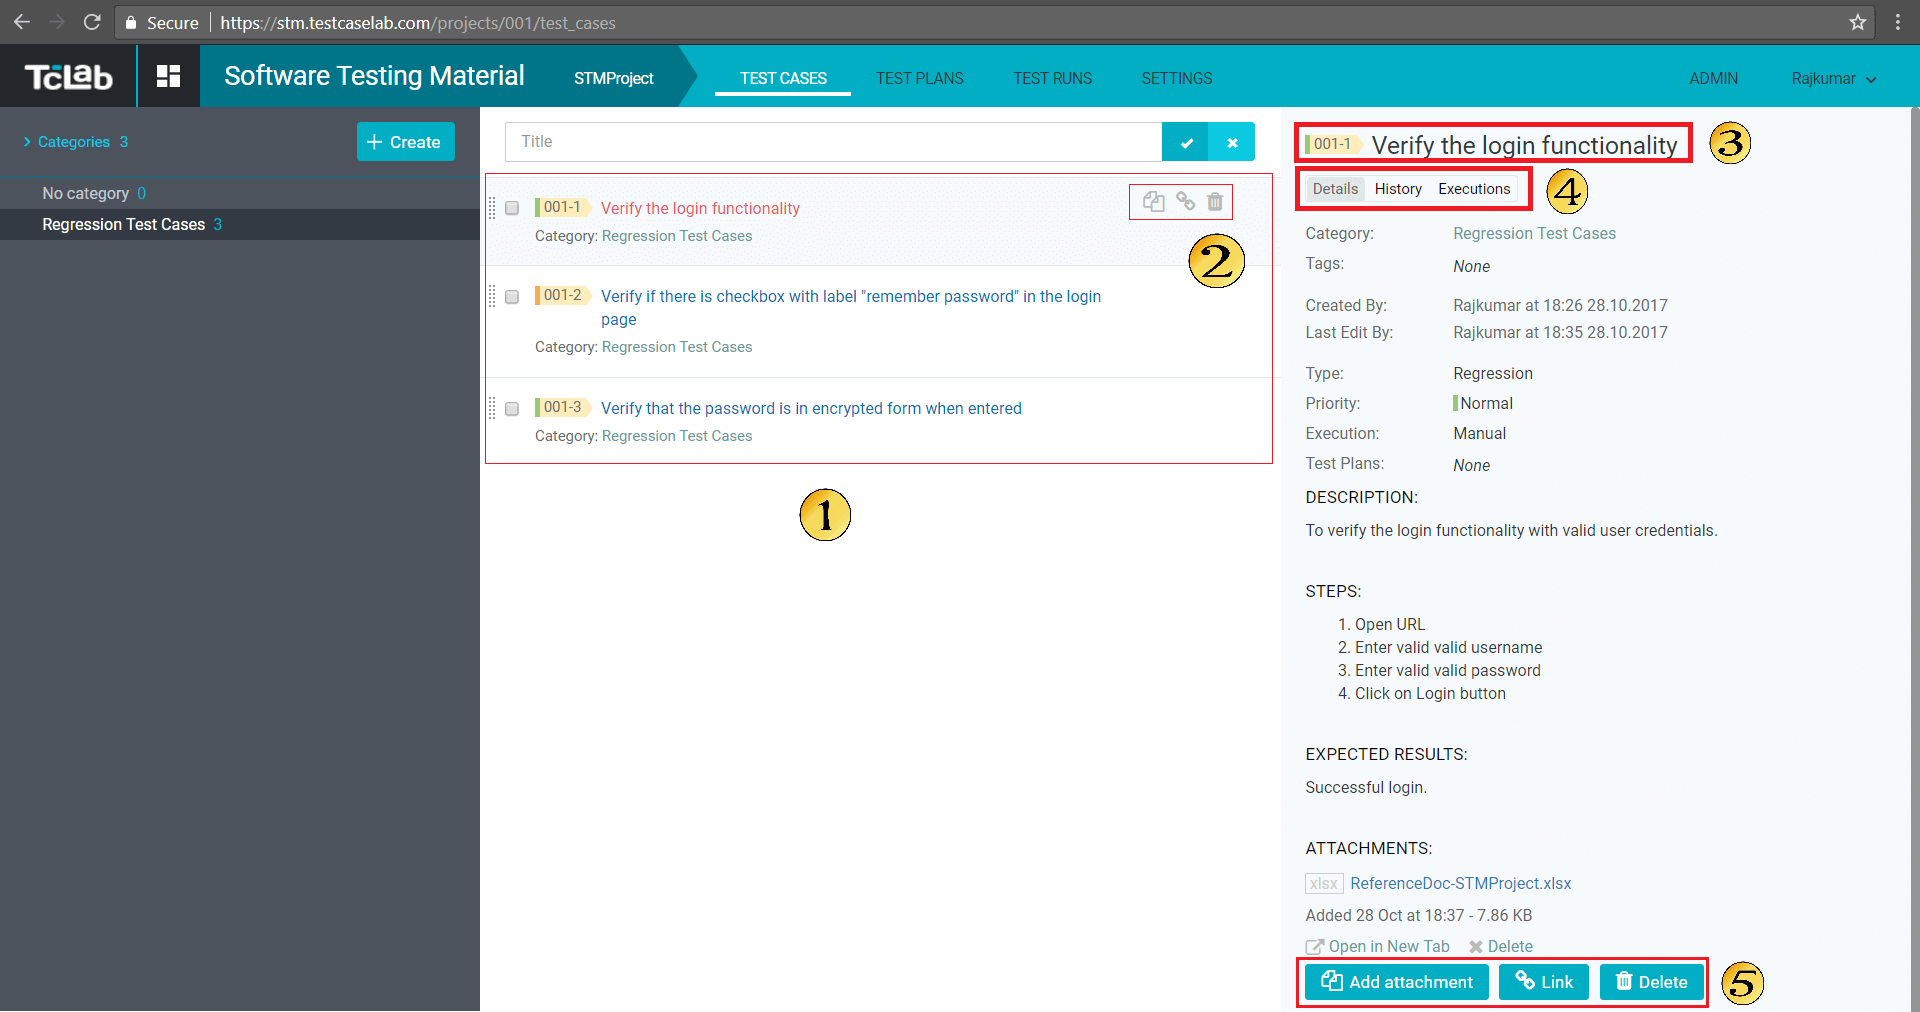
- List of all the test cases
- Option to copy, delete the test cases. Every test case has its unique link. You could copy that link and share it with your peers.
- Title of the Test Case with color indication depends on priority such as Green (Normal), Red (High), Orange (Low)
- Complete Details and history of test cases
- To upload attachments and get a link to that attachment to share with peers.
Creating Test Plan
After creating test cases, you could start creating your Test Plans. It’s very straightforward.
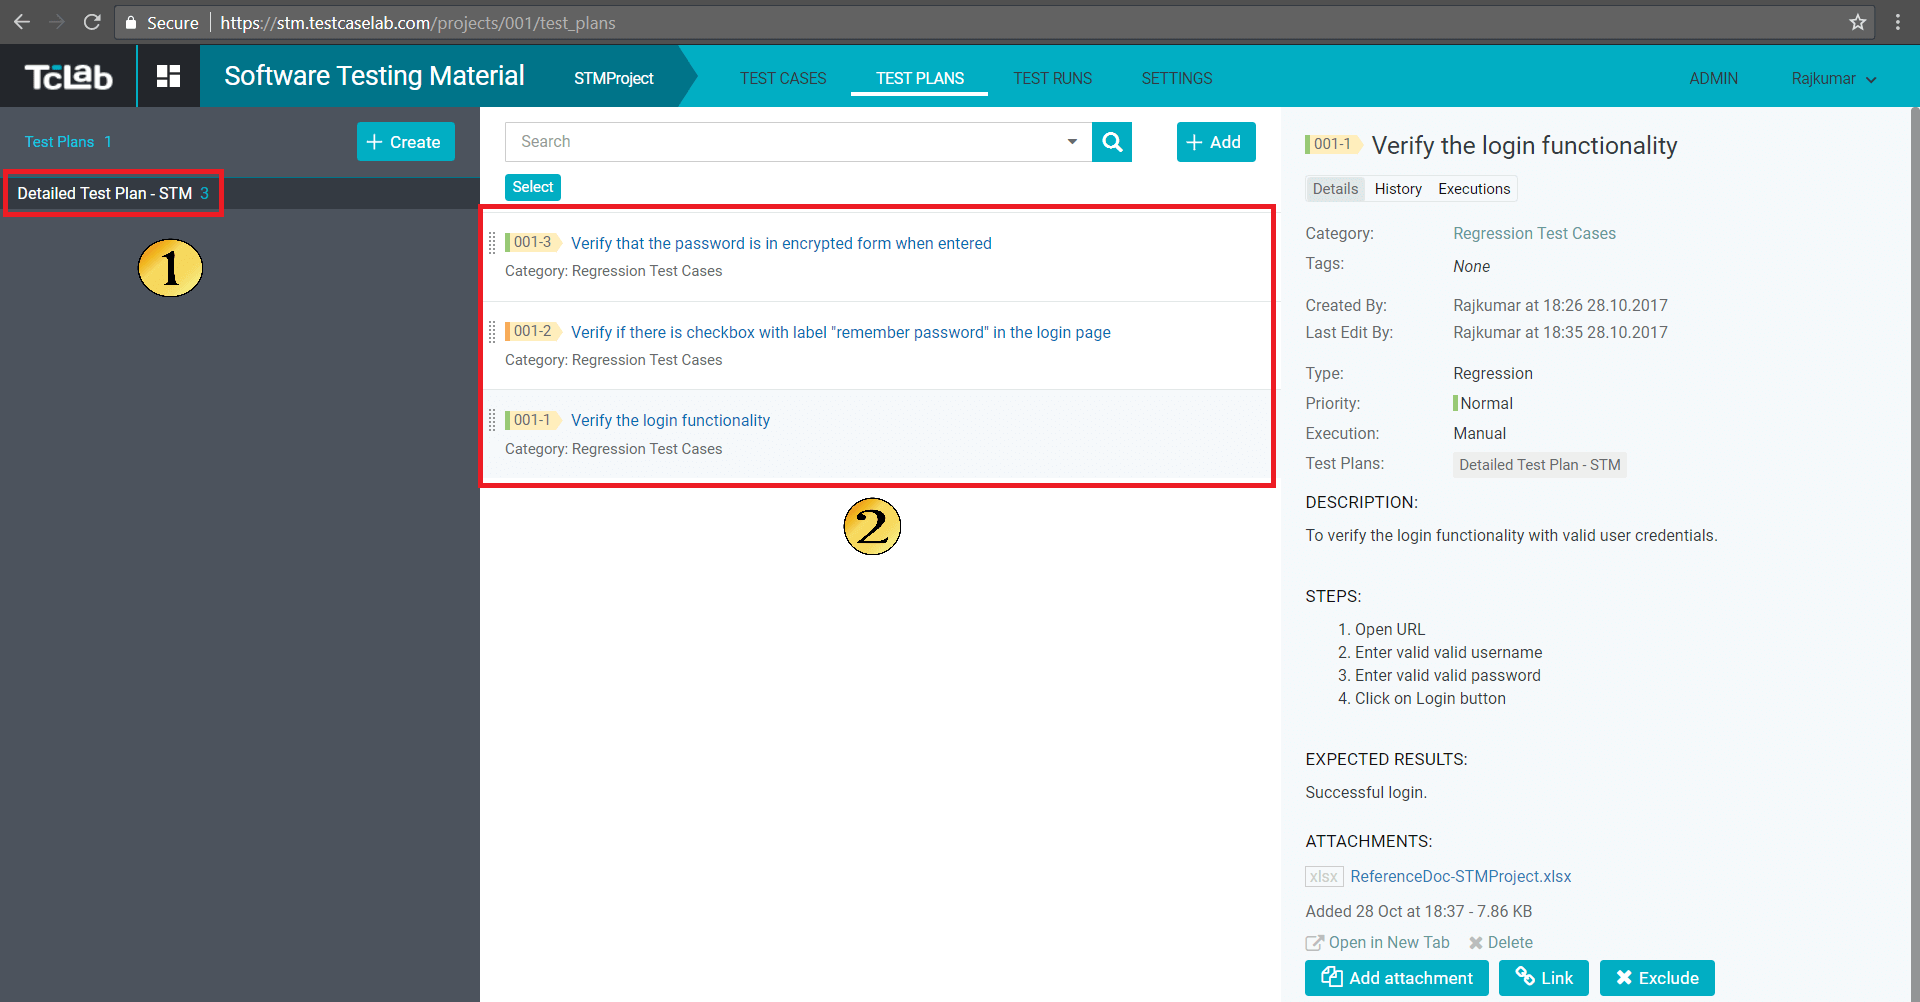
As shown in the above screenshot
- Create Test Plan by clicking on ‘Create’ button from the left sidebar
- Add test cases to the test plan by clicking on ‘Add’ button
- Name of the test plan
- List of test cases added to the test plan
Copy Test Plans:
If you would like to have similar plans with minor differences, you can easily copy existing plan and then modify the content of the newly created test plan.
Creating Test Run
To create test run, enter the name of the test run and select the test plan which will be the basis for this particular run and choose users.
Here I have given Name as ‘Test Run 001’, Test Plan as ‘Detailed Test Plan STM’ and Users as ‘Rajkumar’ and ‘Raj’
Created test run will look as shown in the below image.
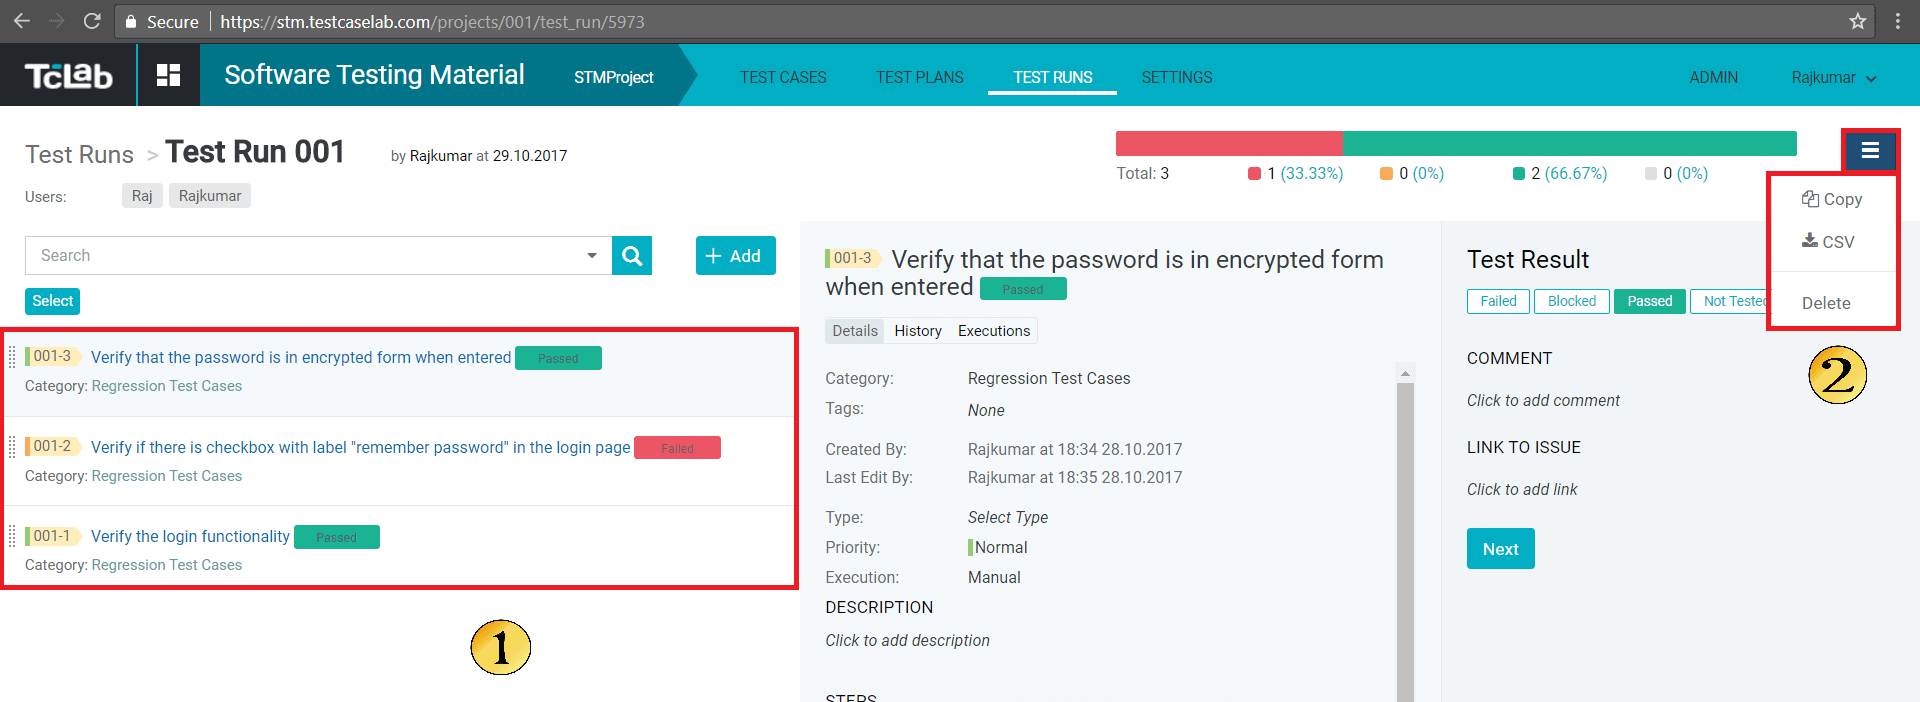
Open the test run by clicking on ‘Test Run 001’. It has parameters such as creation date, colored statuses, and percentage of each test case.
- List of test cases with different test results such as Failed (Red color) and Pass (Green color)
- To copy and download test runs
Reporting Bug to Defect Tracking Tool:
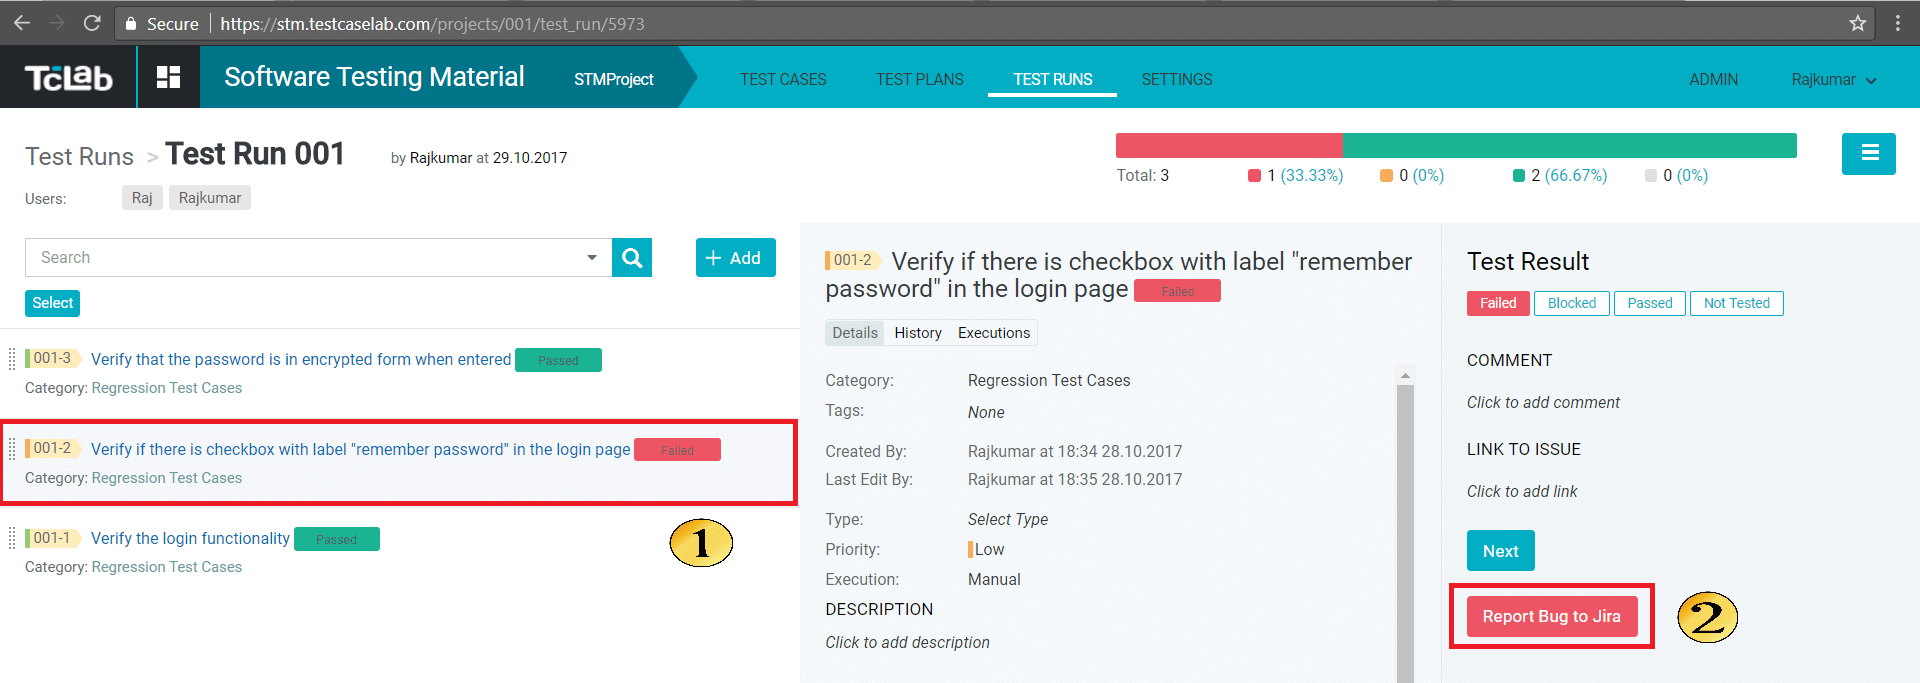
- Test Case 001-2 is marked as Failed.
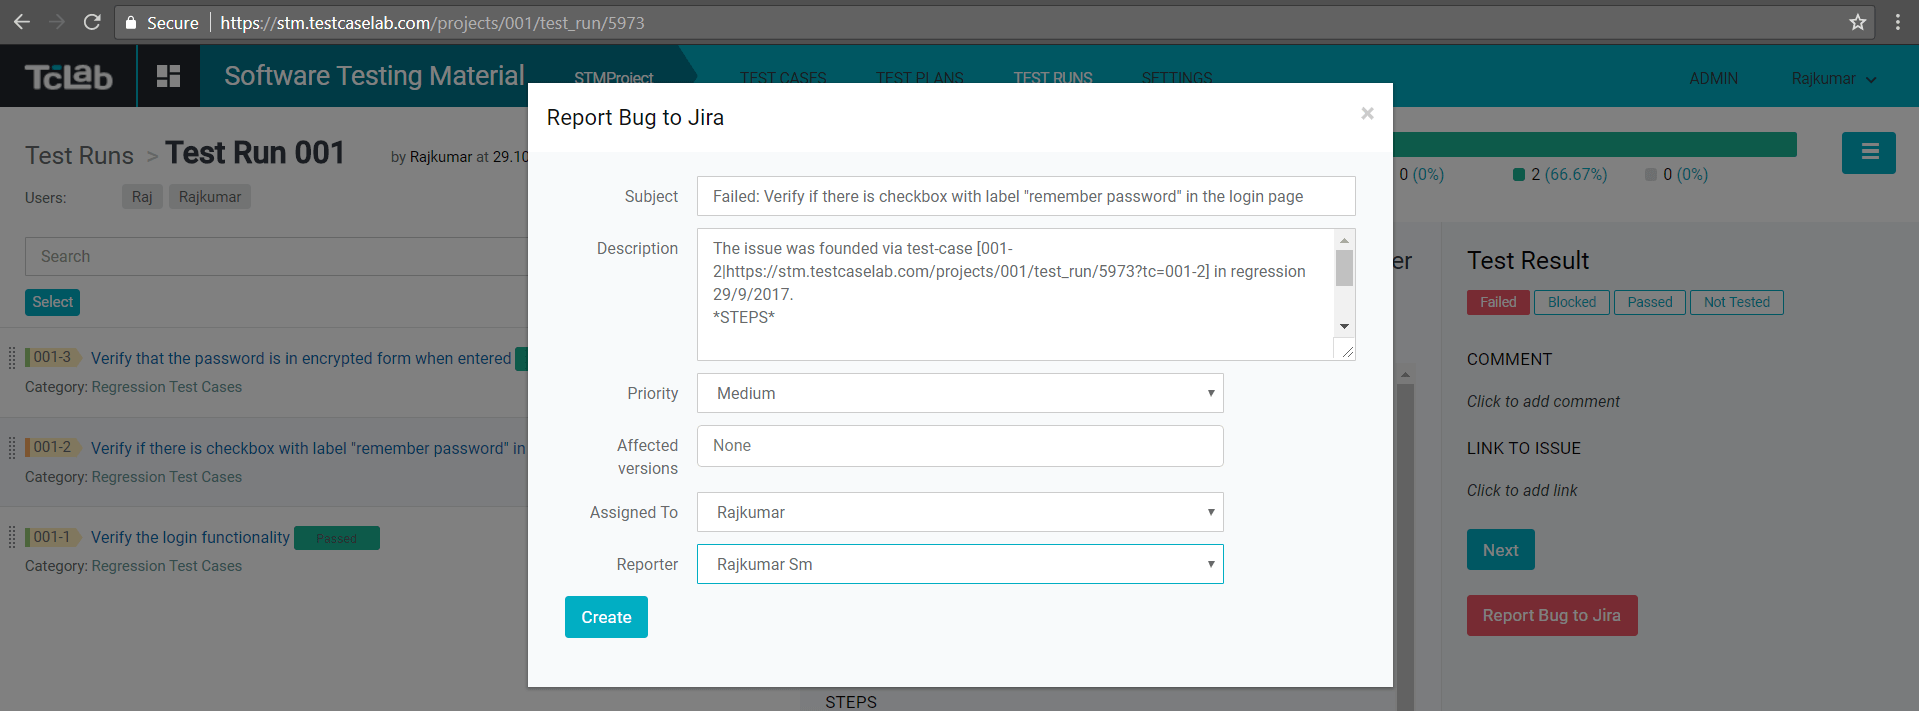
- Click on ‘Report Bug to Jira’ button to report the bug
Note: You could create a test run empty (i.e., without test cases) or based on a test plan.
Synchronization:
Real-time synchronization between peers in the project. If another user is editing the same test case, then you will get a notification. See the below image.
Conclusion:
I am concluding this “TestCaseLab Test Case Management Tool Tutorial” here. I felt that it is one of the self-exploratory Test Case Management Tools. TestCaseLab provides an easy to use interface making your life easy. Using TestCaseLab allows you to concentrate more on testing the application instead of spending time on maintaining your test cases. So here is your turn to try it out. If you would like to try this out, the easiest way to try out TestCaseLab Test Case Management Tool is to Sign up a free trial of 30 days. If you have any queries, feel free to comment below in the comments section.









Thank you sir for introducing another nice tool.
Hi Sharmila, welcome. Try to work on the TestCaseLab Tool and share your thoughts.