Sikuli Guide For Beginners – Integrate Sikuli With Selenium | Software Testing Material
In this article, we will see Sikuli Graphical User Interface Automation Tool in detail and how to integrate Sikuli with Selenium.
Introduction To Sikuli Tool:
Sikuli is a Graphical User Interface Automation Tool. Using Sikuli Automation tool we could automate whatever we see on the screen. It basically uses image recognition technology to identify and control GUI elements. We all know that using Selenium we cant automate windows objects. Integrating Sikuli with Selenium allows us to overcome this issue. Using Sikuli with Selenium, we could automate windows objects. Using Sikuli we could automate both Web and Windows based applications. Most of us using AutoIT to upload or download files in Selenium. Using Sikuli you could do it very easily. We could do flash testing using Selenium. We could not identify the element locators of flash objects. We could use sikuli tool to automate flash objects.
Mechanism of Sikuli with Selenium:
The object, if we want to automate, should be captured and placed in a specific folder and pass the path of the appropriate image into our Selenium script. At the time of execution, if the image which we passed is matched with the image on the screen then the desired action will be performed on that object.
Advantages of Sikuli Graphical User Interface Tool:
- It is an open source tool for automation
- Easily to integrate sikuli with selenium
- Can automate Desktop / Windows application
- Easily automate Flash objects – Flash Testing
- It can be used on any platform such as Windows/Linux/Mac/Mobile
- Due to its image recognition technique, we could automate even though there is no access to the code. It allows us to automate anything we see on the screen.
Sikuli Setup To Integrate Sikuli with Selenium:
To integrate sikuli with selenium, we need to follow the below steps.
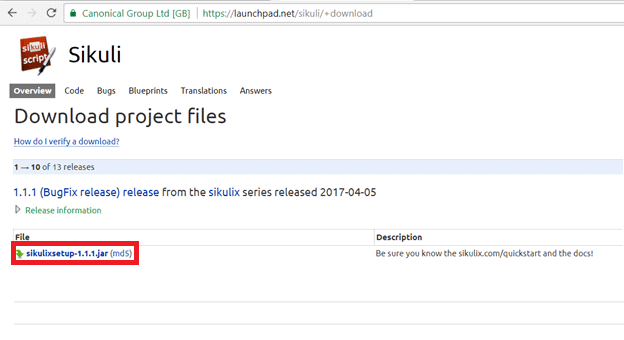
Step 1: Download Sikuli jars
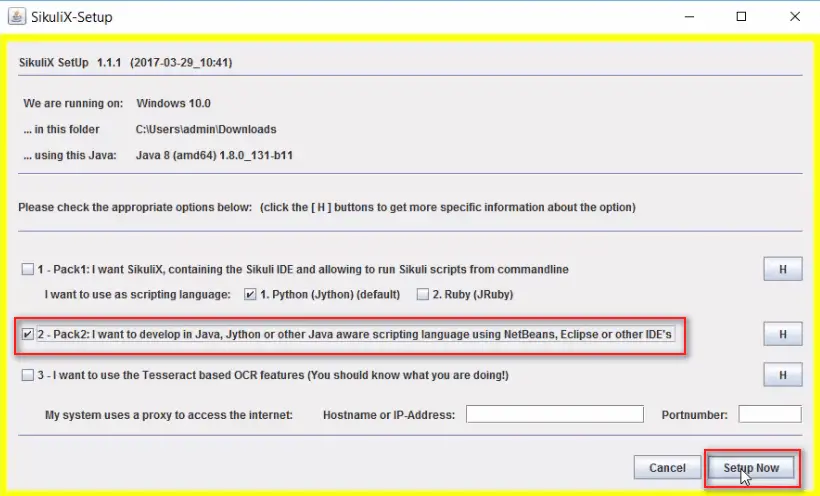
Step 2: Double-click on “sikulixsetup-1.1.1.jar” to do setup.
After having installed Sikuli on your system, a jar file “sikulixapi.jar” generate.
Step 3: Open Eclipse IDE and create a project
Here is a post on how to do Selenium setup.
Step 4: Include “sikulixapi.jar”
Right click on project – Go to Build path – libraries tab – click on ‘Add external jars’ and add the following jar file and click on OK.
Add this “sikulixapi.jar” file
I will present two sample scripts to show you how sikuli works in real time.
Check below video to see “Sikuli Tutorial – Integrate Sikuli with Selenium”
If you liked this video, then please subscribe to our YouTube Channel for more video tutorials.
Scripts to Integrate Sikuli with Selenium Webdriver:
Script 1: Facebook login Using Sikuli with Selenium
Our goal based on the below program is to open facebook page and pass user credentials and do login.
Step 1: Open facebook login page
Step 2: I have captured the following images from facebook login page and saved on my local drive.
Note: You could find the detailed explanation of the script in the code snippet below
package softwareTestingMaterial;

import org.openqa.selenium.WebDriver;
import org.openqa.selenium.firefox.FirefoxDriver;
import org.sikuli.script.FindFailed;
import org.sikuli.script.Pattern;
import org.sikuli.script.Screen;
import org.testng.annotations.Test;

public class STMSikuliClass {

	@Test
	public void facebookLogin() throws FindFailed{

	// Creating Object of 'Screen' class
	//Screen is a base class provided by Sikuli. It allows us to access all the methods provided by Sikuli.
	Screen screen = new Screen();
	// Creating Object of Pattern class and specify the path of specified images
	// I have captured images of Facebook Email id field, Password field and Login button and placed in my local directory
	// Facebook user id image
	Pattern username = new Pattern("C:\\Users\\admin\\Desktop\\Sikuli Images For Selenium\\FacebookEmail.png");
	// Facebook password image
	Pattern password = new Pattern("C:\\Users\\admin\\Desktop\\Sikuli Images For Selenium\\FacebookPassword.png");
	// Facebook login button image
	Pattern login = new Pattern("C:\\Users\\admin\\Desktop\\Sikuli Images For Selenium\\FacebookLogin.png");
	// Initialization of driver object to launch firefox browser
	System.setProperty("webdriver.gecko.driver", System.getProperty("user.dir")+"\\src\\drivers\\geckodriver.exe");
	WebDriver driver = new FirefoxDriver();
	// To maximize the browser
	driver.manage().window().maximize();
	// Open Facebook
	driver.get("https://en-gb.facebook.com/");
	screen.wait(username, 10);
	// Calling 'type' method to enter username in the email field using 'screen' object
	screen.type(username, "softwaretestingmaterial@gmail.com");
	// Calling the same 'type' method and passing text in the password field
	screen.type(password, "softwaretestingmaterial");
	// This will click on login button
	screen.click(login);
	}

}
Script 2: Actions using Sikuli with Selenium
Step 1: Open softwaretestingmaterial.com
Step 2: I have captured the below mentioned image and saved on my local drive.
Our goal based on the below program is to open softwaretestingmaterial page and do actions such as click, doubleClick, rightClick.
Note: You could find the detailed explanation of the script in the code snippet below
package softwareTestingMaterial;

import org.openqa.selenium.WebDriver;
import org.openqa.selenium.firefox.FirefoxDriver;
import org.sikuli.script.FindFailed;
import org.sikuli.script.Pattern;
import org.sikuli.script.Screen;
import org.testng.annotations.Test;

public class STMActions {

	@Test
	public void runSikuli() throws FindFailed{
		Screen screen = new Screen();

		System.setProperty("webdriver.gecko.driver", System.getProperty("user.dir")+"\\src\\drivers\\geckodriver.exe");

		WebDriver driver = new FirefoxDriver();
		driver.manage().window().maximize();
		driver.get("https://www.softwaretestingmaterial.com");

		Pattern pattern = new Pattern("C:\\Users\\admin\\Desktop\\Sikuli Images For Selenium\\ManualTesting.png");
		//uncomment below statement to do 'left click' on Manual Testing tab
		//screen.click(pattern);
		//uncomment below statement to do 'double click' on Manual Testing tab
                //screen.doubleClick(pattern);
		//uncomment below statement to do 'right click' on Manual Testing tab
                //screen.rightClick(pattern);

	}

}
Sikuli Methods:
Here to showcase some examples, I am going to use the same object of Screen class which I have taken in the above scripts.
- Click on an element: screen.click(“path of your image”);
- Double click on an element: screen.doubleClick(“path of your image”);
- Right click on an element: screen.rightClick(“path of your image”);
- Type on a text box: screen.type(“path of your image”, “Your text message”);
- To find an element: screen.find(“path of your image”);
- Element identification whether it exists or not: screen.exists(“path of your image”);
- Drag and drop: screen.dragDrop(“path of your Source image”,”path of your Target image”);
To learn more on Sikuli, please refer this offical documentation. I am concluding here on “Sikuli Tutorial for begineers”, If you have any questions, please comment below.


How to capture the images of the elements present of website? Can we do it as we do normally using “prtSc” and trim rest all.
Yes
you can use snipping tool and qsnap etc… to capture the image
if any windows/patch upgradation happens on system ,then sikuli will get fail.