Learn CSS Selector Selenium WebDriver Tutorial [Without Using Any Tools]
CSS Selector Selenium WebDriver Tutorial
In the previous post, we have seen “locators in Selenium“. In this post, we see CSS Selector Selenium – How To Locate Element By CSS Selector In Selenium. Find the below links on How to find elements on a web page using different types of locators.
1. “How To Locate Element By ID Locator”
2. “How To Locate Element By Name Locator”
3. “How To Locate Element By Class Name Locator”
4. “How To Locate Element By Tag Name Locator”
5. “How To Locate Element By Link Text/Partial Link Text Locator”
6. “How To Locate Element By XPath Locator”
Coming to the actual post..
CSS Selectors Locator:
There is a debate on the performance of CSS Locator and XPath locator and the debate on the performance of CSS and XPath locator is out of scope of this post. Most of the automation testers believe that using CSS selectors makes the execution of script faster compared to XPath locator. CSS Selector locator is always the best way to locate elements on the page. CSS is always same irrespective of browsers. In this post, I will show you how to find element locators using CSS without using any tools like Firebug or Firepath.
img: CSS Selector Selenium WebDriver Tutorial
Following are some of the mainly used formats of CSS Selectors.
- Tag and ID
- Tag and Class
- Tag and Attribute
- Tag, Class, and Attribute
- Sub-String Matches
- Starts With (^)
- Ends With ($)
- Contains (*)
- Child Elements
- Direct Child
- Sub-child
- nth-child
Refer to W3C CSS-Selectors for a list of generally available CSS Selectors
Tag and ID:
CSS ID Selector.
Syntax:
css=tag#id
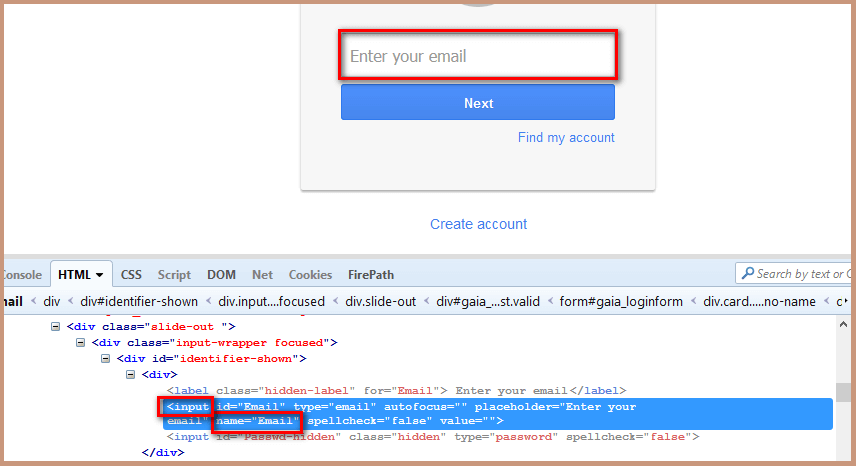
Open Mozilla Firefox and navigate to Gmail application.
Open Firebug and inspect the Enter your email input box. Take a note of its Tag and ID. Follow the below screenshot to do so.
Copy the below mentioned script and execute in your system.
<div>
<label class=”hidden-label” for=”Email”> Enter your email</label>
<input id=”Email” type=”email” autofocus=”” placeholder=”Enter your email” name=”Email” spellcheck=”false” value=””> <input id=”Passwd-hidden” class=”hidden” type=”password” spellcheck=”false”>
</div>
Value to be added in the By.cssSelector method:
css=input#Email
Script:
package seleniumTutorial;
import org.openqa.selenium.By;
import org.openqa.selenium.WebDriver;
import org.openqa.selenium.firefox.FirefoxDriver;
public class Locators {
       public static void main (String [] args){
       WebDriver driver = new FirefoxDriver();
       driver.get("https://www.gmail.com");
       // Here Tag = input and Id = Email
       driver.findElement(By.cssSelector("input#Email")).sendKeys("Software Testing Material");
       }
}
Tag and Class:
If multiple elements have the same HTML tag and class, then the first one will be recognized.
Syntax:
css=tag.class
Open Mozilla Firefox and navigate to Facebook application.
Open Firebug and inspect the Email input box. Take a note of its Tag and Class. Follow the below screenshot to do so.
Copy the below mentioned script and execute in your system.

<td>
<input id=”email“ class=”inputtext“ type=”email“ tabindex=”1“ value=”” name=”email“>
</td>
Value to be added in the By.cssSelector method:
css=input.inputtext
Script:
package seleniumTutorial;
import org.openqa.selenium.By;
import org.openqa.selenium.WebDriver;
import org.openqa.selenium.firefox.FirefoxDriver;
public class Locators {
       public static void main (String [] args){
       WebDriver driver = new FirefoxDriver();
       driver.get("https://www.facebook.com/");
       // Here Tag = input and Class = email
       driver.findElement(By.cssSelector("input.inputtext")).sendKeys("Software Testing Material");
       }
}
Tag and Attribute:
If multiple elements have the same HTML tag and attribute, then the first one will be recognized. It acts in the same way of locating elements using CSS selectors with the same tag and class.
Syntax:
css=tag[attribute=value]
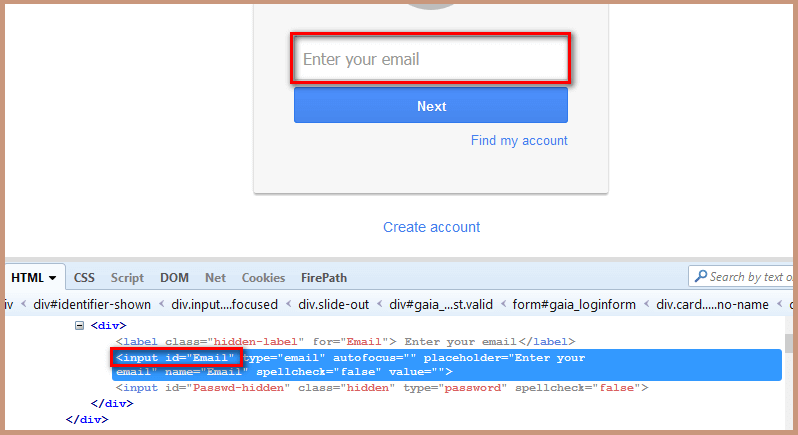
Open Mozilla Firefox and navigate to Gmail application.
Open Firebug and inspect the Enter your email input box. Take a note of its Tag and Attribute. Follow the below screenshot to do so.
Copy the below mentioned script and execute in your system.

<div>
<label class=”hidden-label“ for=”Email“> Enter your email</label>
<input id=”Email“ type=”email“ autofocus=”” placeholder=”Enter your email“ name=”Email“ spellcheck=”false“ value=””> <input id=”Passwd-hidden“ class=”hidden“ type=”password“ spellcheck=”false“>
</div>
Value to be added in the By.cssSelector method:
css=input[name=Email]
package seleniumTutorial;
import org.openqa.selenium.By;
import org.openqa.selenium.WebDriver;
import org.openqa.selenium.firefox.FirefoxDriver;
public class Locators {
      public static void main (String [] args){
      WebDriver driver = new FirefoxDriver();
      driver.get("https://www.gmail.com");
      // Here Tag = input and Id = Email
      driver.findElement(By.cssSelector("input[name=Email]")).sendKeys("Software Testing Material");
      }
}
Tag, Class And Attribute:
Syntax:
css=tag.class[attribute=value]
Open Mozilla Firefox and navigate to Facebook application.
Open Firebug and inspect the Email input box. Take a note of its Tag, Class and Attribute. Follow the below screenshot to do so.
Copy the below mentioned script and execute in your system.

<td>
<input id="email" class="inputtext" type="email" tabindex="1" value="" name="email">
</td>
css=input.inputtext[name=email]
Script:
package seleniumTutorial;
import org.openqa.selenium.By;
import org.openqa.selenium.WebDriver;
import org.openqa.selenium.firefox.FirefoxDriver;
public class Locators {
      public static void main (String [] args){
      WebDriver driver = new FirefoxDriver();
      driver.get("https://www.facebook.com/");
      // Here Tag = input and Class = email
      driver.findElement(By.cssSelector("input.inputtext[name=email]")).sendKeys("Software Testing Material");
      }
}
SUB-STRING MATCHES:
CSS in Selenium has an interesting feature of allowing partial string matches using ^, $, and *.
Have a look on the below mentioned HTML
<input="Employee_ID_001">
Starts with (^):
To select the element, we would use ^ which means ‘starts with’
Syntax:
css=<HTML tag><[attribute^=prefix of the string]>
Value to be added in the By.cssSelector method:
css=input[id^='Em']
Add the below step in the script to find the element and write a text as “hi”
driver.findElement(By.cssSelector("input[id^='Em']")).sendKeys("hi");
Ends with ($):
To select the element, we would use $ which means ‘ends with’
Syntax:
css=<HTML tag><[attribute$=suffix of the string]>
Value to be added in the By.cssSelector method:
css=input[id$='001']
Add the below step in the script to find the element and write a text as “hi”
driver.findElement(By.cssSelector("input[id$='001']")).sendKeys("hi");
Contains (*):
To select the element, we would use * which means ‘sub-string’
Syntax:
css=<HTML tag><[attribute*=sub string]>
Value to be added in the By.cssSelector method:
css=input[id*='id']
Add the below step in the script to find the element and write a text as “hi”
driver.findElement(By.cssSelector("input[id*='id']")).sendKeys("hi");
Also we can use ‘contains()’:
driver.findElement(By.cssSelector("input:contains('id')")).sendKeys("hi");
Locating Child Elements(Direct Child):
<div id="buttonDiv" class="small">
<button id="submitButton" type="button" class="btn">Submit</button>
</div>
Syntax: parentLocator>childLocator
CSS Locator: div#buttonDiv>button
Explanation: ‘div#buttonDiv>button’ will first go to div element with id ‘buttonDiv’ and then select its child element – ‘button’
Locating elements inside other elements (child or sub-child):
Syntax: parentLocator>locator1 locator2
CSS Locator: div#buttonDiv button
Explanation: ‘div#buttonDiv button’ will first go to div element with id ‘buttonDiv’ and then select ‘button’ element inside it (which may be its child or sub child)
Locating nth Child:
To find nth-child css.
<ul id="automation">
   <li>Selenium</li>
   <li>QTP</li>
   <li>Sikuli</li>
</ul>
To locate the element with text ‘QTP’, we have to use “nth-of-type”
css="ul#automation li:nth-of-type(2)"
Similarly, To select the last child element, i.e. ‘Sikuli’, we can use
css="ul#automation li:last-child"
If you have any queries by finding elements using CSS Selector Selenium, please comment below in the comment section. Like this post? Don’t forget to share it!
Here are few hand-picked articles for you to read next:
- Selenium Tutorial
- TestNG Tutorial
- Selenium Interview Questions
- TestNG Interview Questions
- Manual Testing Tutorial
- Manual Testing Interview Questions


By.cssSelector(“input:contains(‘id’)”)
please explain above line.