What is Visual Testing | Automated Visual Regression Testing Tutorial

Visual regression testing is an essential process for ensuring the visual integrity of websites. As a Senior QA who relies on visual testing daily, I can say it helps us catch unintended changes in the appearance of web pages.
Unlike traditional testing, which focuses on functionality, visual regression testing compares screenshots of web pages to identify any visual differences. This process is crucial when making updates or redesigns, as even small changes can impact the user experience.
In this article, we will learn about automated visual testing and how it helps us in delivering better user interface (UI) and user experience (UX) to the end user.
What is a Visual Regression Testing?

Visual Regression Testing is also known as Visual Testing or Visual Checking or UI Testing or Visual UI Testing.
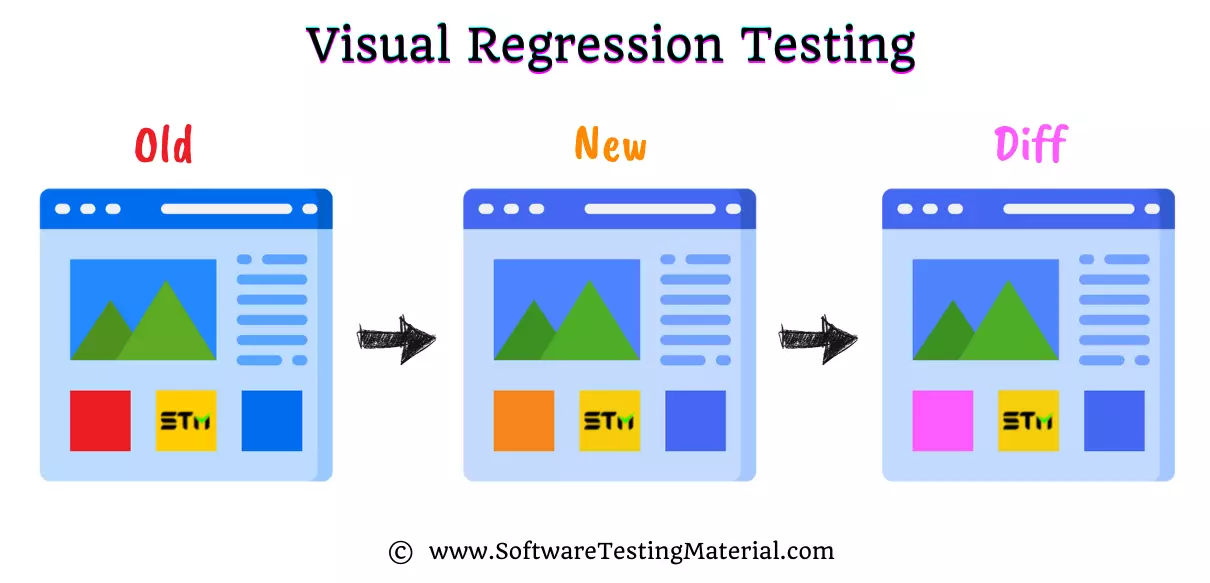
Visual regression testing is a kind of regression testing in software development that focuses on checking the visual aspects of software to ensure that changes or updates haven’t caused any unwanted differences or errors.
As a Senior Software QA, I’ve learned that this type of testing is crucial for maintaining the overall appearance and user interface of an application. We compare screenshots from the current version to previous versions to spot any changes in layout, colors, fonts, or other visual elements. This helps catch bugs that affect user experience but might be missed by functional tests.
In our day to day life, we browse our favorite websites and apps on all sorts of devices. Companies need to make sure their websites look great and work well no matter where they’re viewed.
Often, the bugs that slip through to production are UI defects. Most companies use functional testing tools like Appium and Selenium WebDriver to test their applications, but these tools aren’t built to catch rendering issues (visual bugs). To find the visual bugs we need to perform visual testing.
What are Visual Bugs?
Visual bugs are issues in a website or application’s appearance. They can include things like misaligned text, wrong colors, or images that don’t display correctly. These bugs affect how users see and interact with a site, making it look unprofessional or hard to use. Visual bugs often occur when updates or changes are made to the code.
Some of the common UI defects are as follows:
- Font issues (unknown marks instead of text)
- Alignment issues
- Layout issues
- Rendering issues
- Overlapping elements
- Responsive layout issues
Most of the users won’t return to your website or app, if they face negative experiences when they are accessing your website or app. Successful organizations must continuously monitor and address these issues to ensure their clients enjoy the best possible user experience. Failing to do so risks diminishing customer satisfaction, revenue, service subscriptions, and overall performance.
Otherwise they will be at risk of not driving higher levels of customer satisfaction and negatively impacting revenue, service subscriptions and performance in general.
If a visual bug is restricting user to access the key functionalities of an application then we should report it as a functional bug.
Must Read: Functional Testing vs Non-functional Testing
Why is Visual Testing Important?
Visual testing is crucial because it ensures that the user interface of an application looks and functions correctly across different devices and platforms. As a senior software QA, I have witnessed how even minor visual bugs can significantly impact user experience. For instance, a button that appears perfectly on a desktop might be misaligned on a tablet, or a font that looks great on Chrome might be hard to read on Safari.
Without visual testing, these discrepancies might go unnoticed until users start complaining. Such issues can hurt the credibility of your product and lead to user frustration. Visual testing helps catch these bugs early in the development cycle, making it easier and cheaper to fix them. It also ensures a consistent and professional appearance for your application, which can improve user satisfaction and trust.
Imagine you’re shopping on an ecommerce website from your desktop and have added a few items to your cart. Later, you open the same site on your mobile to add more items, but you encounter an issue: the product image overlaps the “Add to cart” button, preventing you from adding anything. This frustrating experience would likely drive you to a different site. Visual testing is essential for identifying and fixing such visual bugs, ensuring a seamless user experience. Effective visual testing requires evaluating the application across multiple browsers, operating systems, and screen sizes.
Keep in mind that mistakes in the user interface can result in lost sales.
Why Can’t We Find Visual Bugs With Functional Testing?
Functional testing and visual testing aim to catch different types of issues. Functional testing is all about making sure the application works as intended. We check if buttons function, forms submit, and pages load as they should. However, it doesn’t always capture how the application looks.
Visual bugs, like misaligned elements, overlapping text, or incorrect colors, don’t usually break the functionality but can severely affect user experience. Since functional tests focus on the “what” of the application’s behavior, they often miss the “how” of the presentation. This gap is where visual testing comes in, ensuring the final product looks as polished as it works.
Functional tesitng: It ensures that the software is working as intended.
Visual Testing: It ensures that the software is looking as intended.
Visual Testing vs. Functional Testing
| Aspect | Visual Testing | Functional Testing |
|---|---|---|
| Purpose | Identifies visual inconsistencies and UI issues. | Verifies that the application functions as expected. |
| Focus | Looks at the appearance, layout, and styling of the UI. | Concentrates on the operations, data processing, and logic flow. |
| Execution | Often involves taking and comparing screenshots over time. | Involves running tests to check specific functions and features. |
| Tools | Uses tools like Applitools, Percy, and Visual AI for UI checks. | Uses tools like Selenium, JUnit, and TestNG for functional checks. |
| Common Bugs Detected | Finds visual bugs such as broken layouts, missing images. | Detects functional bugs like incorrect calculations or crashes. |
| Usability | Ensures that the user interface looks as intended across devices. | Ensures that all functionality works as intended across scenarios. |
| Testers | Often used by developers, designers, and QA engineers. | Primarily used by QA engineers and developers. |
| Frequency | Typically run after every UI change or on a regular schedule. | Usually run at every build, release, or significant code change. |
| Scope | Limited to the visual aspects of the application. | Covers the entire functionality of the application. |
| Importance | Crucial for user experience and brand consistency. | Essential for the core functionality and reliability of the app. |
Implementing visual testing early in the development cycle along with the functional testing allows us to find and fix visual bugs before releasing the application to end users. We can do visual testing either manual way or using automated tools.
Let’s see which type of visual testing gives better results.
What is Manual Visual Testing?
Manual visual testing is the process of checking a website or application’s interface by looking at it with your own eyes. This means manually comparing the design you expected to what actually appears on the screen. During this process, a tester will go through the website on different devices, browsers, and screen sizes to spot any visual issues. These issues could include things like misaligned images, incorrect fonts, or broken layouts. The tester takes notes or screenshots of any differences they find, which helps the development team fix these visual bugs.
Disadvantages of Manual Visual Testing
- It is a time consuming process.
- It is an expensive task and error prone due to human intervention.
- It is impossible to test the application in all the device permutations through manual visual testing.
- It is not easy to find the minor UI changes through manual visual validation testing.
To overcome these issues we opt for automated visual testing tools.
What is Automated Visual Testing?
Automated visual testing is a process that uses automated visual testing tools to automatically check the visual appearance of a website or application. Unlike manual visual testing, which requires someone to look at the application on different devices and browsers, automated visual testing tools does this work for you. It takes screenshots of your app and compares them to the expected design. If there are any differences, it alerts you. This saves time and reduces the chance of human error. Automated visual testing helps ensure your app looks great and works well for everyone.
Manual Visual Testing Vs. Automated Visual Testing
| Aspect | Manual Visual Testing | Automated Visual Testing |
|---|---|---|
| Efficiency | Time-consuming and labor-intensive | Quick and efficient |
| Accuracy | Prone to human error | High accuracy due to automated comparisons |
| Scalability | Difficult to scale as it requires more human resources | Easily scalable with minimal additional resources |
| Cost | Higher long-term costs due to labor requirements | Higher initial setup cost but lower long-term maintenance costs |
| Coverage | Limited coverage due to manual effort | Comprehensive coverage across multiple devices, browsers, and OSs |
| Consistency | Inconsistent due to human error | Consistent and reliable test results |
| Setup Time | Minimal setup time | Longer initial setup time |
| Maintenance | High maintenance due to ongoing manual checks | Low maintenance after initial setup |
| Speed | Slower due to manual effort | Faster due to automation |
| Reporting | Manual note-taking and screenshot comparison | Automated reporting and detailed comparisons |
Types of Visual Regression Testing
Here are some visual regression testing techniques.
- Manual Visual Testing: This involves a person manually comparing the current UI with the previous version. It is time-consuming and prone to human error but can be useful for small projects or minor changes.
- Screenshot-Based Testing: This type captures images of the UI and compares these screenshots pixel by pixel to identify differences. It is very accurate but can detect even minor and insignificant changes.
- DOM-Based Testing: This type checks the HTML structure and layout of the web page. It compares the new version of the DOM to the old version to find inconsistencies. It is a bit more flexible than pixel-based testing.
- Layout Testing: This focuses on the structure and alignment of elements on a page rather than pixel-perfect accuracy. It ensures that elements are positioned correctly and are of the right size.
- Visual AI Testing: This type uses artificial intelligence to compare the visual appearance of web applications. AI models are trained to detect significant changes while ignoring minor ones, making it suitable for dynamic and responsive designs. It often does not require a baseline image for comparison.
Advantages of Automated Visual Testing Tools
Automated visual regression testing tools compare images against each other “pixel by pixel” to look for changes due to bugs or bad practices and allows companies to ensure these changes do not negatively affect the end product experience. Some of the advantages these tools offer are as follows.
- Efficiency: Automated tools can quickly compare the visual aspects of your application across multiple platforms and devices, significantly faster than manual checks.
- Accuracy: These tools can detect even the smallest visual discrepancies that might be missed by the human eye, ensuring a higher level of precision.
- Consistency: They provide consistent results by running the same tests under the same conditions every time, eliminating human error.
- Cost-Effective: By reducing the need for extensive manual testing, automated tools can lower costs and free up resources for other critical tasks.
- Scalability: Automated visual testing can easily scale to cover a wide range of devices, browsers, and operating systems, ensuring comprehensive coverage.
- Faster Feedback: Immediate feedback from automated tests allows developers to quickly address and fix visual issues, speeding up the development cycle.
Using automated visual testing tools ensures a more reliable and visually consistent user experience, ultimately contributing to the overall quality of your application.
How The Visual Testing Process Works?
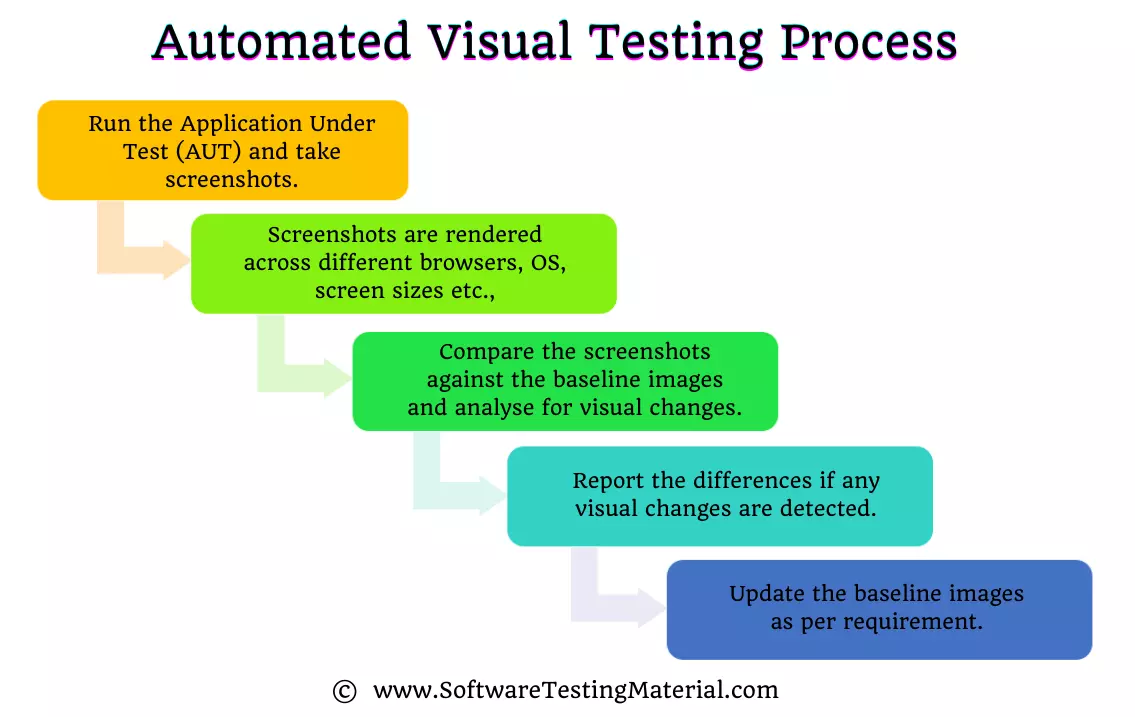
The visual testing is performed to compare UI screenshots of a software against baseline images to see if any changes have occured.

Step #1: Run the Application Under Test (AUT) and take screenshots.
Step #2: Screenshots are rendered across browsers, operating systems, screen sizes and devices.
Step #3: Compare the screenshots against the baseline images and analyse for visual changes.
Step #4: Report the differences if any visual changes are detected
Step #5: Update the baseline images as per requirement.
When To Perform Visual Regression Testing?
Visual regression testing is crucial whenever changes are made to an application’s codebase. Here are some key scenarios:
- Before a New Release: Every time you release a new version of your application, visual regression testing ensures that new features or changes haven’t negatively impacted the user interface.
- After Code Refactoring: When you clean up or restructure your code without changing its functionality, perform visual regression testing to ensure that the UI remains consistent.
- Following Bug Fixes: If you’ve corrected visual bugs or any other type of bugs, test visually to confirm the errors are fixed and no new visual issues have been introduced.
- During Cross-Browser Testing: Whenever you need to support multiple browsers or devices, visual regression testing helps ensure that your application looks and behaves correctly across all supported environments.
- With Design Updates: When the design or layout of your application changes, visual regression testing can verify that the intended updates are correctly implemented everywhere.
By regularly performing visual regression testing during these scenarios, you can catch and fix visual discrepancies early, maintaining a seamless and user-friendly interface.
Automated Visual Testing Use Case and Example
Automated visual testing is widely used in web development and application maintenance. Imagine a company that frequently updates its website to improve user experience and add new features. Each update might introduce unexpected changes in the website’s appearance, such as misplaced buttons, overlapping text, or incorrect colors.
Some examples of Visual Testing Use Cases are as folllows
- E-commerce Websites: Visual testing is perfect for e-commerce websites, where any change can affect how products are displayed. For instance, adding a new product line or updating the design can lead to layout issues like overlapping images or incorrect product details. Automated visual testing helps identify these glitches quickly, ensuring a smooth shopping experience.
- Marketing Campaigns: Companies often run special marketing campaigns during holidays or sales events, which usually involves updating website banners, ads, and promotional content. Visual testing can verify that these changes look perfect across different devices and browsers, making sure that all customers see the correct offers and messages.
- Content Management Systems (CMS): Websites using CMS platforms like WordPress or Joomla frequently update their content. Visual testing can ensure that new blog posts, images, or videos appear correctly and do not disrupt the existing layout. This is crucial for maintaining a professional and visually pleasing site.
- Mobile Applications: Mobile apps often receive updates for new features or improvements. Visual testing helps check that these updates do not distort the app’s interface, whether it’s the placement of buttons, navigation paths, or the display of multimedia content, ensuring a consistent user experience.
- User Interface (UI) Changes: When developers revamp a website or app’s UI, visual testing ensures that all elements are correctly aligned and displayed. It can catch errors like missing icons, misaligned text, or incorrect colors, helping maintain a cohesive and aesthetically pleasing design.
By applying automated visual testing in these areas, businesses can maintain high standards for visual quality and user experience, ultimately leading to higher customer satisfaction and retention.
What Are Some Problems With Snapshot Testing?
While snapshot testing can be useful, it also comes with several significant problems. As a QA, you might face the following issues:
- Dynamic Content: Websites with changing content, like news sites or blogs, can fail tests because the snapshots quickly become outdated.
- Variable Data: Elements such as timestamps, random IDs, or user-generated content can lead to false positives in tests since these fields are expected to change.
- Browser Variations: Minor differences in how browsers render fonts, images, or layouts can cause snapshots to appear inconsistent, even when the content remains identical.
- Environmental Factors: Differences in hardware and operating systems can affect how content is displayed, leading to inconsistencies in snapshot tests.
- Frequent Updates: Applications that are frequently updated may require constant updating of snapshots, which can become time-consuming and counterproductive.
- High Sensitivity to Minor Changes: Snapshot testing tools can be overly sensitive. Even the slightest change, like a small shift in layout or a minor color difference, can be flagged as a visual bug. This often leads to false positives, which can be time-consuming to investigate and resolve.
- Difficulty Handling Dynamic Content: Many web and mobile applications include dynamic content that changes frequently, such as dates, times, and user-generated content. Snapshot testing often struggles with these elements, as the dynamic nature results in differences in every test run, leading to numerous false positives.
- Large Image Size: Storing and processing large bitmap images can be resource-intensive. This can increase the overall testing time and slow down the CI/CD pipeline, reducing efficiency.
- Maintenance Overhead: Maintaining a large number of baseline images can become cumbersome. Whenever there is a legitimate UI change, the baseline images need to be updated. This can become an ongoing maintenance burden, particularly for large and complex applications.
These issues suggest that while snapshot testing can be useful, it also requires careful consideration and potentially other complementary testing methods to ensure reliable results.
Popular Commercial Visual Testing Tools
If you’re interested in purchasing a Visual Testing solution, check out the list of vendors below that offer this service. Here is a detailed guide on Best Visual Testing Tools.
- Applitools – Best for desktop – web application visual testing.
- Percy (BrowserStack) – Best for web application visual testing.
- Kobiton – Best for mobile testing teams.
How Do I Use AI for Automated Visual Testing?
Using AI for automated visual testing is simpler than you might think. Here are a few straightforward steps to get you started:
- Set Up Your Test Environment: Begin by setting up your testing environment. This usually involves installing some testing tools and setting up your development environment with the necessary configurations.
- Integrate with Your Testing Framework: Most AI visual testing tools, like Applitools, integrate smoothly with popular testing frameworks such as Selenium, Cypress, and WebdriverIO. All you need to do is add the relevant plugin or library to your project.
- Write Your First Test: Create a simple test script to capture screenshots of your application’s different states. This script will help compare the current appearance of your application with a baseline image.
- Run Your Tests: Execute your test suite to capture the new set of screenshots. The AI will automatically compare these screenshots with your baseline images to detect any differences.
- Review Identified Differences: After running the tests, the AI will highlight any visual differences it found. You can then review these differences to determine if they are actual bugs or expected changes.
- Maintain Your Baselines: Regularly update your baseline images to reflect the latest acceptable state of your application’s UI. This ensures future tests accurately identify unintended changes.
By following these steps, you can seamlessly incorporate AI into your automated visual testing process, ensuring your applications look perfect across all browsers and devices.
Conclusion
Visual testing is a method of software quality assurance, which analyzes how the user interacts with your website or app. It checks to see if it meets usability and accessibility standards and looks for bugs in site navigation, graphics, fonts, color schemes, etc.
Automated visual testing tools are great because they allow you to test on multiple platforms at once without having to manually do so yourself.
If this article has peaked your interest in automated visual testing tools, you can check our detailed guide on best visual regression testing tools in the market.
FAQ: Visual Regression Testing
What are the best Code/Script Based Open-source Visual Validation Tools?
Following are the list of code/script based visual testing tools that are free to use and open-source.
#1. FBSnapshotTestCase (Uses XCTest)
#2. Gemini (Uses JS DSL)
#3. Needle (Uses Python)
#4. PhantomCSS (Usess CapserJs)
#5. Pix-Diff (Uses JS and Protractor)
#6. Rspec Page Regression (Uses Capibara)
#7. Selenium Visual Diff (Uses Java and WD)
#8. Specter (Uses JS DSL)
#9. VisualCeption (Uses PHP and CodeCeption)
#10. Vizregress (Uses .NET and WD)
What are the best Configuration Based Open-source Visual UI Testing Tools
Following are the list of configuration based visual validation tools that are free to use and open-source.
#1. BaskstopJS
#2. CSSCritic
#3. CSS Visual Test
#4. Grunt Photobox
#5. GreenOnion
#6. Grunt-Vigo
#7. Galen Framework
#8. Kobold
#9. Snap And Compare
#10. VIFF
What is Cross browser visual testing?
Cross browser visual testing is a process used to ensure that web applications or websites appear as intended across various browsers and devices. It involves capturing screenshots of web pages rendered in different browser environments and then comparing these screenshots to identify any inconsistencies or visual discrepancies. This type of testing is crucial because different browsers and devices can render HTML, CSS, and JavaScript differently, potentially leading to unexpected visual issues. By performing cross browser visual testing, developers and QA teams can ensure a consistent user experience, catching and resolving visual bugs before they affect end users.
Why should you perform cross browser visual testing on real devices?
Performing cross browser visual testing on real devices is essential because it ensures that your web application or website functions and appears as expected in real-world scenarios. Emulators and simulators can be useful during development, but they may not fully replicate the nuances and specific behaviors of actual devices and browsers. Real devices provide authentic feedback on performance, rendering, and user interactions, revealing issues that might not be evident on simulated environments. This approach helps in identifying and resolving potential visual and functional discrepancies, leading to a more reliable and seamless user experience across all devices and browsers.
Related posts:
- Regression Testing Guide
- Best Regression Testing Tools
- Best Automated Visual Testing Tools
- What is AI In Software Testing


