TestProject Test Automation Tool Review by Software Testing Material
Would you like to create test automation scripts for your application?
- It’s absolutely essential that you do! Whether you’re looking to increase speed, reduce the testing costs, or to expand test coverage etc., – having a framework is the key.
- The first step towards creating a game-changing automation scripts is to build a robust framework.
As automation testers, we know how many problems we face in our automation projects. Especially when using open source tools like Selenium and Appium. By keeping this in mind, a group of people working in the industry for years focused on building a powerful and collaborative test automation framework that will help solve some of those common problems and named it ‘TestProject’
So, let see how TestProject helps us to achieve our goals.
In this TestProject tutorial, I will show you the following:
- TestProject Introduction
- Features of TestProject
- Pricing Plan
- TestProject Signup
- TestProject Dashboard
- Creating a new project in TestProject
- Creating a new folder in TestProject
- Creating a new test in TestProject
- Review test results in TestProject
- Creating a new job in TestProject
- Conclusion
TestProject Introduction
TestProject is a community powered test automation platform. It is used to create automated tests for web and mobile apps. It simplifies and enhances the use of leading open source tools Selenium & Appium. It supports operating systems such as Windows, Linux, MacOS. It is driven by a community of passionate developers that create and share addons for Mobile, Web and API testing.
It is available for free to use for as long as you want.
Features of TestProject
Key features of TestProject are as follows:
TestProject Setup:
Using TestProject, you can easily start with test automation. Its setup is simple and clean. All you need to do is install the TestProject Agent. The Agent is a cross-platform local desktop component that communicates with TestProject’s cloud testing repository and is responsible for local test execution. The Agent incorporates all of the tools and drivers needed to start your test automation on any browser or device you need, using any operating system you like. By using the Agent you will always be up-to-date with all the latest stable components and drivers to support your test automation.
Platforms:
You can create automated tests for Web, and mobile apps (both Android and iOS) and run them on a variety of supported browsers and mobile devices.
- It supports operating systems such as Windows, Linux, and MacOS
- It supports mobile devices which use either Android or iOS operating system
Addons:
TestProject is driven by a community of developers that create and share addons. An Addon is a collection of coded actions you can use within any tests, which provides useful features to test cases. By using addons, you can save valuable time and enhance your recorded and coded tests with capabilities developed by fellow experts. You can also create your own addons and share them with other TestProject users or team members across the globe.
Recording:
You can write test cases by recording them, using an in-browser recorder which provides built-in capabilities to easily automate web, Android and iOS apps.
SDK:
TestProject provides a powerful SDK for creating tests and addons using standard open source libraries (Selenium & Appium) for Web, Android and iOS applications. TestProject’s SDK is based on standard Selenium APIs commands, which makes the development of new tests or porting existing ones as easy and straightforward as possible. Currently, TestProject’s SDK has a Java and C# (.NET Core) implementation.
Team Management and collaboration:
You can easily share your tests, UI elements, addons, test reports and any other component that will help your teammates to create better tests in less time. It’s all managed in a single testing repository which enables you to easily collaborate with your team members or clients anywhere around the globe. In addition, you can manage and monitor your execution processes by creating automation jobs and using a built-in scheduler to execute tests and utilize your automation across your entire organization.
Reports:
View execution reports with detailed logs and screenshots. Easily troubleshoot errors by quickly identifying failed steps.
Integrations and API:
With TestProject’s REST-API, you can easily integrate your automated tests into your existing continuous integration flows. In addition, TestProject easily integrates with your favorite third party tools, such as: Jenkins, Slack, email notifications and any service that supports web hooks.
Pricing Plan
It comes with three plans:Free forever, Professional and Enterprise.
Free forever plan:
In the free forever plan, we can get up to 5 agents and we can use these agents for free forever.
- Unlimited users
- Unlimited test execution
- Reporting dashboards
- Smart test recorder for Web, Android & iOS
- Support for iOS on Windows
- CI
intergrations - Execution scheduler
- Access to
addons library - Powerful SDK
- Screenshots of failed test steps
- Up to 5 Agents
- Up to 2 projects
- Total storage of 500MB
- Essential API access
- 30-days execution history
- Best effort support
- Always up-to-date
Professional Plan:
To get the most out of TestProject, you can go with Professional Plan. It’s just $8 per agent per month, and includes everything in the Free plan, plus:
- 2GB storage per agent
- Unlimited projects
- Unlimited execution history
- Unlimited API access
- Full screenshot resolution
- Screenshots of all test steps
- 24-hour support SLA
Enterprise:
Enterprises with special
TestProject Sign Up
We need to sign up to start working with TestProject. It is available for free on ‘Free Sign Up’ option
Sign up here for TestProject Free Account
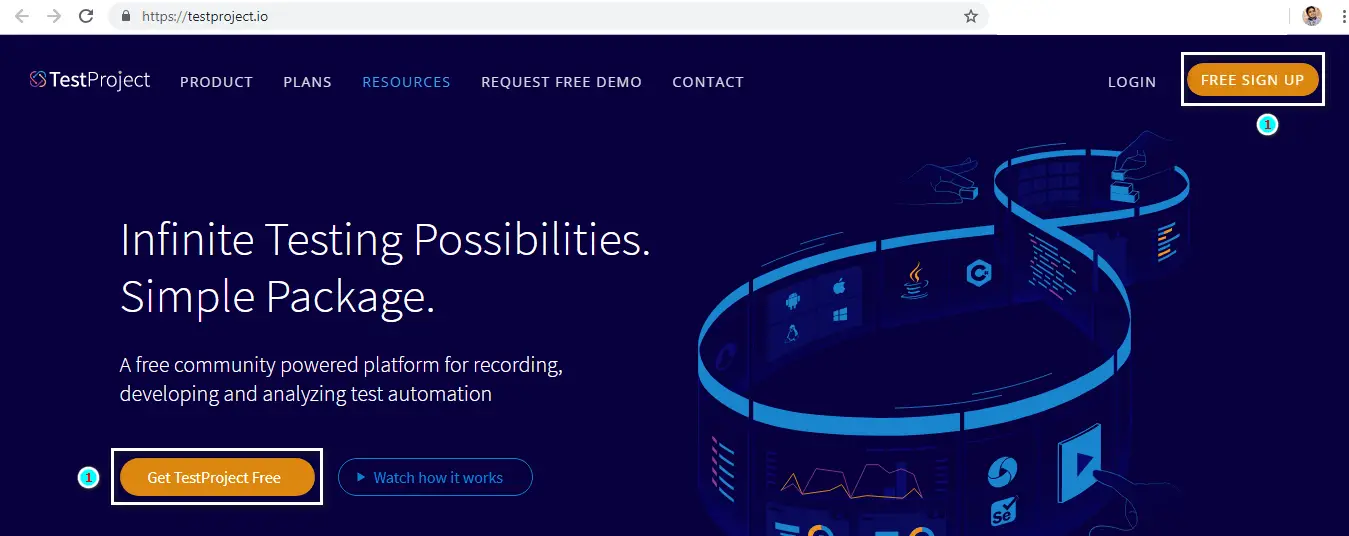
Step 1: Go to official website of TestProject and click on ‘Free Sign up’ link
You will be redirected to a sign up page
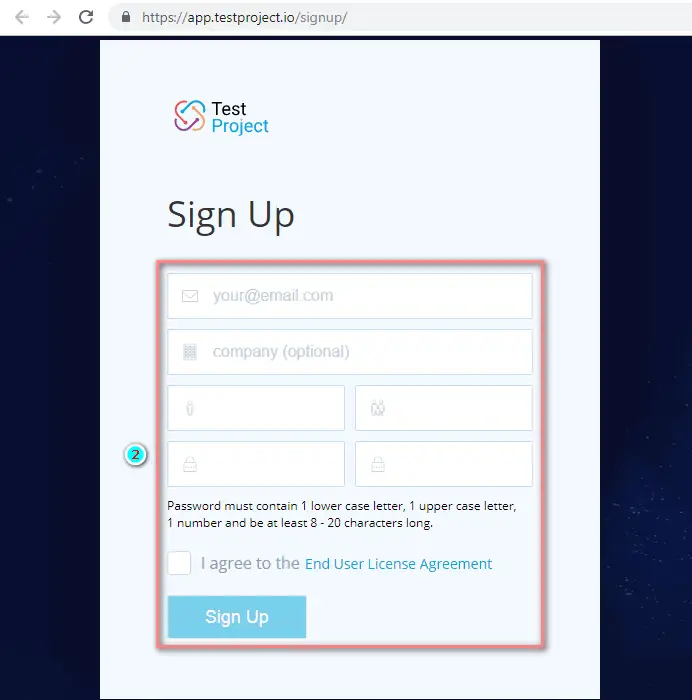
Step 2: Fill all the required details and click on ‘Sign Up’
Note: You will receive a Welcome email from TestProject and you will need to confirm your email address.. Once confirmed, you will receive another email that your account is ready and you can start using TestProject by simply signing in.
Next we will take a closer look at the TestProject Dashboard
TestProject Dashboard
Once you login, you can see a dashboard.
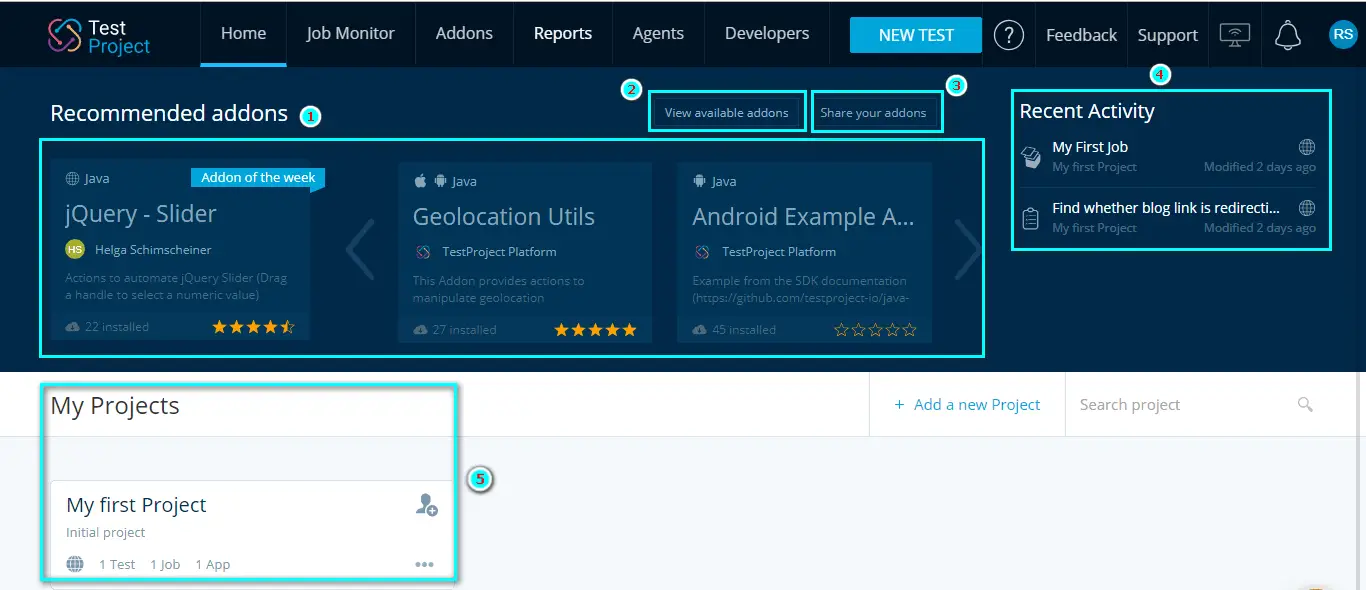
On the dashboard you can see the following
1. Recommended Addons
Here you can see recommended addons. One of the unique feature of TestProject is Addons. Addons are the reusable components that can be created and used by the entire community.
TestProject is driven by a community of developers that create and share addons. By using shared addons, you can save valuable time and enhance your tests with capabilities developed by fellow experts. You can also create your own addons and share them with other TestProject users or team members.
2. View available addons
You can see all the available addons by clicking on the link ‘view available addons’
3. Share your addons
If you have any addon you’ve developed and would like to share with the community then you can click on ‘Share your addons’ link and upload your addon.
4. Recent activity
Under the recent activity, you can see your recent activity details like the tests you have been running.
5. My Projects
In this section, you can see all your projects. Let’s learn how this TestProject test automation tool works. To move forward the first thing that we are going to do here is creating a new project.
Create a new Project
To create a new project we need to follow the below steps
We can create a new project by clicking the ‘Add a Project’ button.
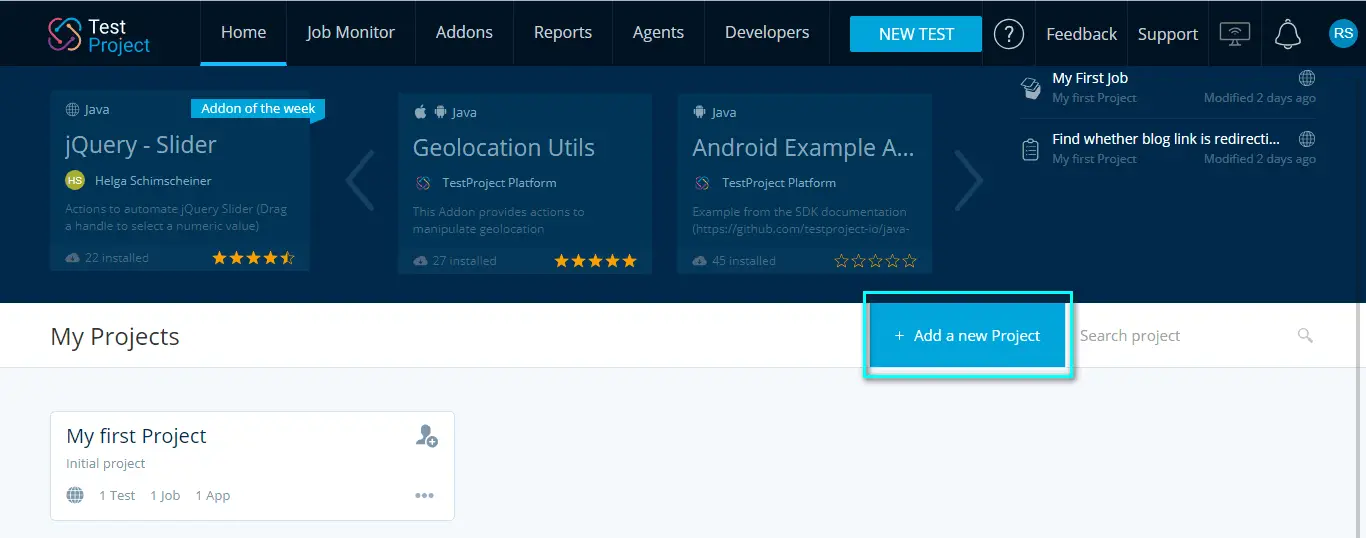
Click on ‘Add a new Project’
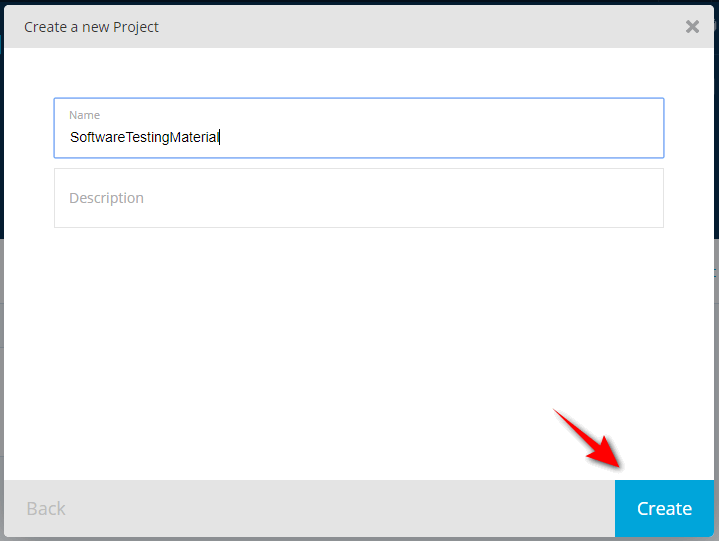
On the ‘Create a new Project’ modal dialog box, enter a Name and an optional Description of your project. After entering the required information, you can create a new project by clicking the ‘Create’ button.
You can give any name as your project name. Usually we give a project name as our application name. Here I am going to give my project name as ‘SoftwareTestingMaterial’.
SoftwareTestingMaterial is going to be my Project.
I have created a new project. Now, let’s move on and find out how we can add tests to our project. On the left-hand side, you can see a test pane. Here we can create different folders to organize our tests.
Here I am going to create a new folder. Click on ‘New Folder’.
Create a new Folder

I am going to create a new folder named ‘Regression Tests’. We can create a new folder by clicking on ‘Add’ button
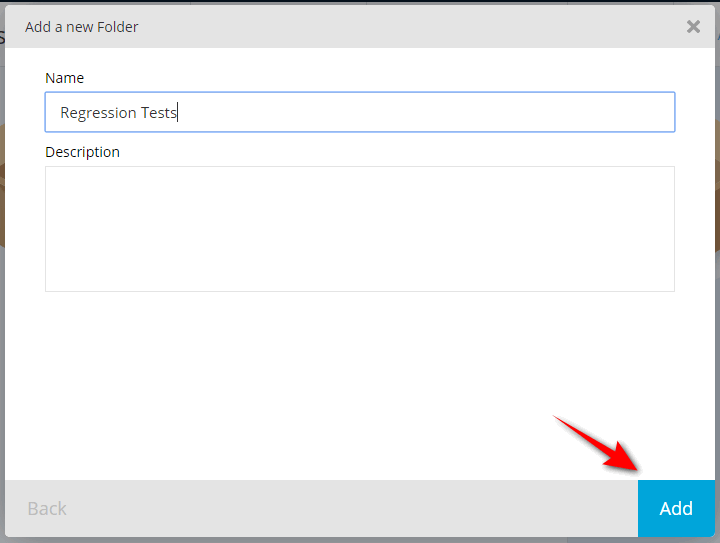
Now, we have a folder ‘Regression Tests’. So let’s add some tests.
Create a new Test
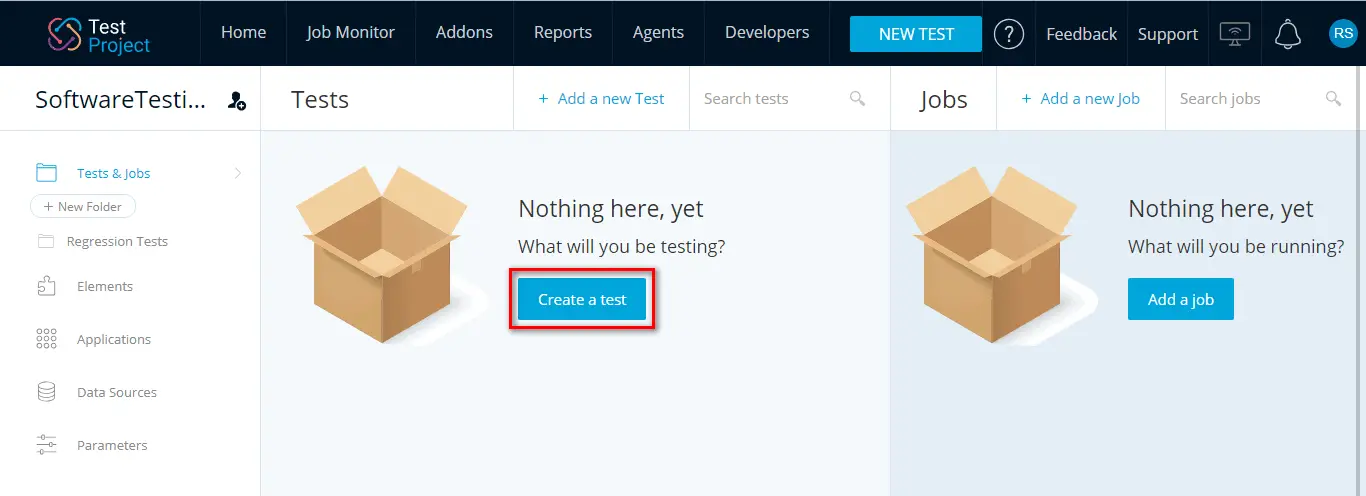
Click on ‘Create a test’ to add new test to a project.
Note: You can also click on the ‘NEW TEST’ button that is visible on every page
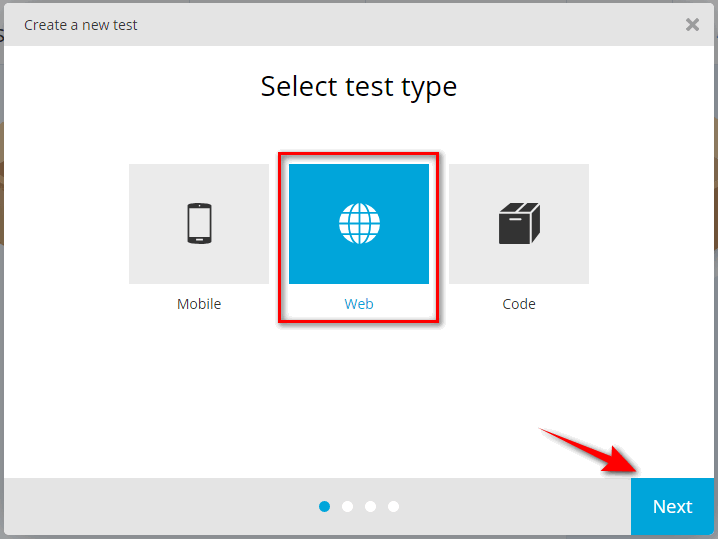
Once ‘Create a new test’ wizard opens, you can see multiple options that you can select from. We have to specify the type of the added test (say mobile, web or code) and the project that contains the added tests.
Here I am going to choose ‘Web’.
To proceed to the next step, click on ‘Next’ button
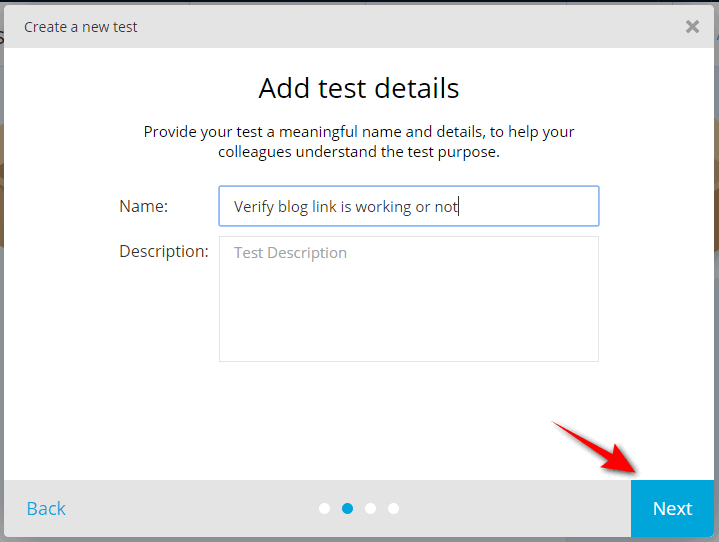
You can give your test a name and optional description here and click on the Next button.
Here I am going to choose a test case to validate the blog link of my application shows the appropriate text.
Here you can choose
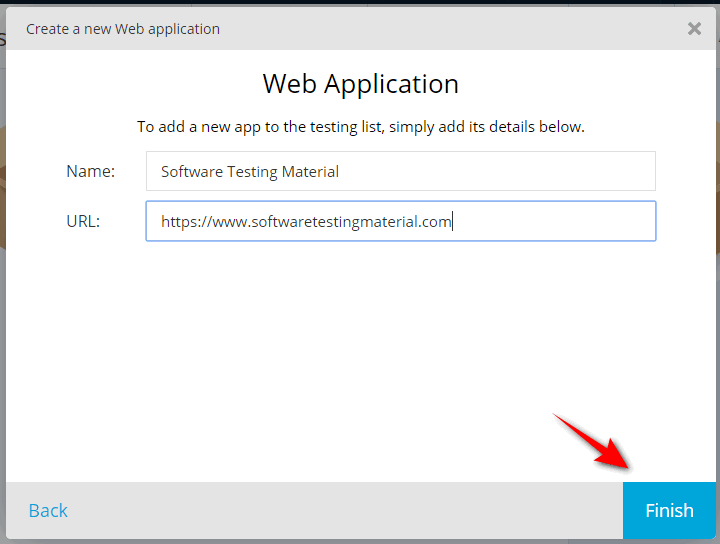
I am going to add a new application ‘Software Testing Material’ and passing my application URL
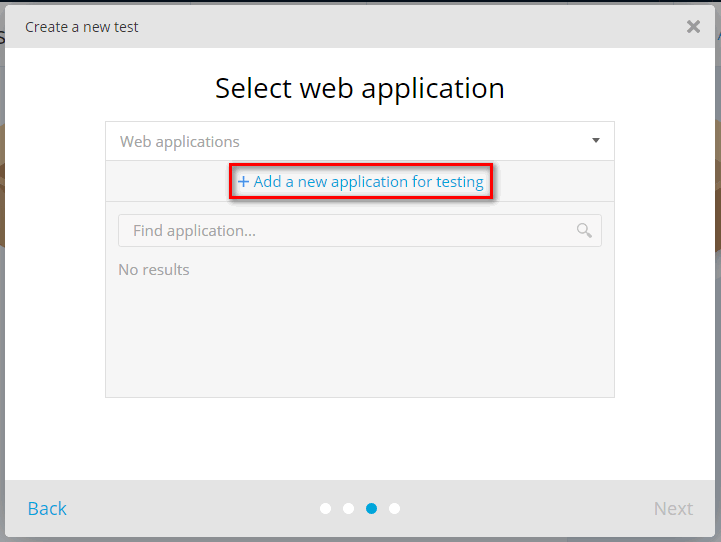
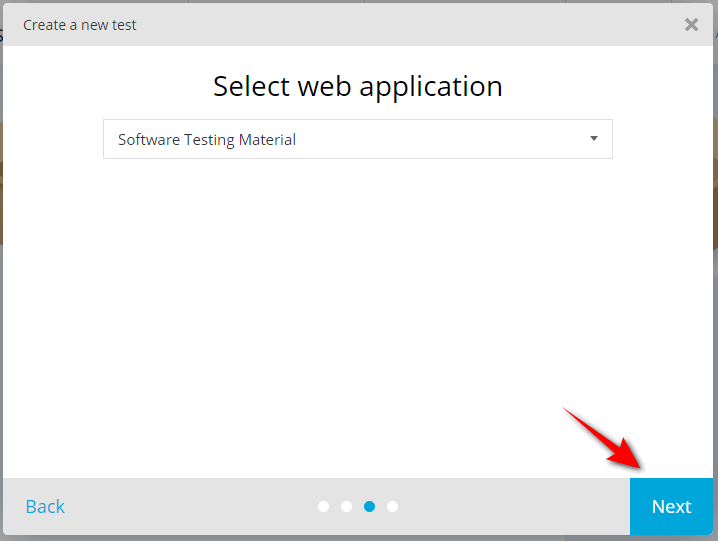
Finally selecting the application which I have added
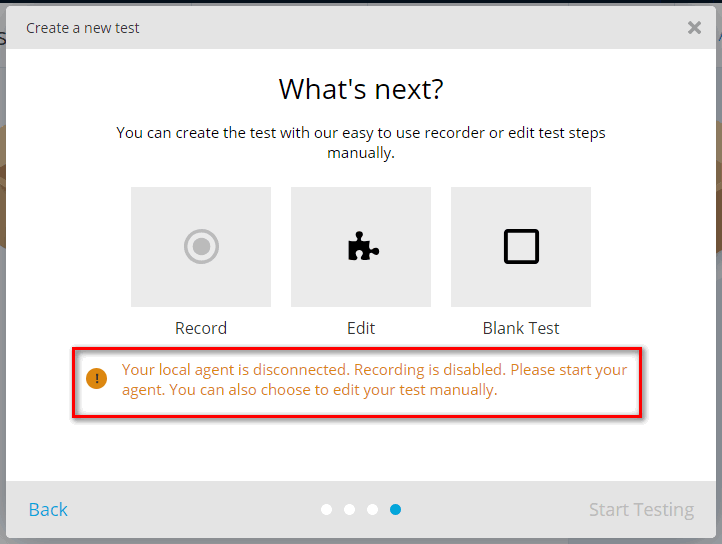
Here I am going to create a new test using Record option.
It is showing a message that my local agent is disconnected and recording is disabled.
To record tests, we need to get an agent up and running.
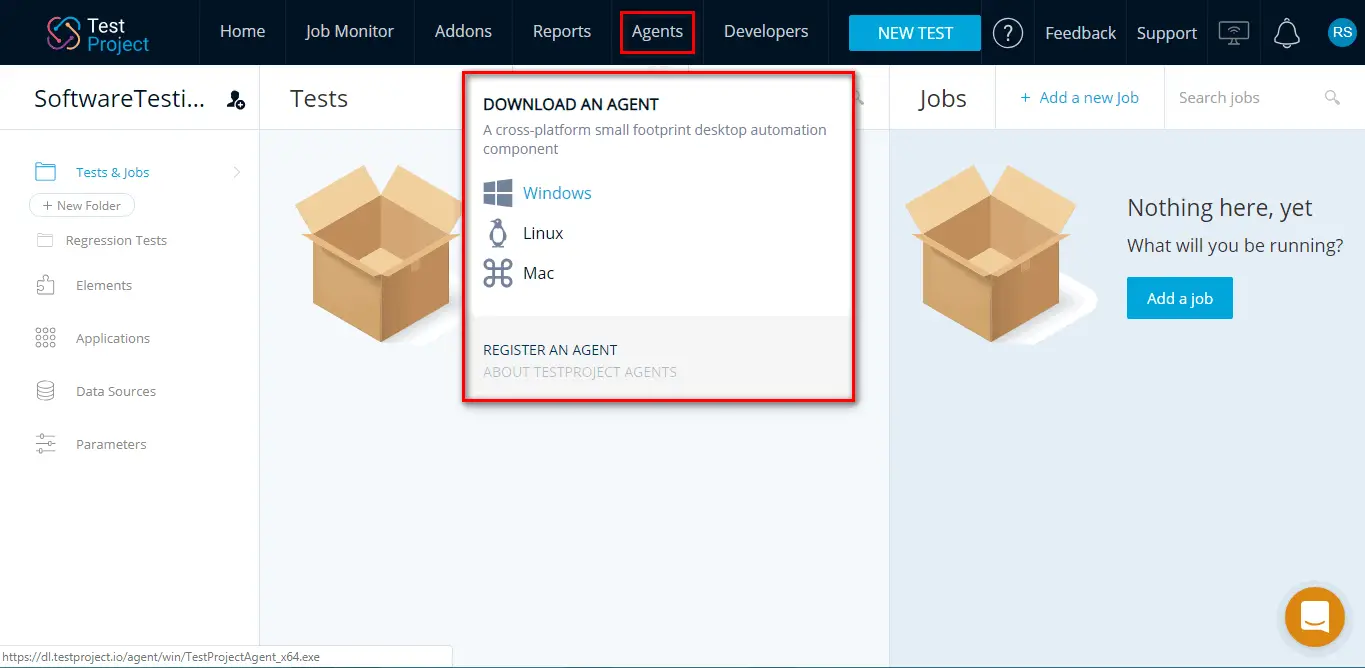
IMPORTANT NOTE: You have to download the agent and install it before you begin. Click on the executable file to install the TestProject Agent from the “Agents” tab. It will take you through the installation process.
You can use it for Windows, Linux or Mac. I selected Windows because I am using a Windows machine.
When the agent is finished installing, you have to start the agent. So that the agent starts running in the background.
Once you’ve installed your agent on your local system, you have to register your agent.
Go to “Agents” and you can actually select an agent to you or you can add an agent
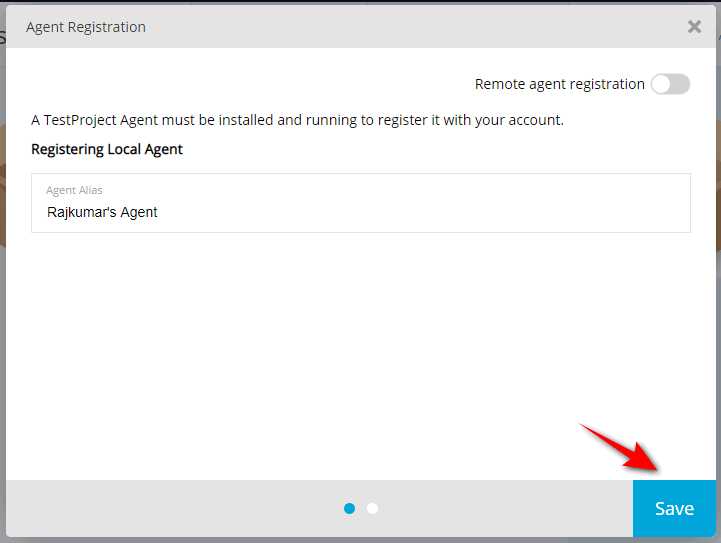
Here I am going to pass my Agent name ‘Rajkumar’s Agent’
Add an agent name and save it
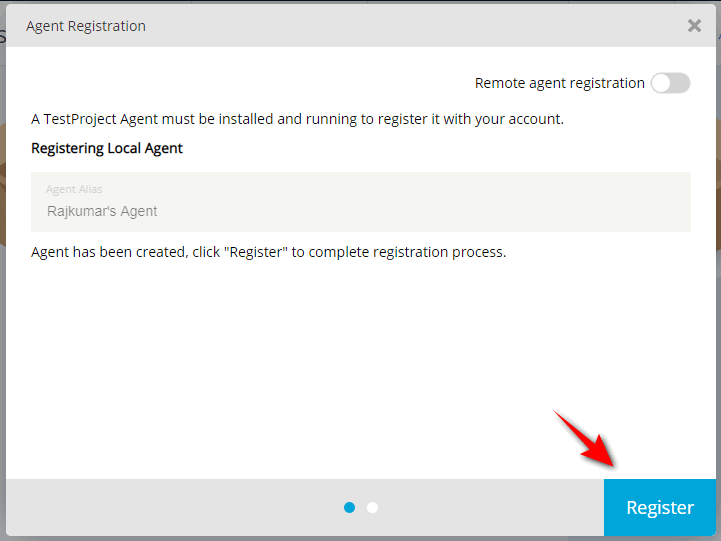
Once the agent has been created, click ‘Register’ to complete registration process
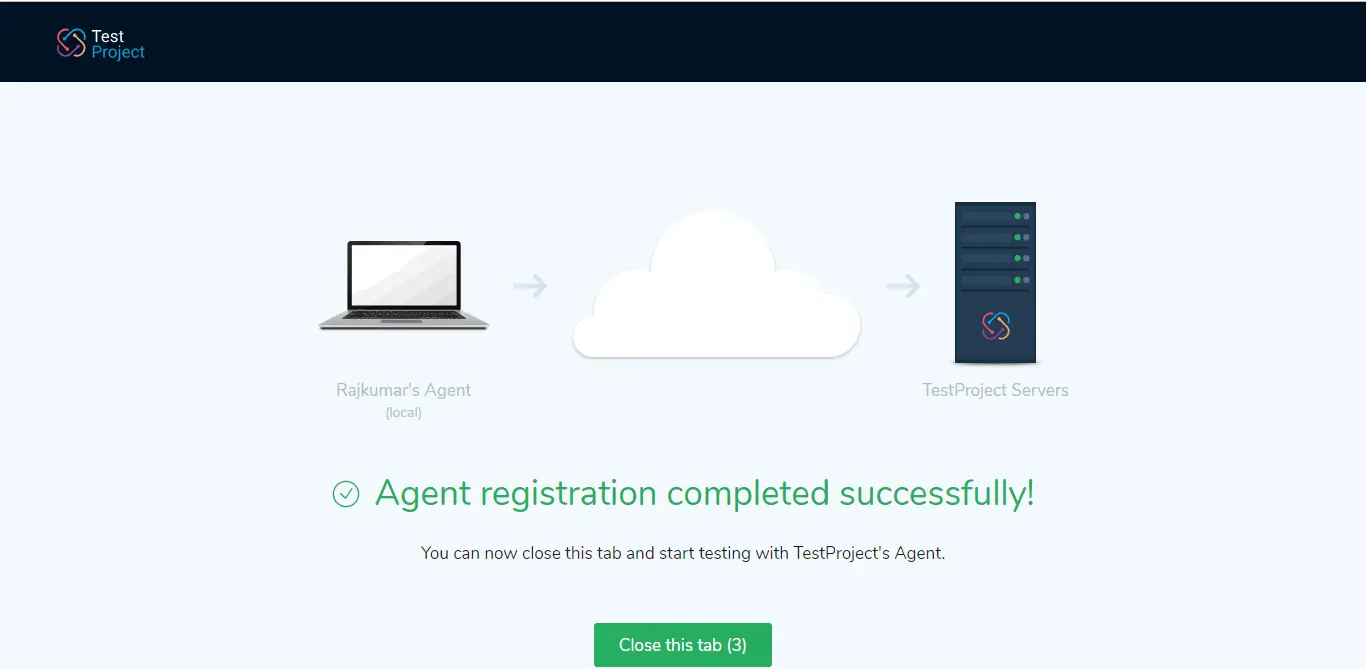
You can see here the agent registration is completed successfully. So, now there is an agent on my local machine.
The agent (windows) is available under All Agents list and it is in idle status.
Now that we can finally create a new test.

Now I will show you how to record an automated web test (but of course you can also automate mobile tests and even create coded tests using TestProject’s SDK).
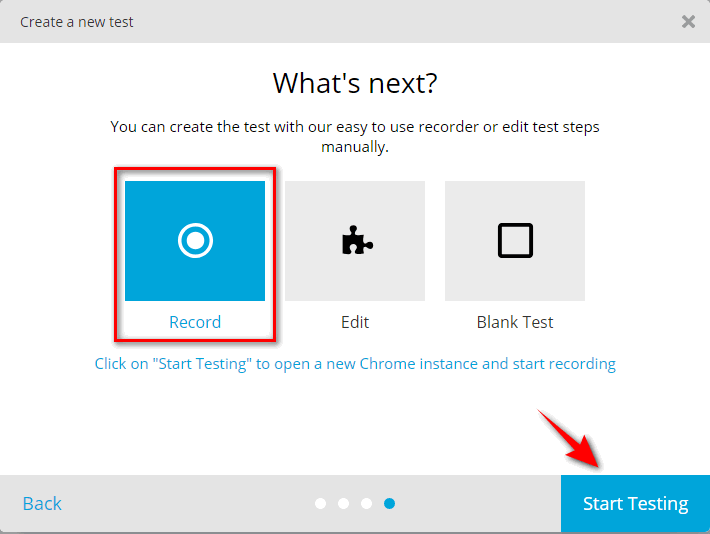
Now, I have the option to record a new web test. I choose ‘Record’ and click ‘Start Testing’
You can see here that our windows agent (Rajkumar’s Agent) pulled up a new chrome window.
On the left hand side, you can see the recorder. Whatever actions we perform here, the recorder just records and shows the steps.
Once we start recording, it opens our application (https://www.softwaretestingmaterial.com)
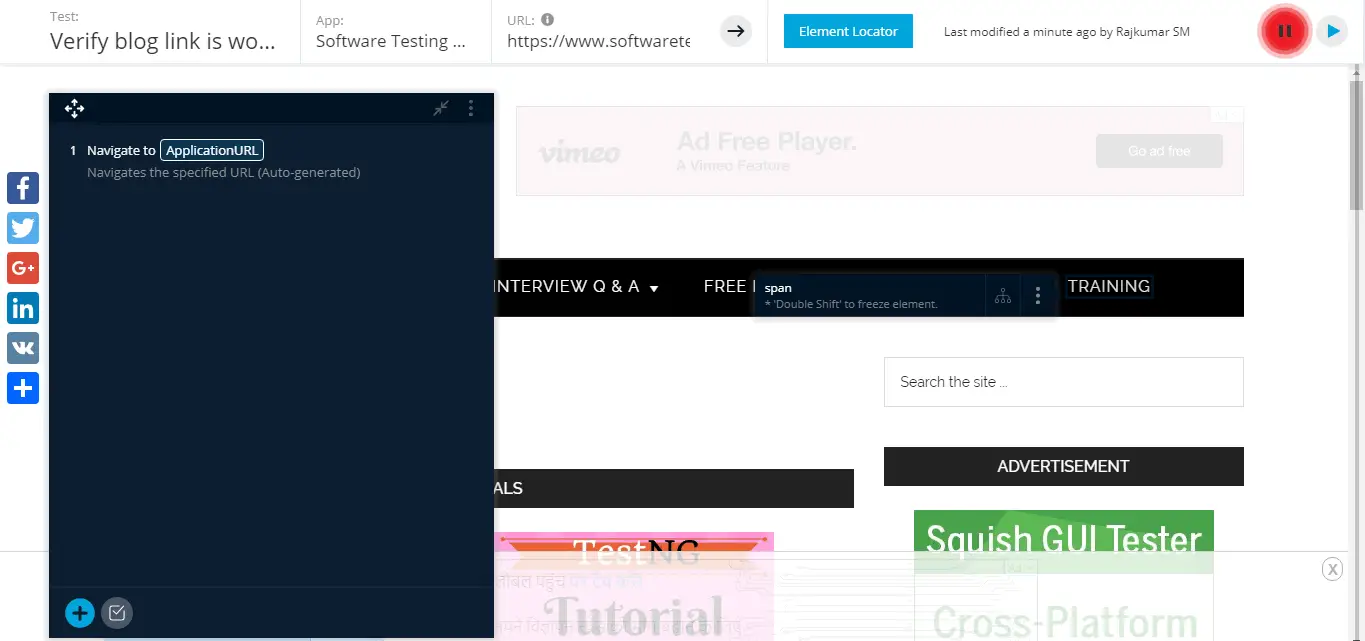
Hovering on an element and you choose any action based on your requriement.
If we hover over any element, we can see a black box surrounding it, and if we click double shift then it will freeze the element inspector which enables us to choose from various actions, set validations, view locator strategies and save elements.
Here I am going to click on the Blog link. Once I click on it, we can see that there is a step added in the recorder.
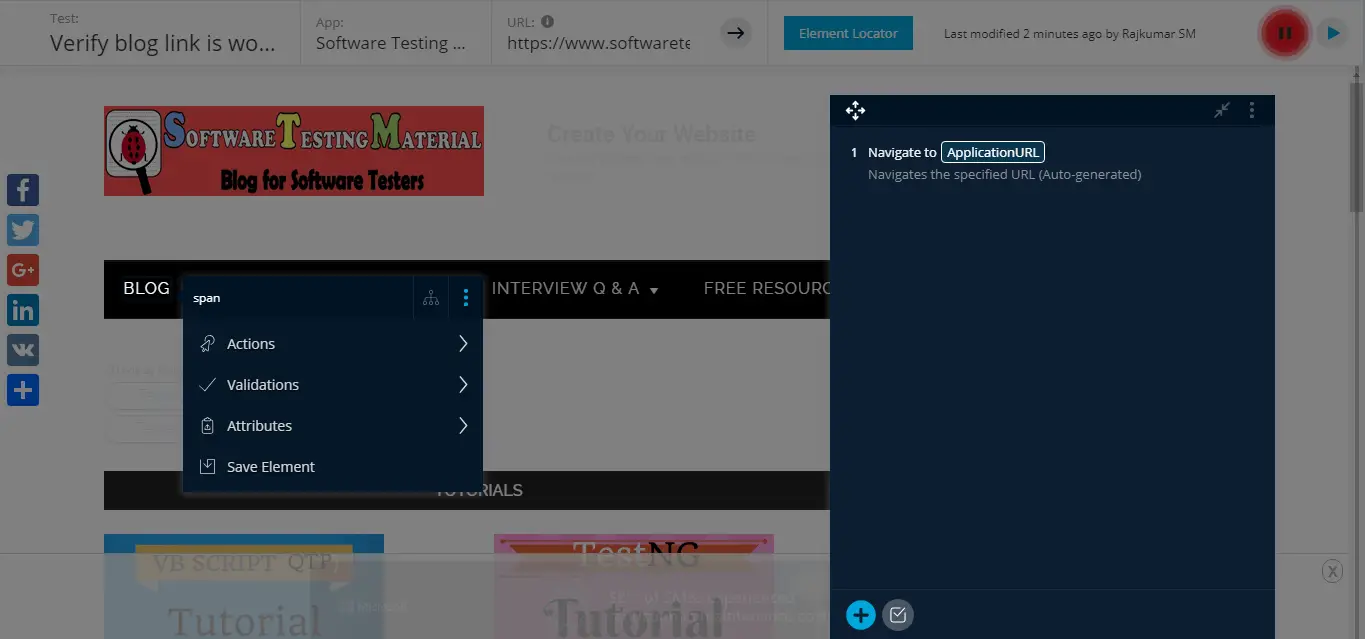
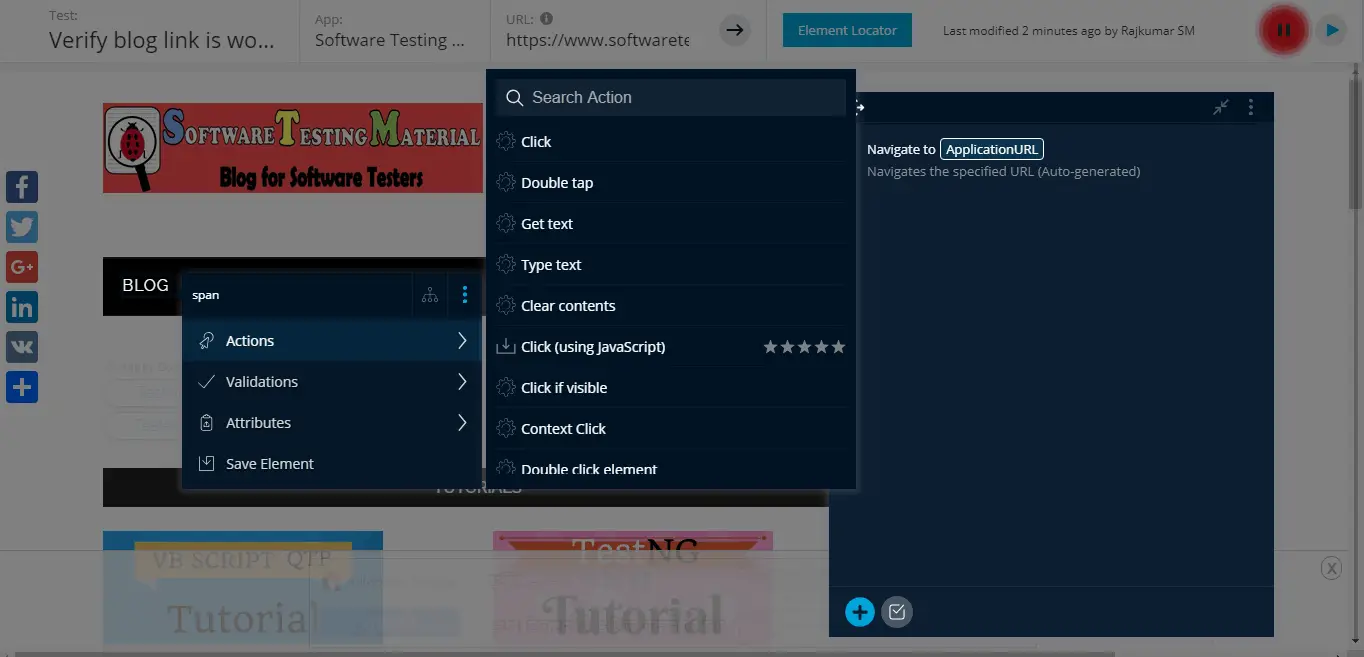
Here I am going to choose Action – Click
Following image illustrates some of the list of Actions available
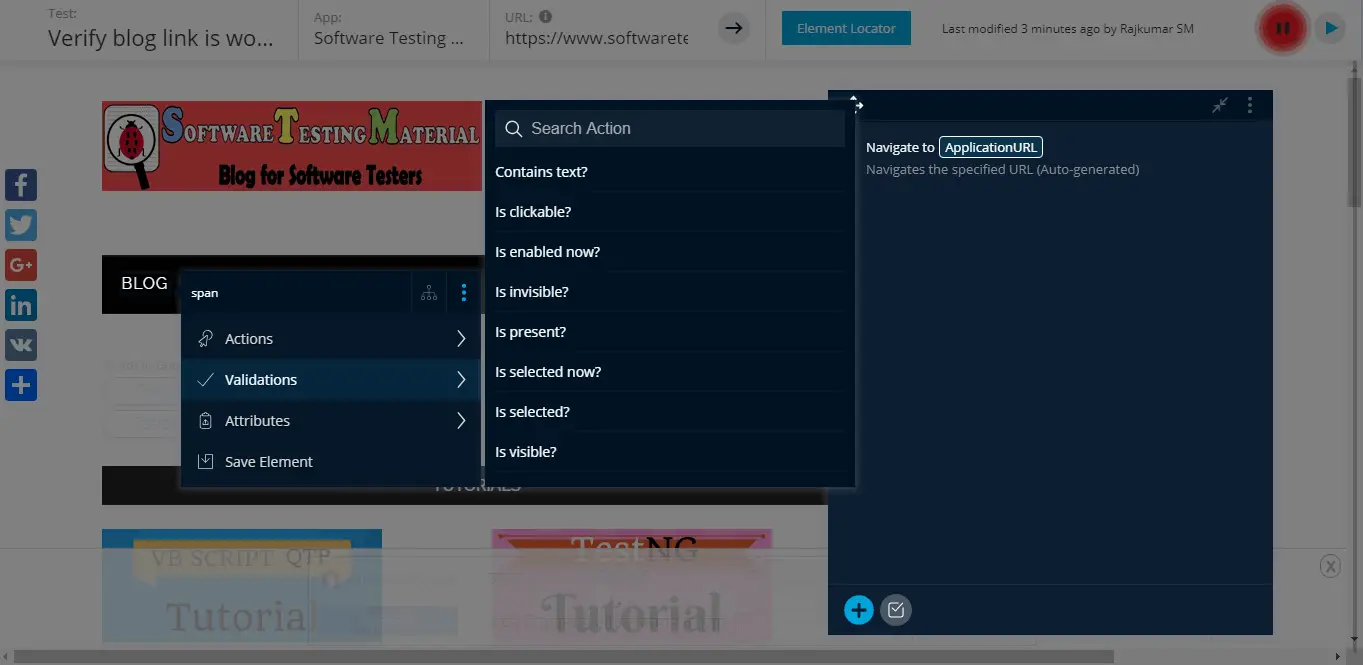
Following image illustrates some of the list of Validators available
Following image illustrates some of the list of Attributes available
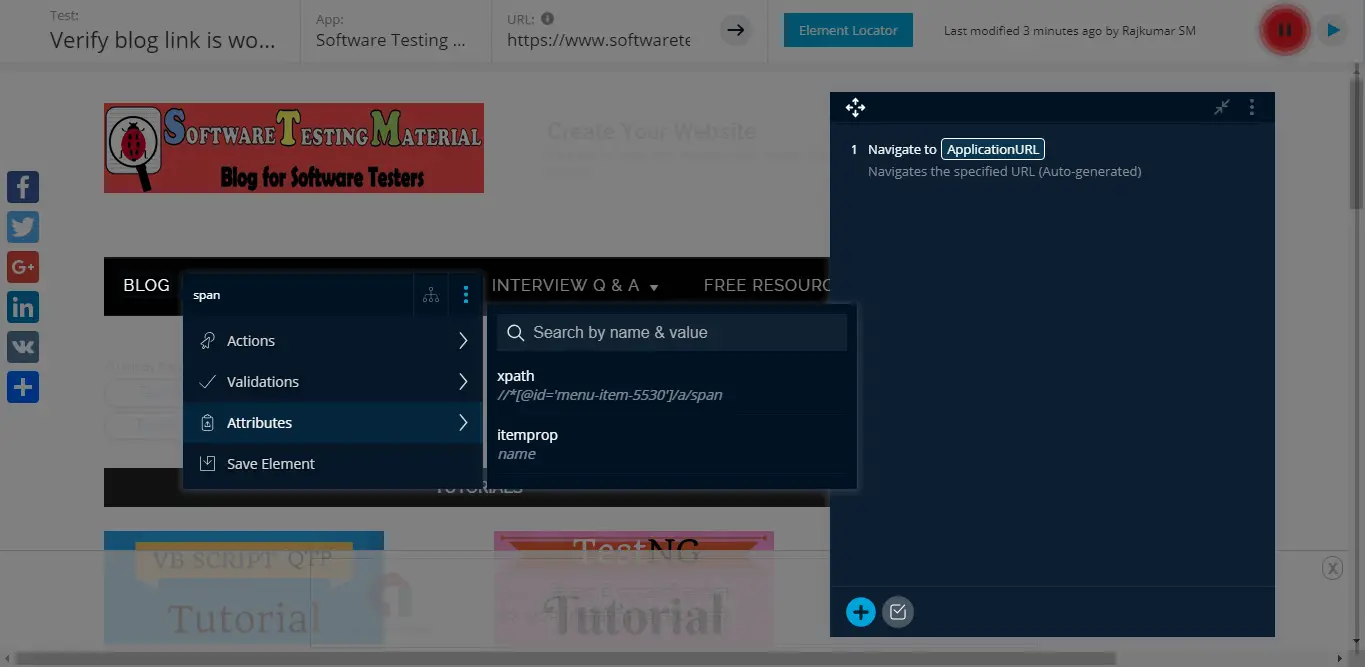
Note: Here you can set timeout, validations, add comments and many more.
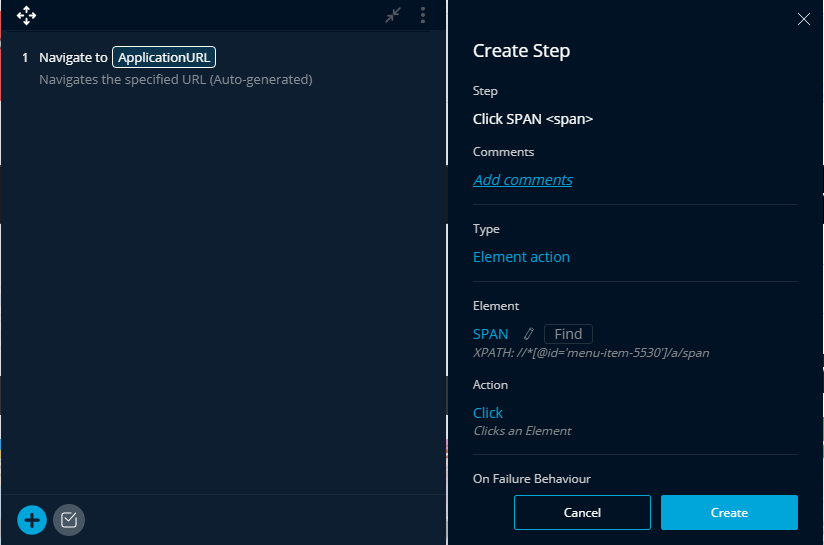
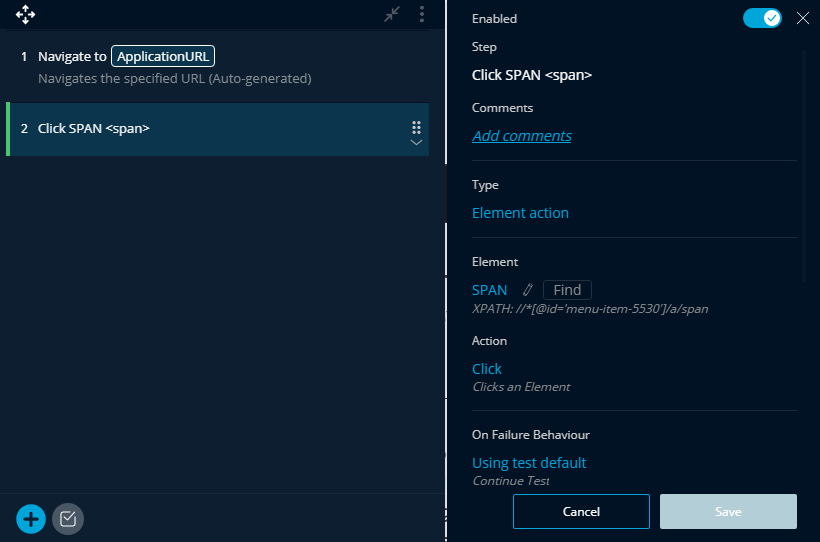
I am going to click the ‘Blog’ link. You can see the step added in the recorder.
I am going to validate the blog page’s first post title
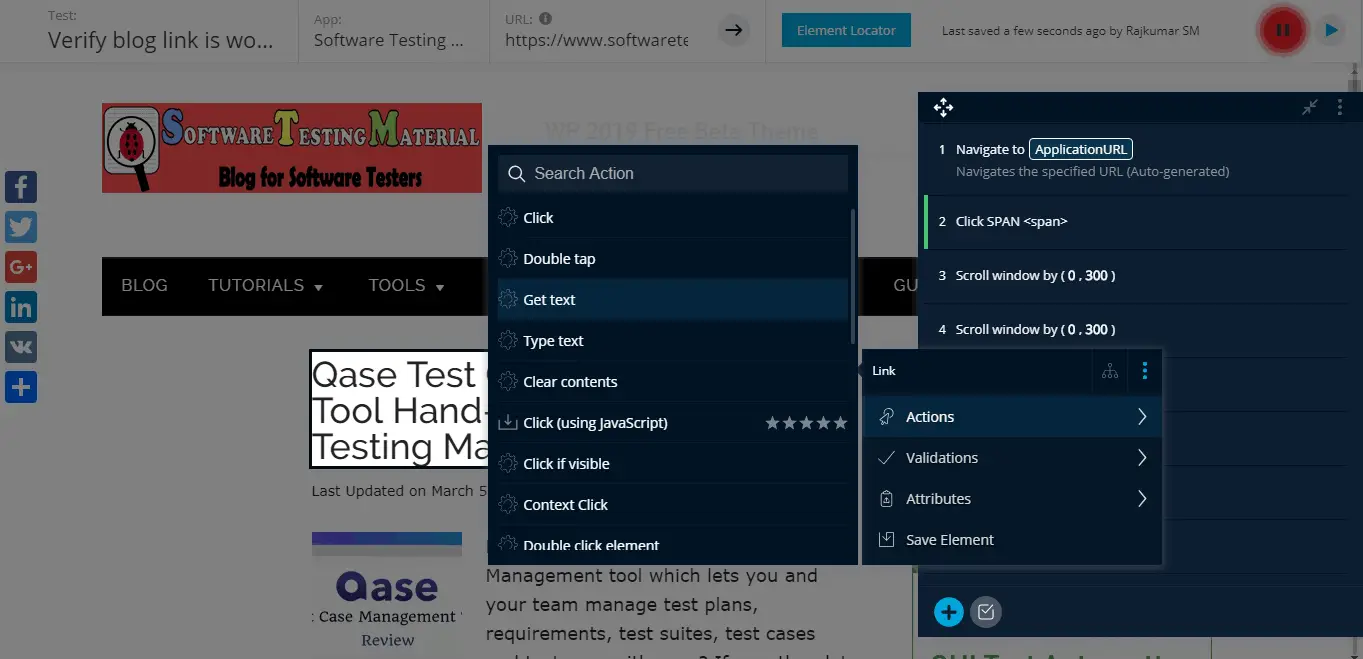
Here I am going to add a validation step
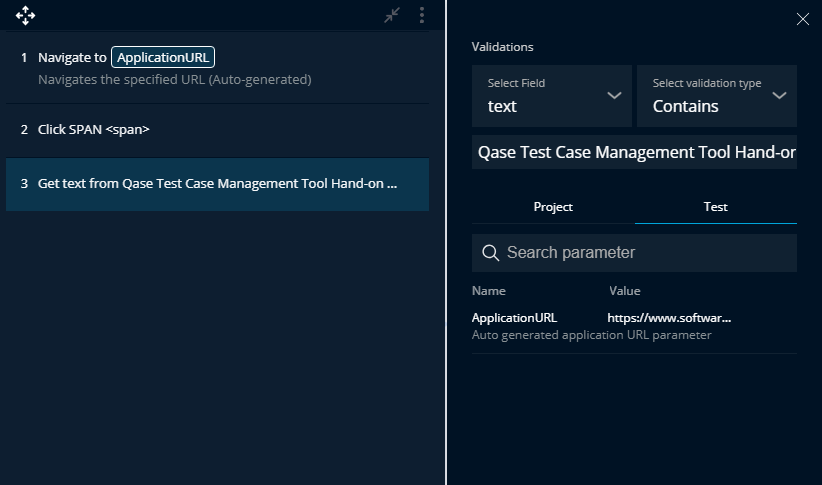
Once the test is complete, we have to pause it and close the window.
Note: Just do replay to see how the recorded test runs. Here I am in the
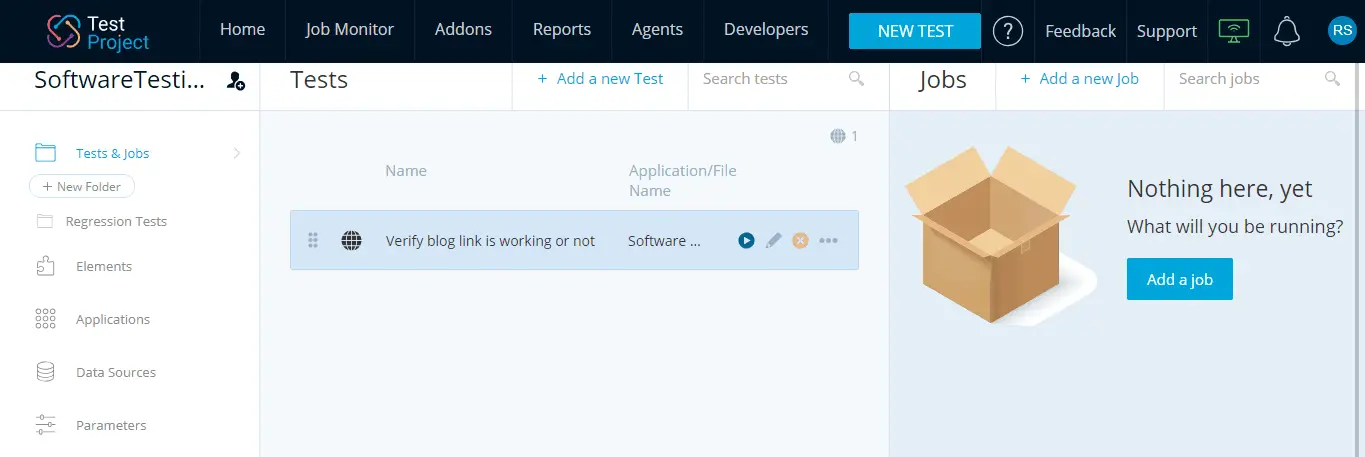
Here we can edit this test. We can modify the steps right here. Once we are done with our modifications, we can save and exit.
To execute the test, simply click ‘Execute’ button
You will be asked to provide either desktop or mobile and choose the browser.
Here I am going to choose Desktop and Chrome Browser
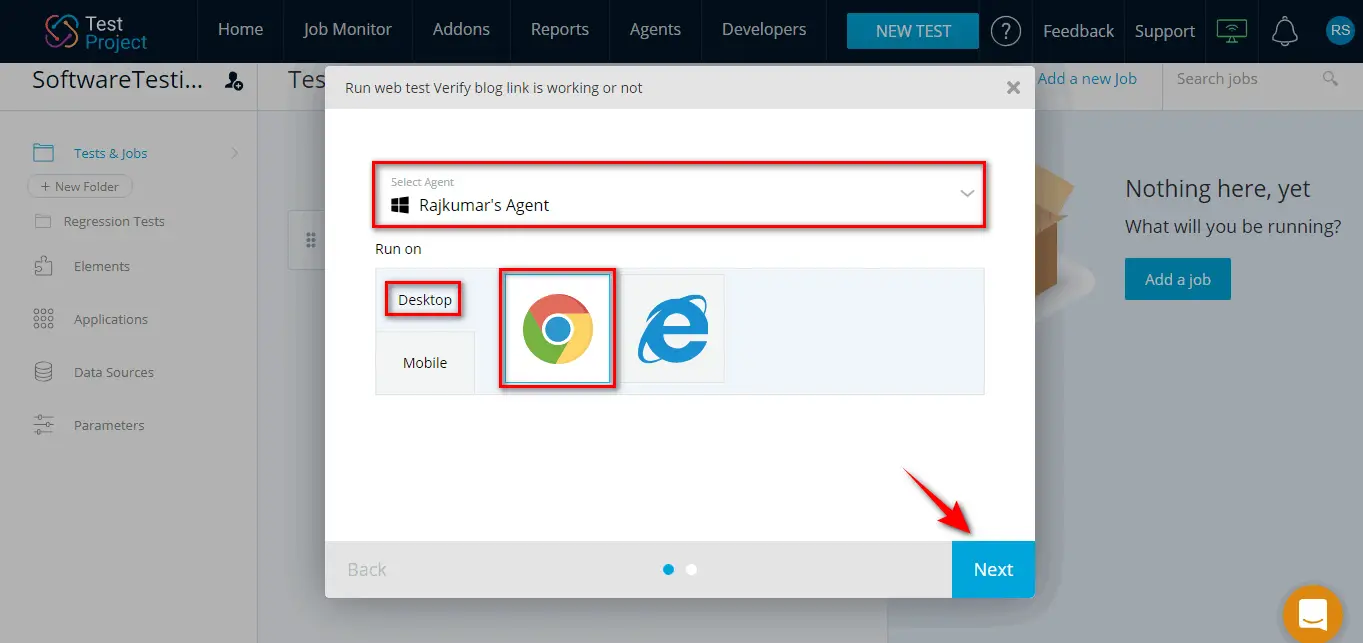
There is no change in the application URL.
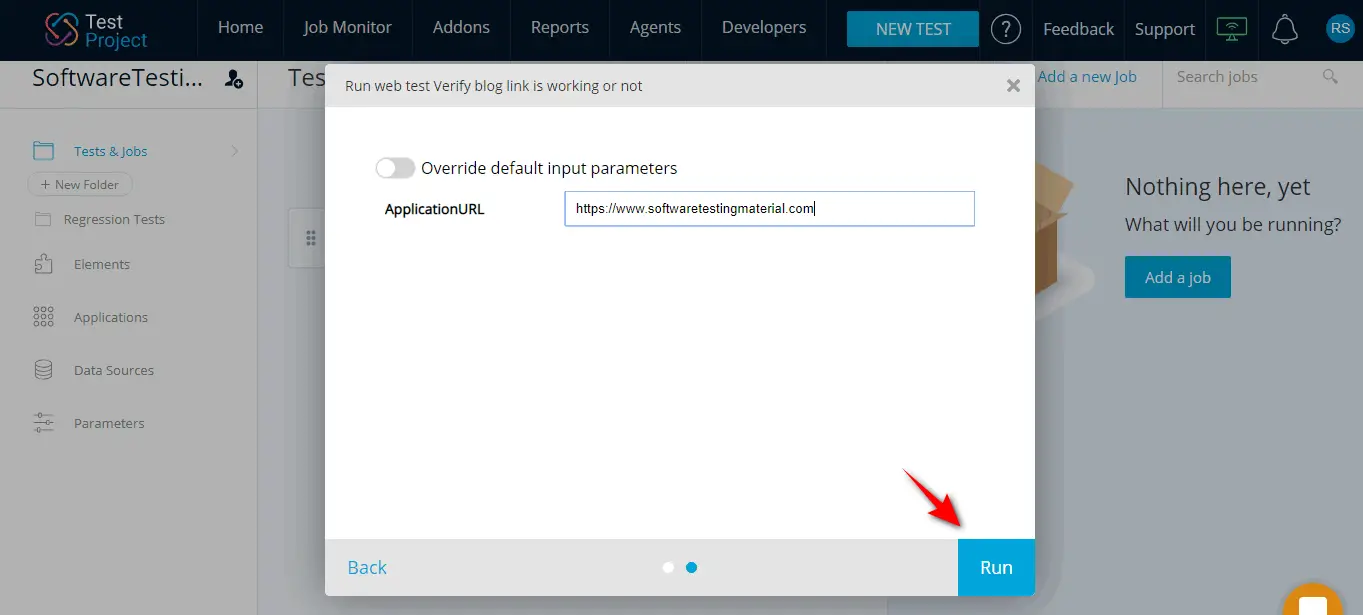
Our test is running. Once it is done you can see reports.
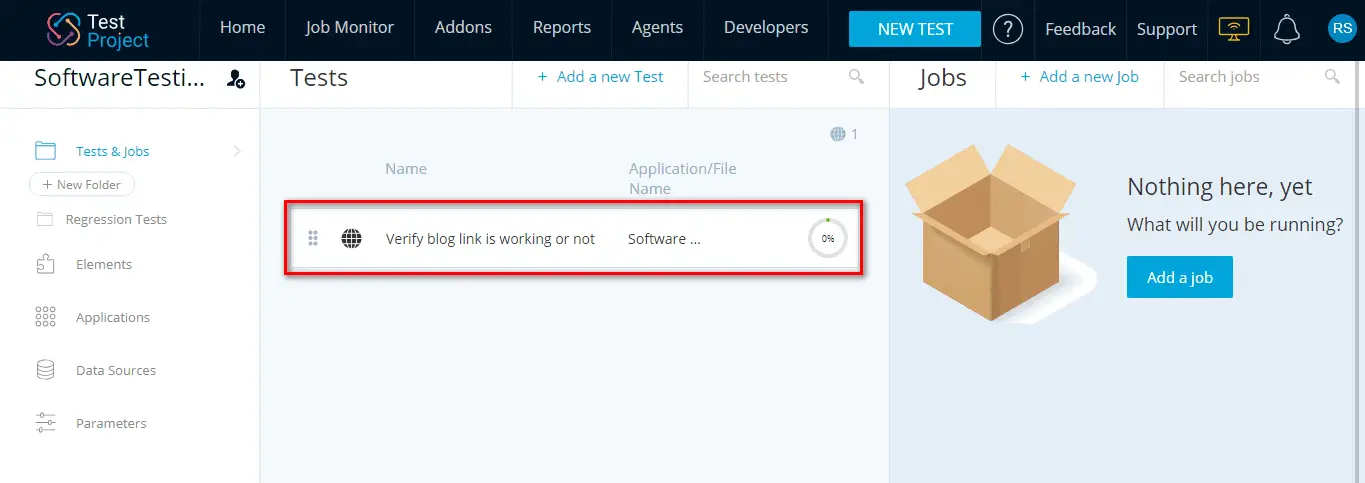
Now our test was executed. Let’s see the reports.
View test results in TestProject
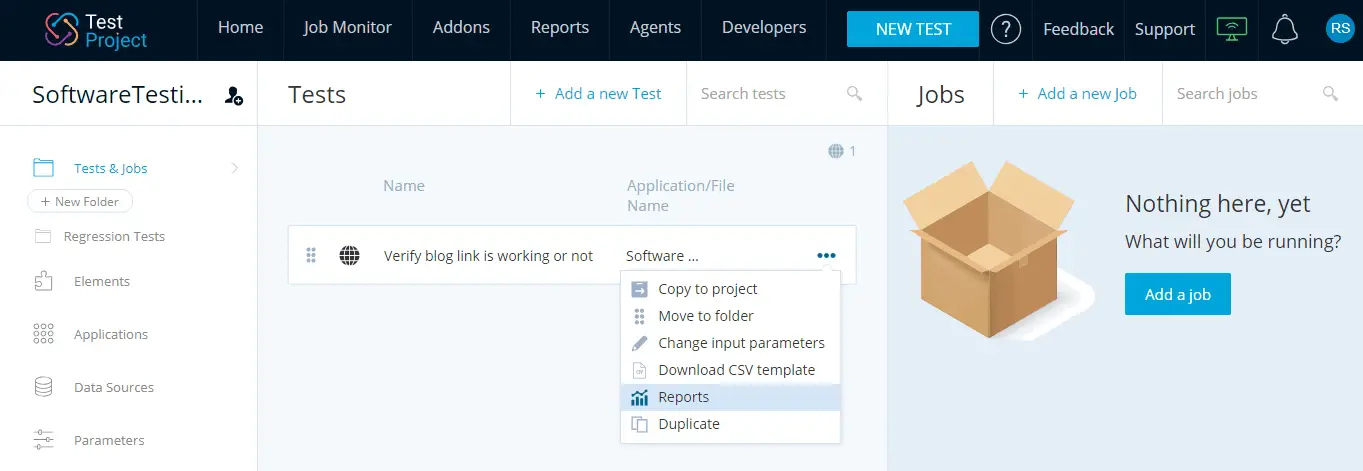
To check the results of a test case, we just click on these ellipses and choose required option out of multiple options. Here I am going to choose ‘Reports’ option
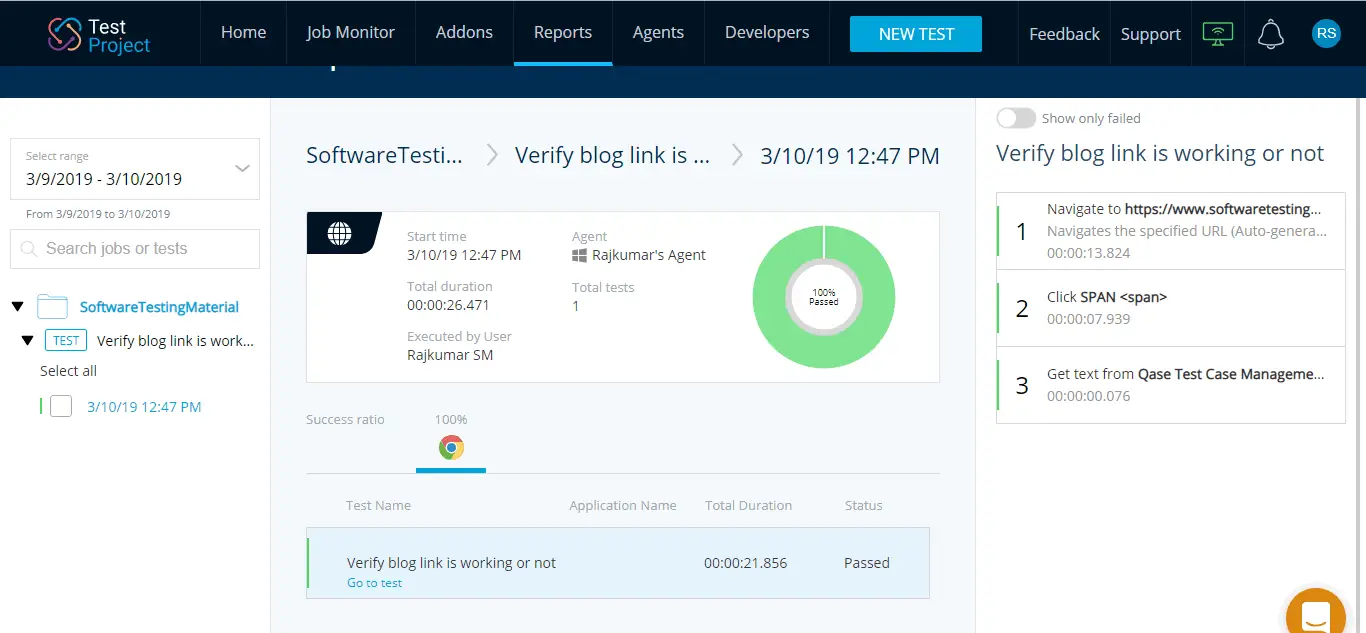
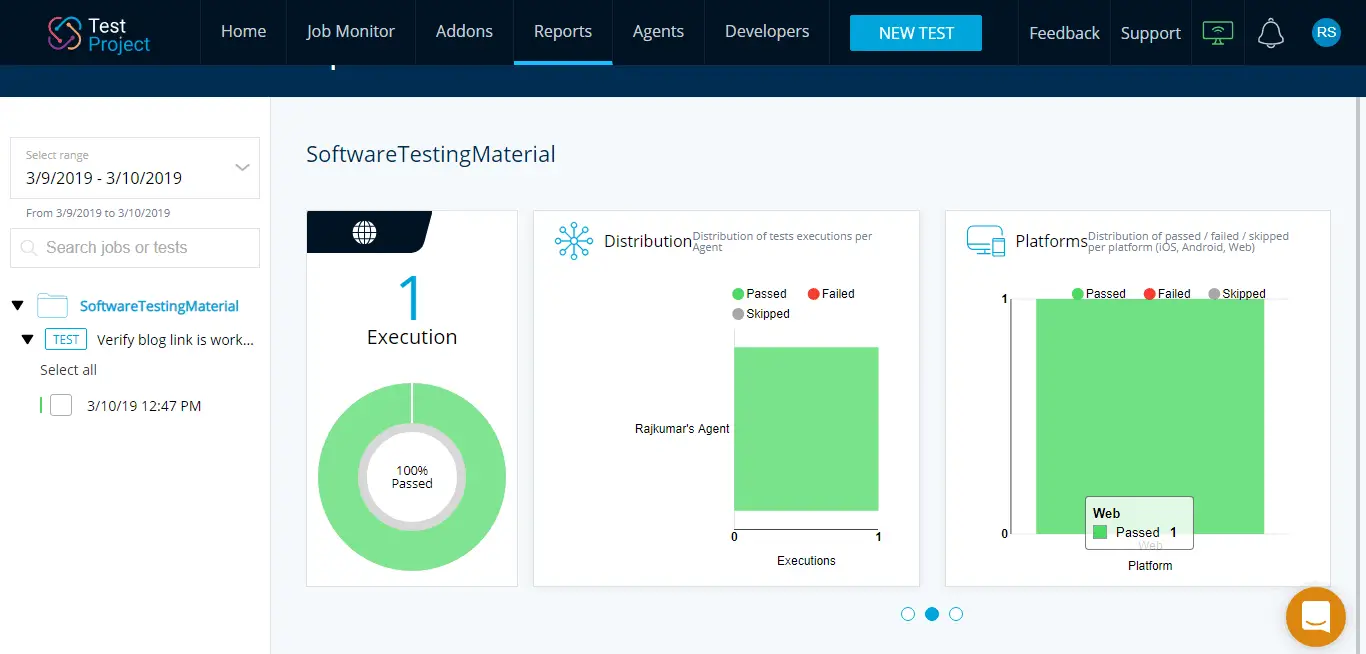
In the repots, we can see the data like when the test case was executed, how long it took to complete, status of the test case whether it is passed or failed, test percentage, environment details etc.,
Here we can see reports of the entire project.
There is a velocity graph here. It shows us when tests were executed and their test status.
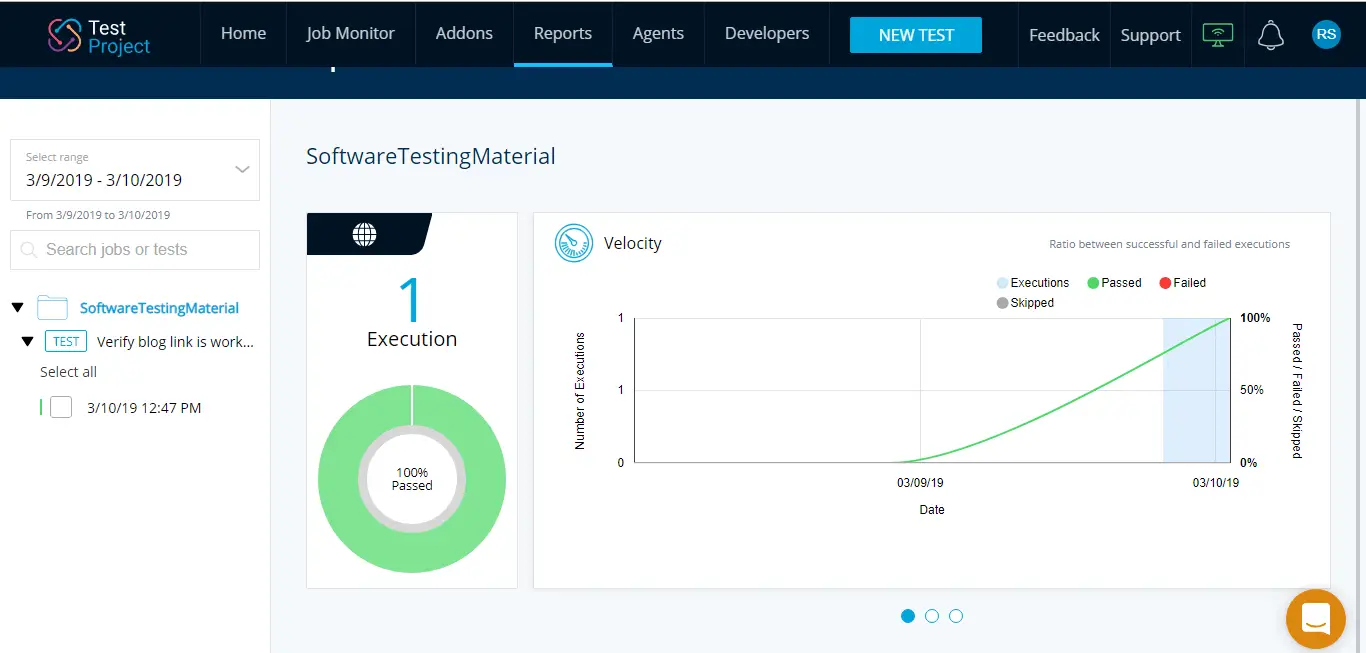
You can also see different reports like distribution of test execution across various agents in your project, testing trends, and execution platforms.
If you want to add the test cases in different test suites like Regression, Smoke, Sanity etc., You can do those by moving test cases to an appropriate folder.
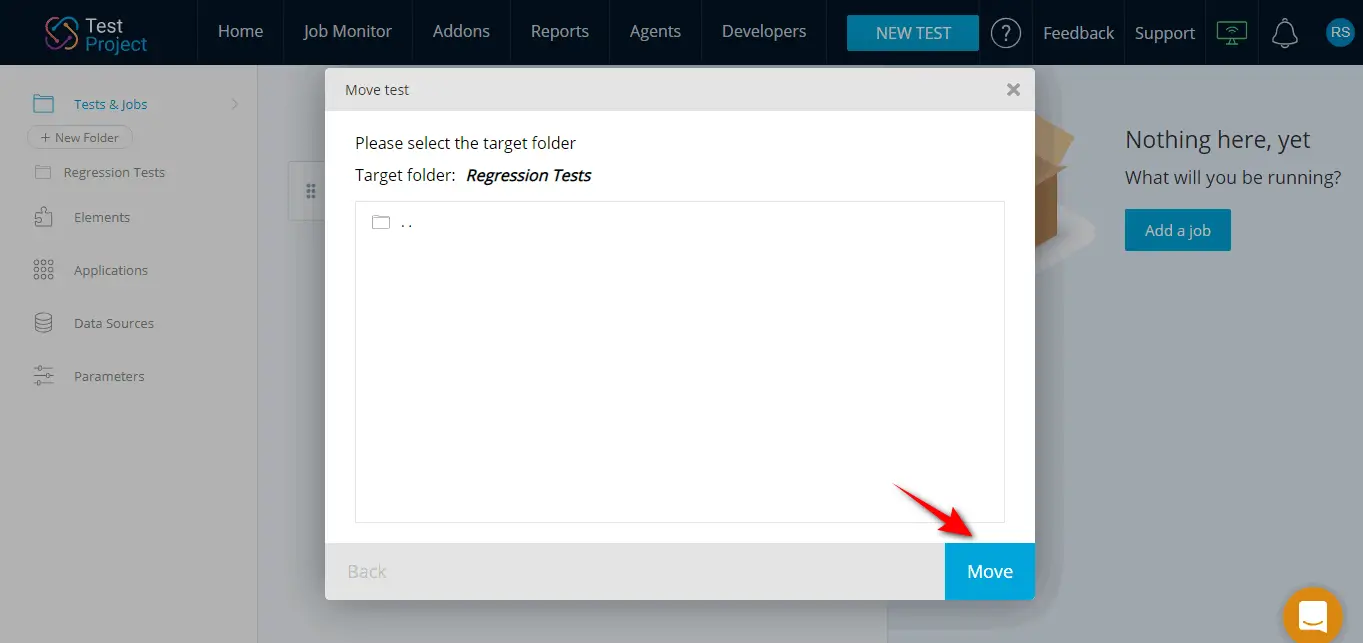
Earlier we have created a folder named ‘Regression Tests’
If we choose an option (Move to folder), you can easily move tests to the required folder.

Creating a new job in TestProject
Let’s see how to create a new job using TestProject. It enables you to run your test automation on any agent that is connected with your account, and on multiple browsers and devices.
To create a new job, click the ‘Add a new job’ link

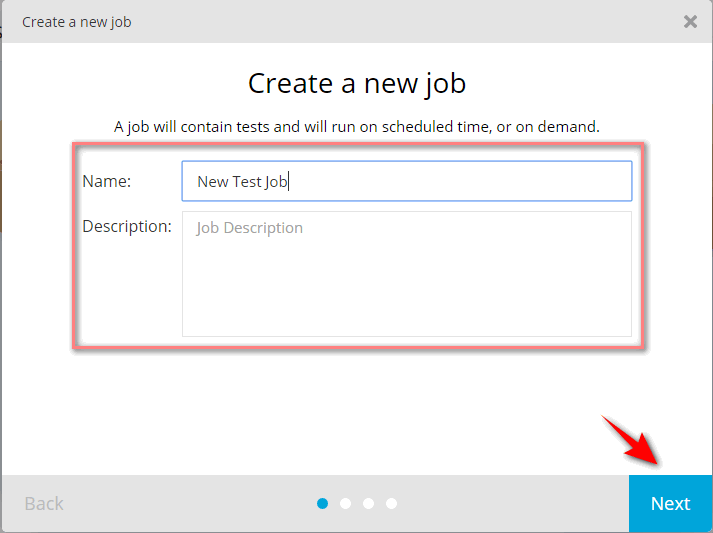
I am going to create a new job by providing a name and an optional description of our job. Click on the ‘next’ button to proceed to the next step.
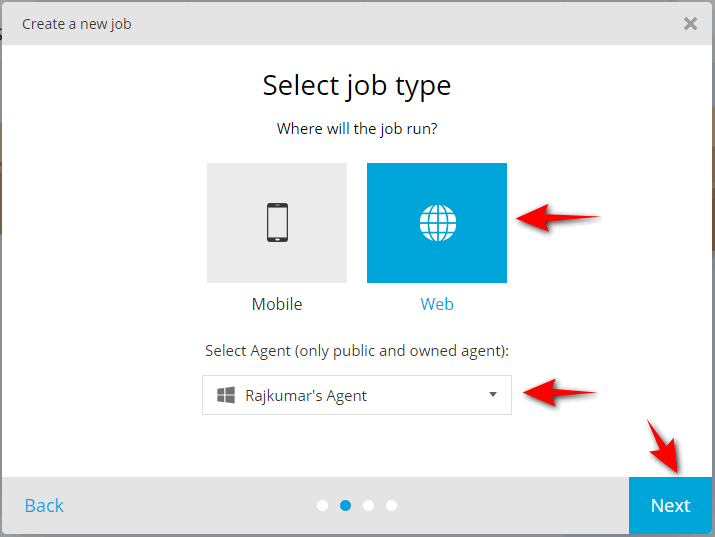
In the next step, I am going to configure the execution environment of our job.
Here I am going to choose ‘Web’ and the agent ‘Rajkumar’s Agent’ and clicking on the ‘Next’ button
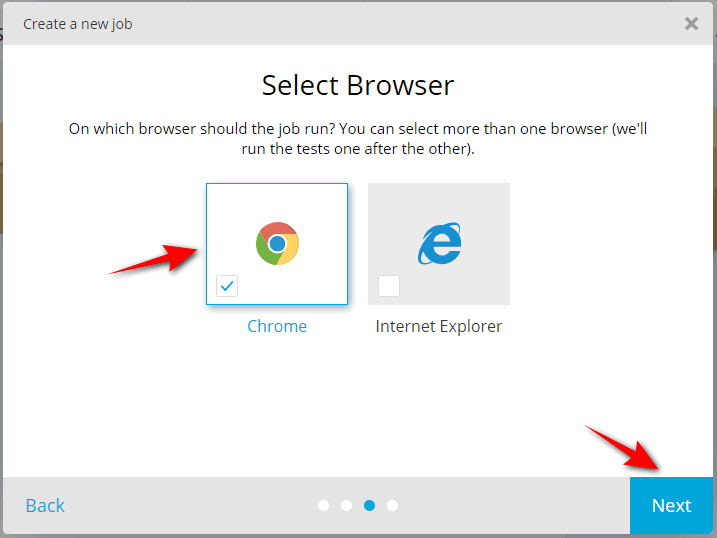
In the next step, I am going to select the web browsers to run our tests.
Here I am going to choose ‘Chrome Browser’ and clicking on the ‘Next’ button. It’s important to mention that I can choose to execute the job on multiple browsers. In this case, I have installed on my machine only Chrome and IE, but TestProject also supports Edge, Safari & Firefox browsers.
In the next step, I am going to schedule the job.
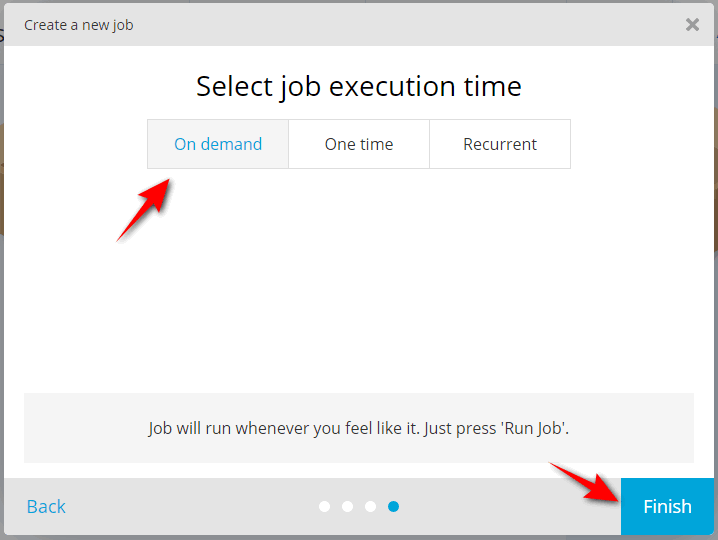
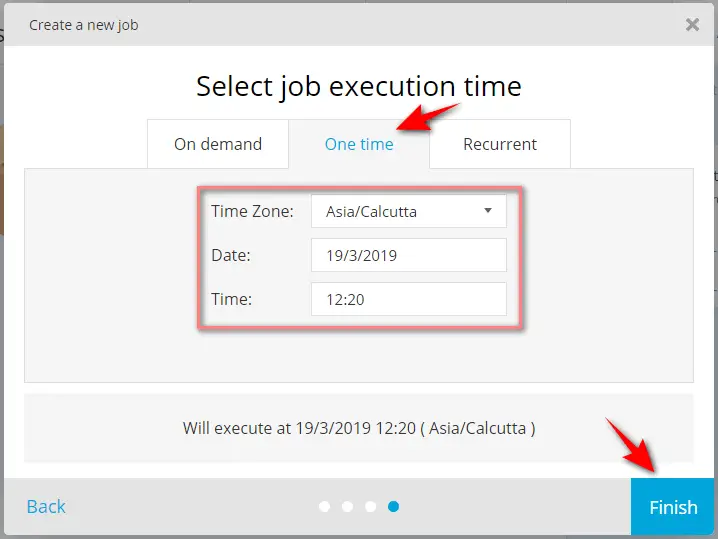
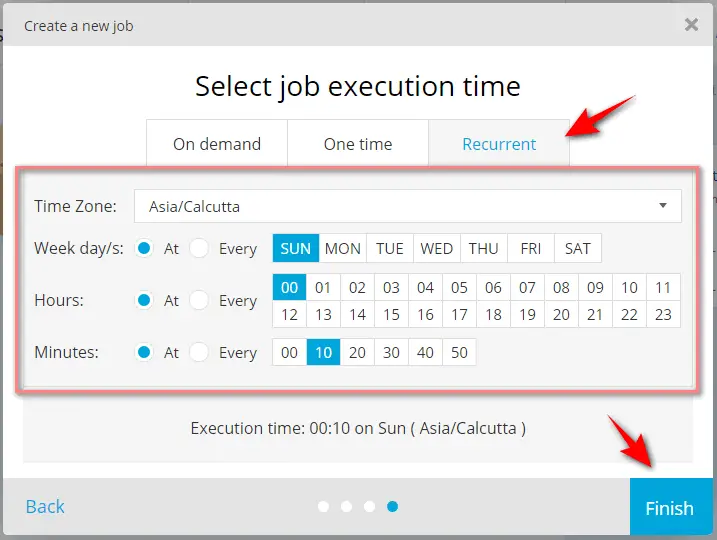
Here we have three options such as ‘On demand’, ‘One time’, and ‘Recurrent’.
On demand job:
This means that your job will run whenever you want it to, by simply clicking the “run” icon. To create a job on demand, we have to select the ‘On demand’ option and click on the ‘Finish’ button
One time job:
To create a job that will run only one time, we have to select the ‘One time’ option and schedule it by providing information like Time Zone, Date and Time, and finally click the ‘Finish’ button
Recurrent job:
To create a recurrent job (to run at a specific time), we have to select the ‘Recurrent’ option and schedule it by providing information like Time Zone, Weekdays, Hours and Minutes, and finally click the ‘Finish’ button
The job we added will be listed in our project page.
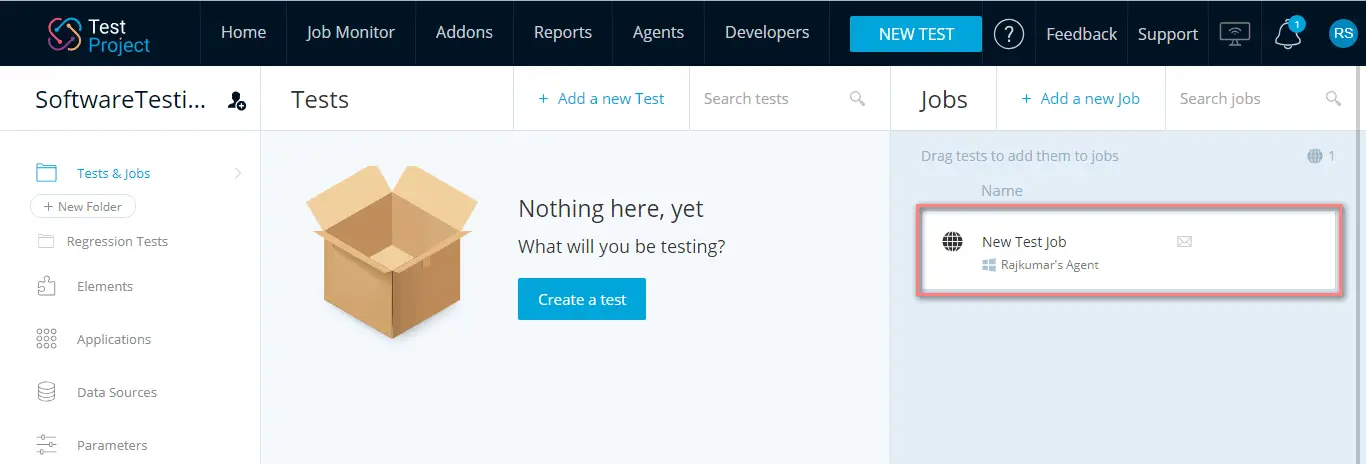
Now we have to configure the tests which are invoked when our job is run.
To do this, we have to open the ‘Tests’ view and add the invoked tests to our job. We can drag the tests to our job.
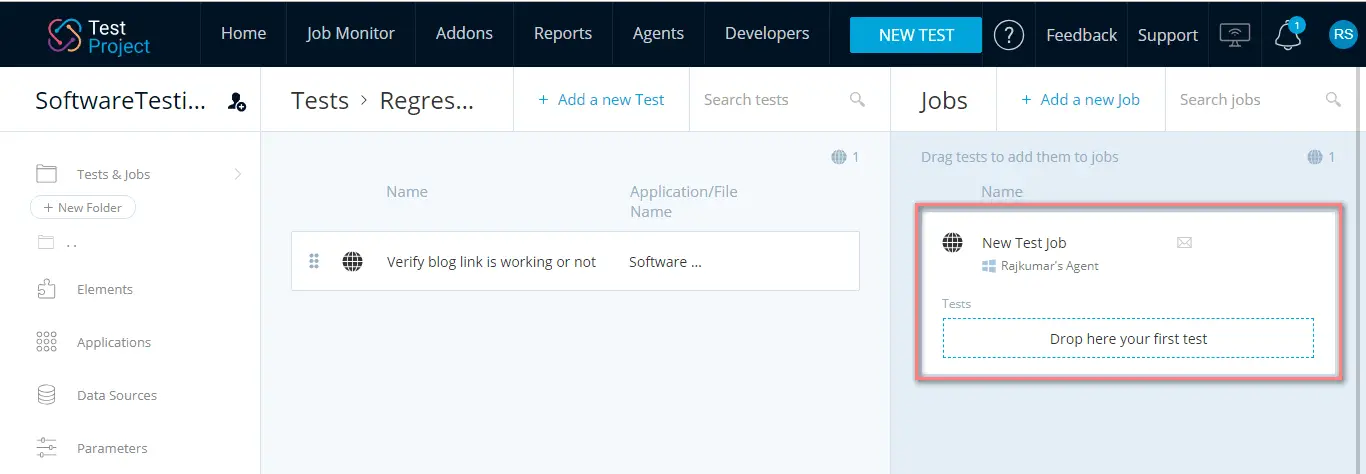
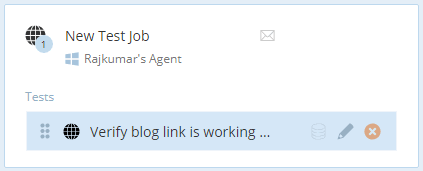
I have added a test to my job. You can see that in the below image.
The job we have added will run at the scheduled time we’ve selected. If the job is a on demand one then we have to run it manually by clicking on the ‘Run’ icon (To do this, we have to mouse hover the name of our job).
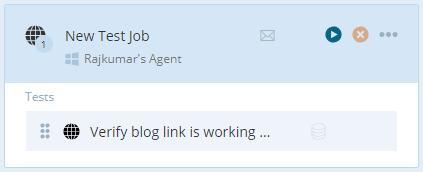
Note: By clicking the Envelope icon, you also have the option to send job execution summary notifications to your email or directly into your Slack, or use any service that supports web hooks.
Conclusion
I am going to conclude this post here. TestProject makes our life simpler with an easy installation process, a framework that includes the best tools and SDKs available (for both recording tests and developing coded tests), while reducing the maintenance efforts. TestProject’s recording tool enables user actions to be recorded as they are carried out on an application and generates robust test scripts. This recording feature helps you in the development of automated test scripts and also allows you to quickly create test cases. Some of the other features I like most are their Addons, and Pricing plan.
What do you think of TestProject. Let me know your thoughts on TestProject in the comment section below.

