TestLodge Tutorial – TestLodge Test Management Tool Tutorial
Recently, I have worked on TestLodge Test Management tool and I would like to share this TestLodge Tutorial with you all.
As a tester, we do write test plans, test cases in our day to day life and link those with bugs and generate reports to share with the team. Sometimes we do repetitive tasks by writing the same kind of test plans and test cases again and again and some of us are still using Excel sheets and Word documents to maintain test artifacts.
Do you want to try a simple and easy to work test management tool? I am sure you could present this tool to your management and get approval. It’s very straight forward and self-exploratory. There is no need to put hard efforts working on installations.
TestLodge knows that most users will appreciate signing up and quickly getting started with no setup required. TestLodge allows you to start your journey by simply signing up. Maybe you are in one of the teams who are still in the dark ages using Excel sheets to maintain test cases or you are using Google Spreadsheets to write test cases. Don’t worry TestLodge address this too. You could easily import your test cases from Google Spreadsheets.
TestLodge is one of the best choices in terms of Test Management Tools. TestLodge supports you to create test plans, test cases, test runs, defects, and reporting. Let’s discuss some of the TestLodge’s features that make it worth choosing this Test Management Tool.
Key features of TestLodge Test Management Tool are as follows:
- Creating Test Plan
- Creating Test Suites
- Creating Test Cases
- Tracking Bugs
- Graphical Reporting System
- Integration with popular bug tracking tools
Assume we are working on a project where we have to evaluate the login page of TestLodge. As per the requirement, we create a test plan, test suites and test cases to make sure the login page is working as per the requirement specification.
So, let see how TestLodge helps us to achieve our goals.
In this TestLodge tutorial, I will show you the following:
- Registration – TestLodge Test Management Tool
- Overview on TestLodge Dashboard
- How to create a Project on TestLodge
- How to create a Requirement
- How to create a Test Plan
- How to create a Test Plan by copying an existing Test Plan
- How to create Test Suites and Test Cases
- How to copy Test Cases from one Project to another
- How to import Test Cases from Google Spreadsheets
- How to run Test Cases
- How to generate Reports
- Integrate TestLodge with issue trackers
Registration – TestLodge Test Management Tool:
We need to register to start working with TestLodge. Let’s register.
Step 1: Go to official website of TestLodge
Step 2: Click on ‘Pricing & Sign Up’ button on the Home Page
You will be redirected to choose the plan.
Step 3: Choose a plan and click on ‘Sign up’ button.
TestLodge offers multiple plans such as Premium, Plus, Basic and Personal. Choose a plan based on your requirement and click on appropriate ‘Sign up’ button. Here I choose ‘Basic’ Plan.
Note: You will get 30 days free trial.
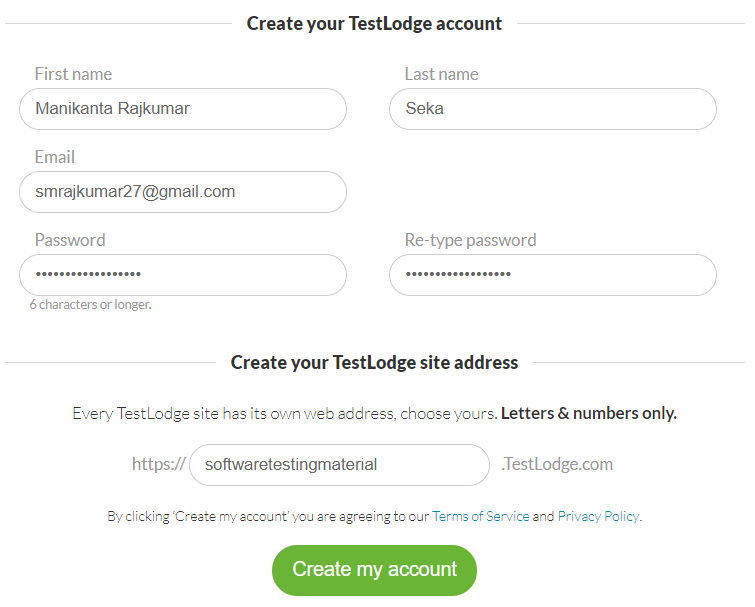
Step 4: Fill all the required details and click on Create my account button
Enter required account details in the ‘Create your TestLodge account’ section:
- First name
- Last name
- Password
- Re-type password
Choose site address based on your preference and enter that under ‘Create your TestLodge site address’ section:
Here I choose ‘softwaretestingmaterial‘.
My site name will be https://softwaretestingmaterial.TestLodge.com
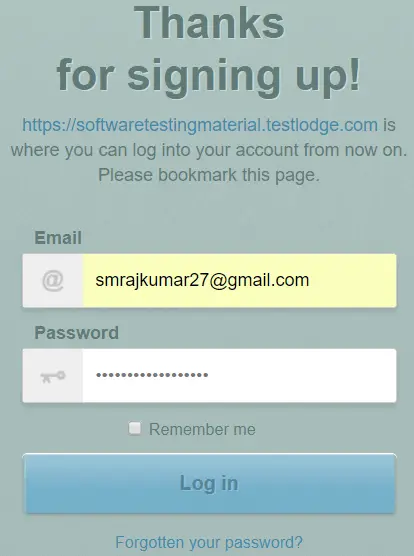
Click on ‘Create my account’ button. Once you do this, you will be registered and a message will be displayed saying “Thanks for joining TestLodge – Your new account is being created now and you will be automatically redirected in a few seconds.”
Step 5: Enter your login credentials (such as ‘Email’ and ‘Password’) and click on ‘Log in’
You will be redirected to your dashboard of TestLodge.
Overview on TestLodge Dashboard:
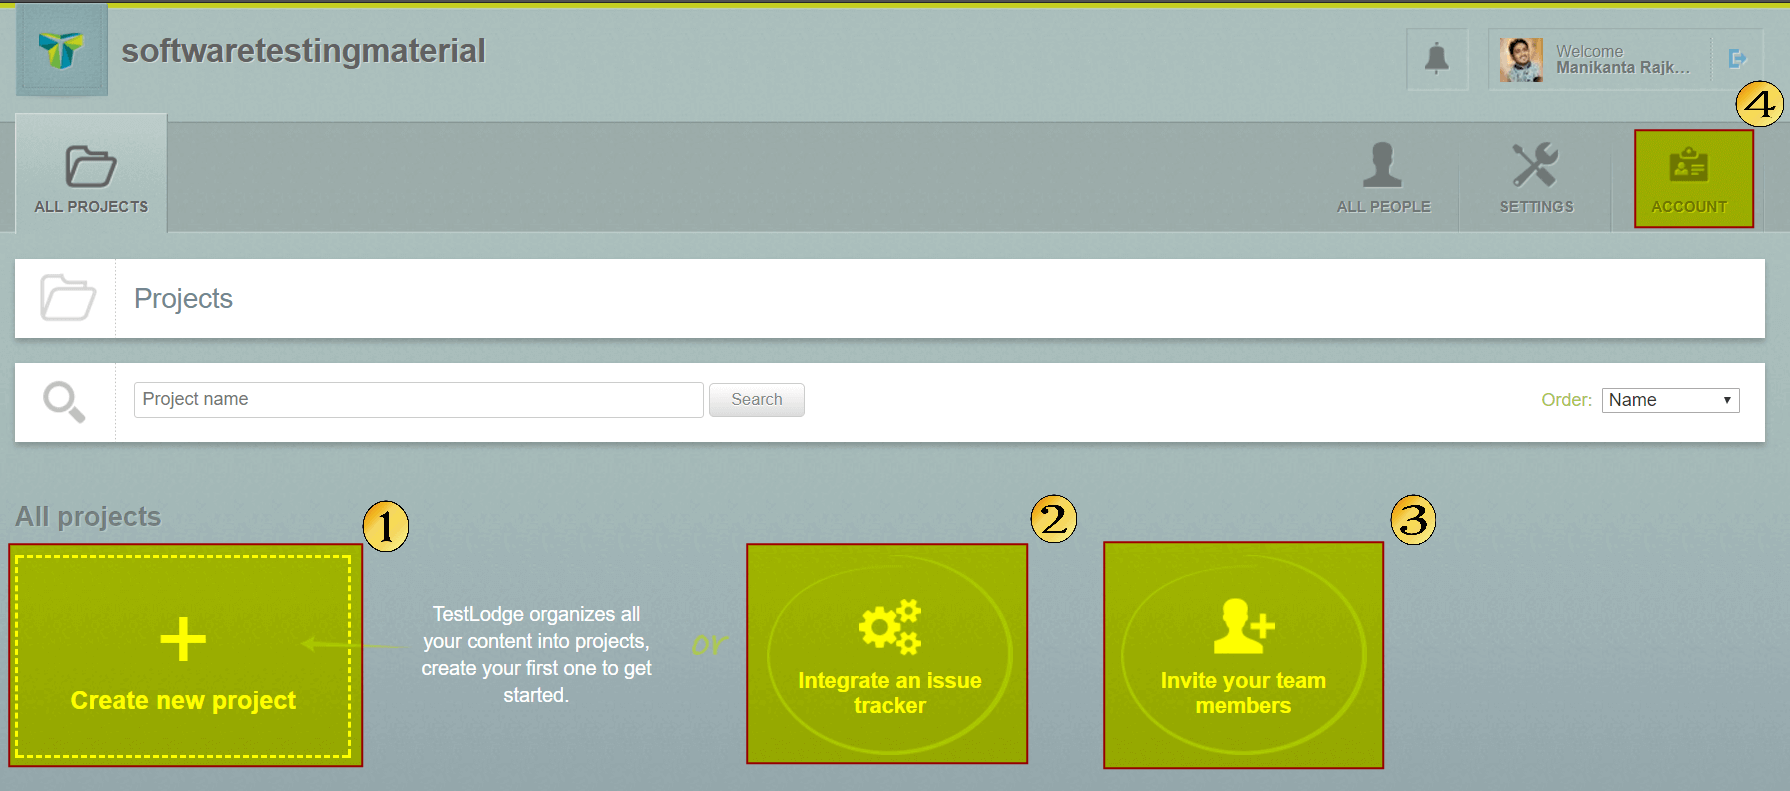
Here on Dashboard, you could do following things
- Create Projects
- Integrate issue trackers
- Invite your team members
- Upgrade your account
You could also manage people and assign user roles and you could upload your preferred logo to your projects.
How to create a Project on TestLodge
Step 1: Click on ‘Create New Project’ link
Note: Marked 1 in the above screenshot
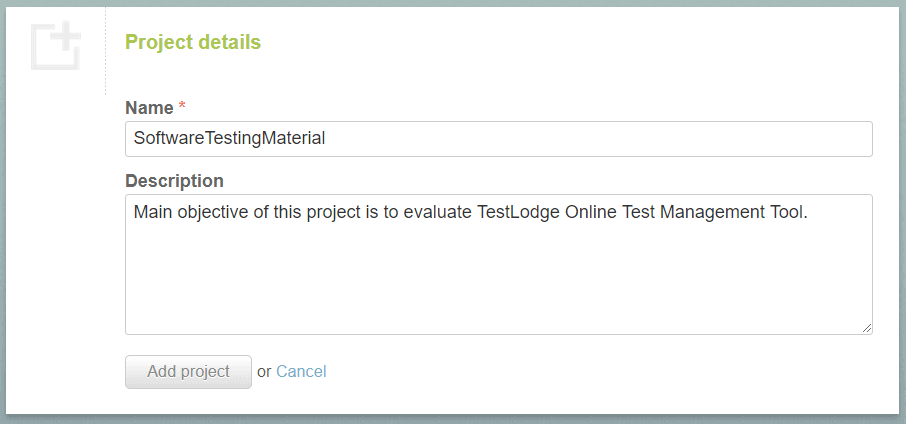
Step 2: Enter your project details such as ‘Name’ and ‘Description’ and click on ‘Add Project’ button
Here I give my Project Name as ‘SoftwareTestingMaterial’ and Description as ‘Main objective of this project is to evaluate TestLodge Online Test Management Tool.’
A message will be shown as “Project was successfully created”.
As per Software Development Life Cycle (SDLC), we gather the requirements once we are allotted to any project. You could read Software Development Life Cycle here.
So let’s move on to create a requirement on TestLodge.
How to create a Requirement
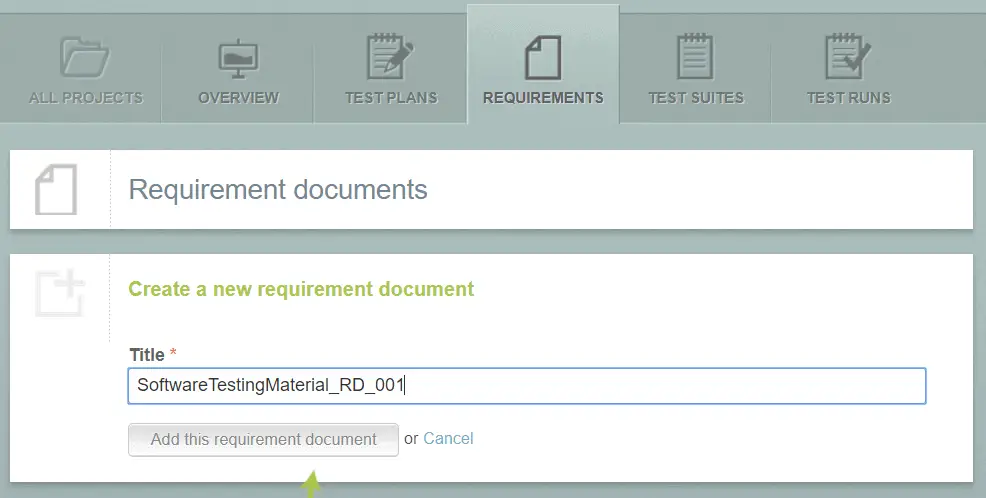
Step 1: Click on the ‘Requirements’ tab and enter the ‘Title’ of your requirement
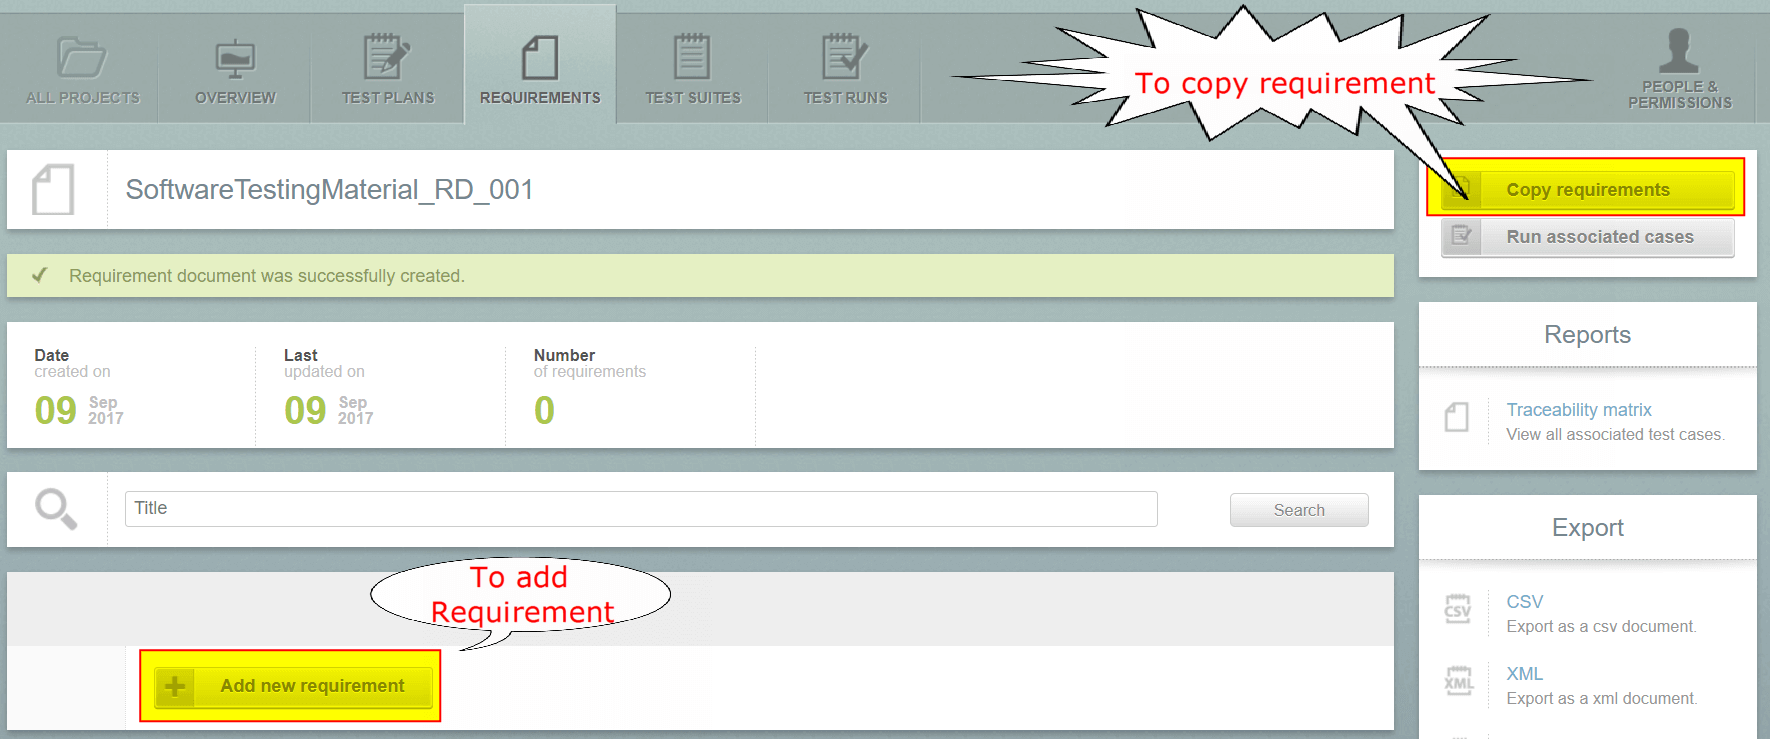
Once you have added the requirement document, a message will be shown as “Requirement document was successfully created”.
Step 2: Add new requirement by clicking on the ‘Add new requirement’ button
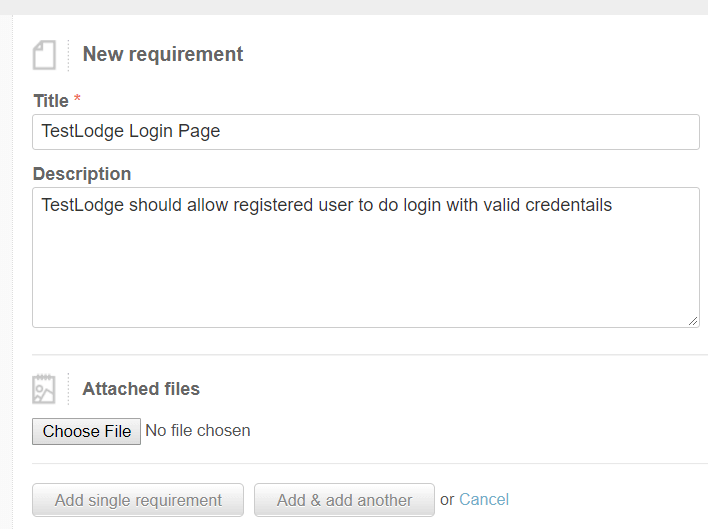
Step 3: Enter the required details such as ‘Title’ and ‘Description’. You could also attach files here. If you want to another requirement immediately after posting this requirement then click on ‘Add & add another’ else click on ‘Add single requirement’ button.
A message will be shown as “Requirement document was successfully added”. You could also see ‘Number of requirements’, ‘Date created on’ and ‘Last updated on’
Note: You could also copy the requirements by clicking on the ‘Copy requirement’ button
How to create a Test Plan
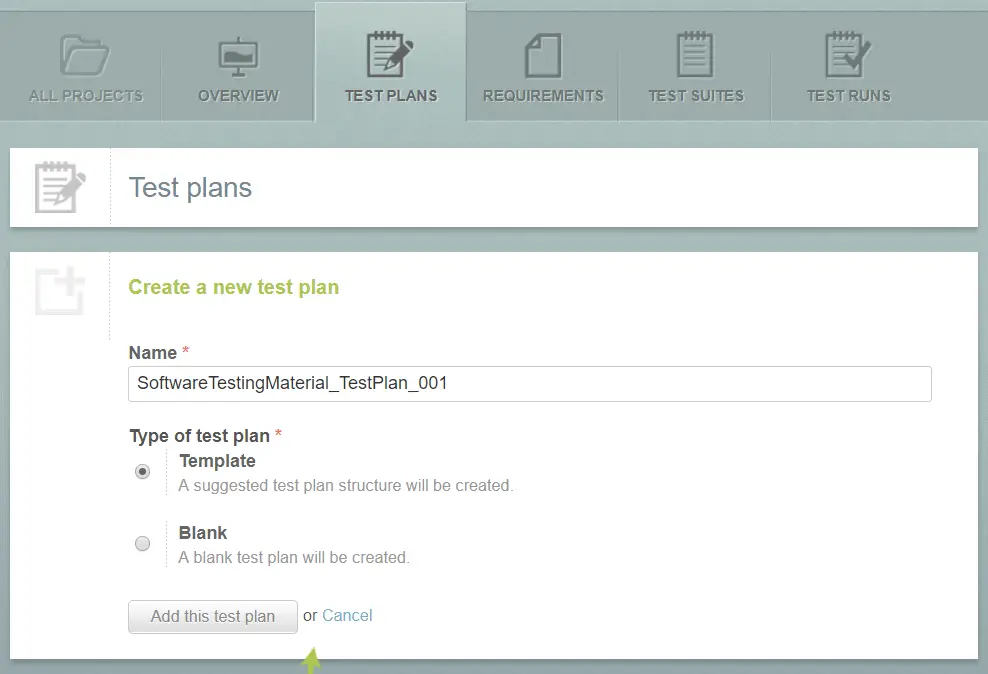
Step 1: Click on the ‘Test Plan’ menu
Step 2: Enter a name of the test plan and click on ‘Add this test plan’ button
Here you could find Type of test plan with two options namely ‘Template’ and ‘Blank’. If you choose ‘Template’ as Type of test plan then TestLodge loads a predefined Template.
A message will be shown as “Test plan was successfully created”
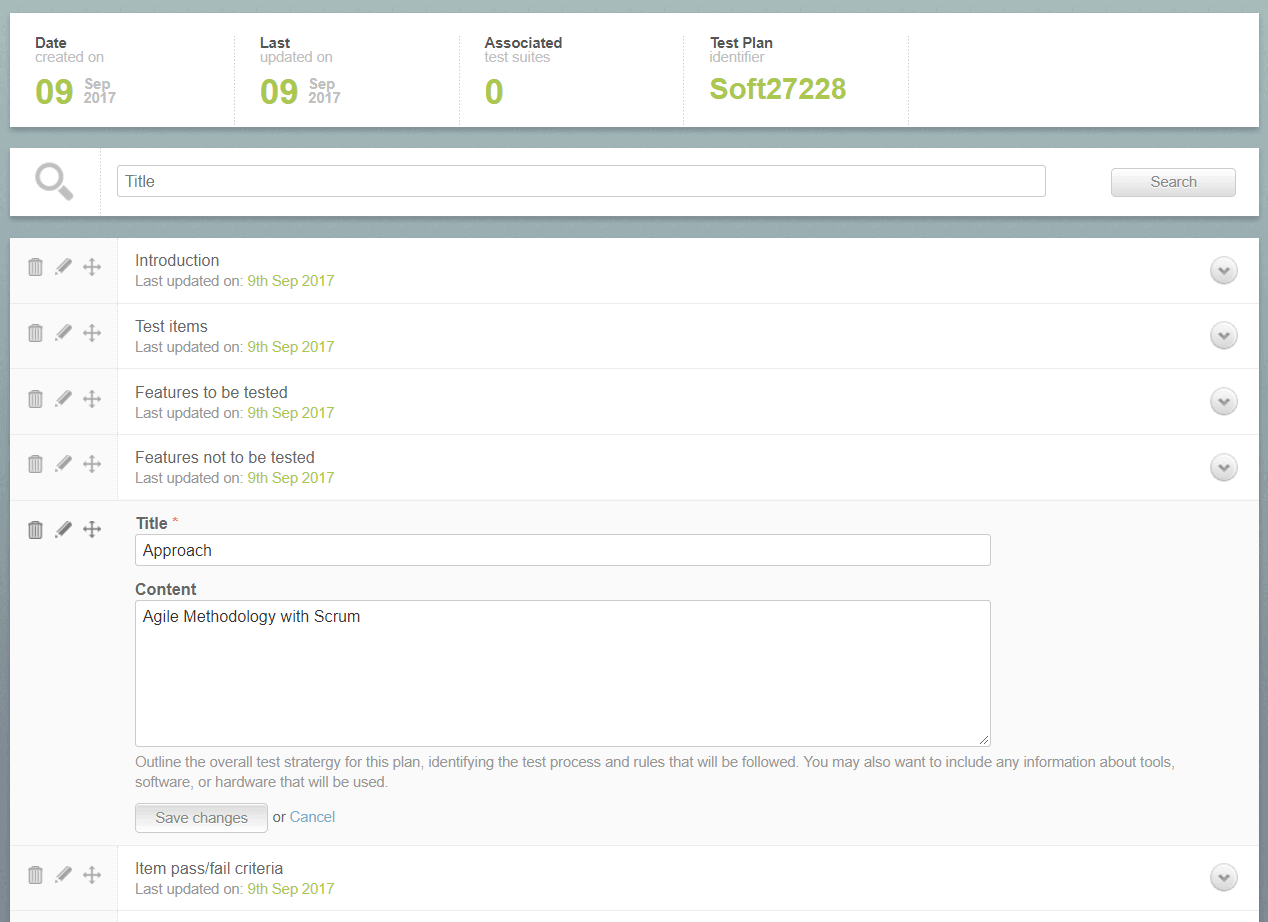
Step 3: Scroll down to see the ready made test plan template. Click on the pencil icon next to any component in the template and add the details as shown in the below screenshot. Here I have added ‘Approach’ and ‘Features to be tested’ to show you how to add. You could add whatever necessary as per your test plan.
How to create a Test Plan by copying an existing Test Plan
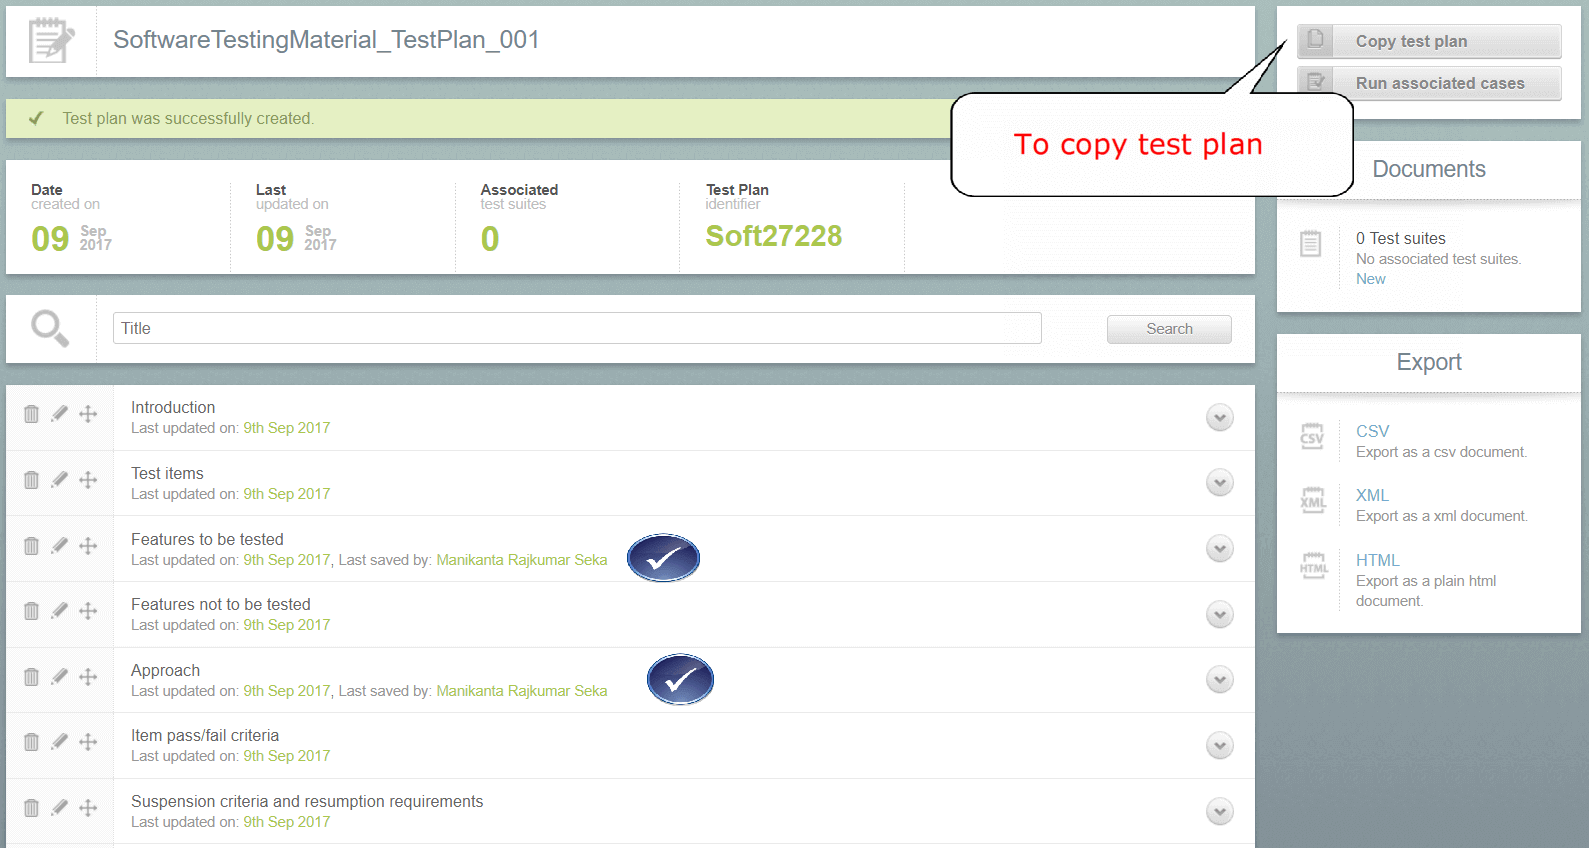
Step 1: TestLodge allows you to copy the existing test plan to create a new test plan. You could click on the ‘Copy Test Plan’ button as shown in the above screenshot.
Select the project from the Project dropdown list and select any of the two options such as ‘copy to an existing test plan’ or ‘copy to a new test plan’.
How to create Test Suites and Test Cases
Step 1: Click on ‘Test Suites’ menu
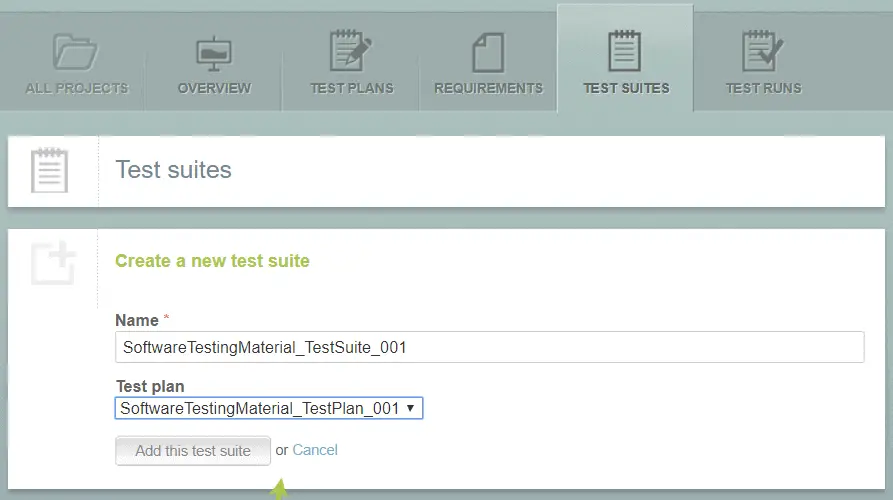
Step 2: To create ‘Test Suite’ – Enter the ‘Name’ and choose ‘Test plan’ from the drop down list and click on ‘Add this test suite’
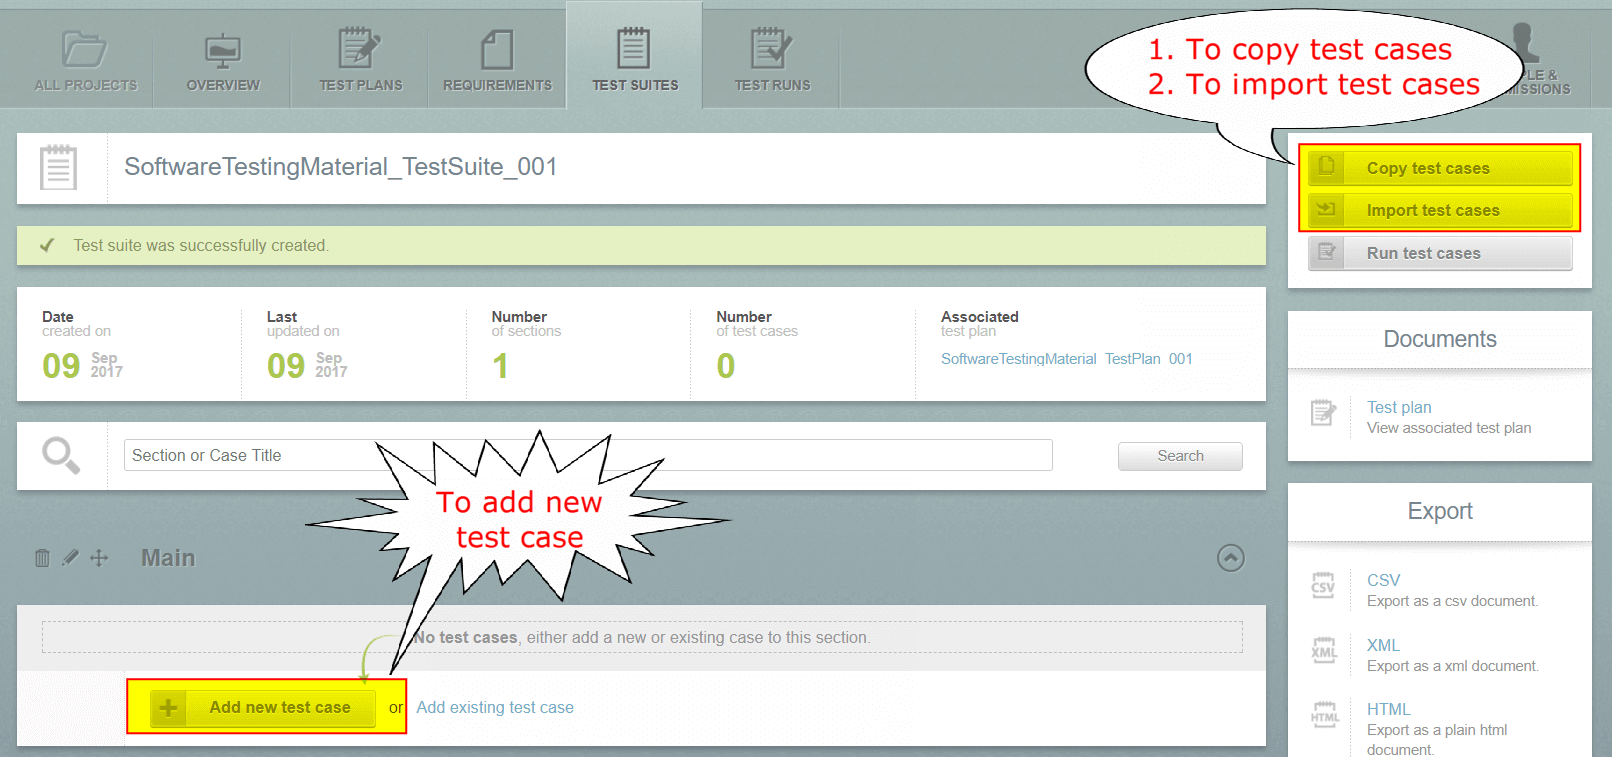
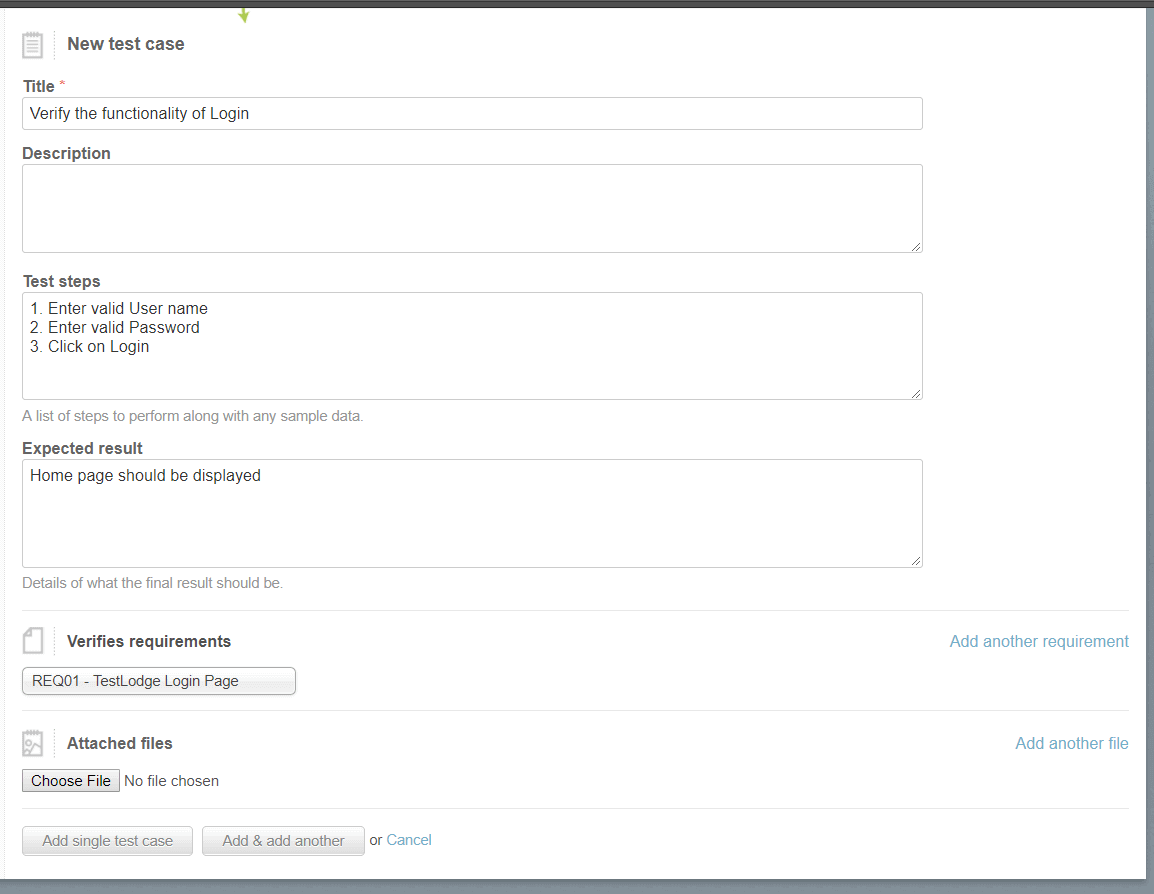
Step 3: To create ‘Test cases’ – Click on ‘Add new test case’ button
Step 4: Enter the required data in the ‘New test case’ template as shown in the below screenshot.
A message will be shown as “Test suite was successfully created”. If you want to add more test cases, you could use ‘Add new test case’ again.
Here you could see ‘Number of test cases’, ‘Date created on’ and ‘Last updated on’.
How to copy Test Cases from one Project to another
Step 1: Click on the ‘copy test cases’ button as shown in the above screen shot
Step 2: Select the ‘test case’ which you want to copy
Step 3: Choose a ‘project’ from the drop down list to which project you want to copy the selected test case and choose the ‘test suite name’ from the dropdown list (either ‘existing’ or ‘new’) and click on ‘copy test cases now’ button
How to import Test Cases from Google Spreadsheets
Step 1: Click on ‘import test cases’ button as shown in the above screenshot
Step 2: Give permission to TestLodge to access your Google Spreadsheet account to import
How to run Test Cases
We have created test cases, let’s see how to execute test cases using TestLodge
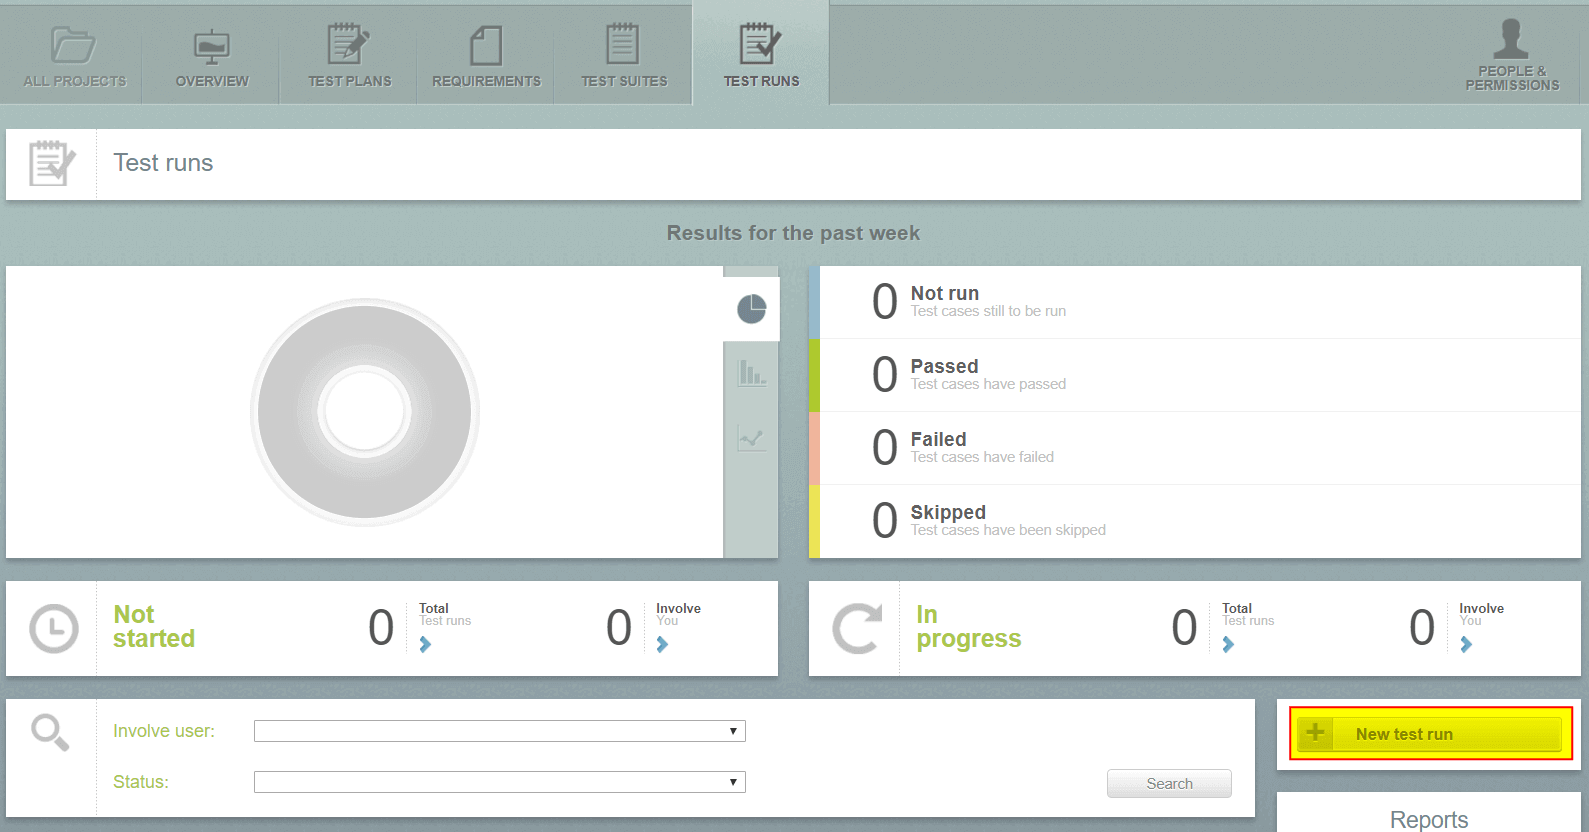
Step 1: Click on the ‘Test Run’ menu and click on ‘New test run’ button
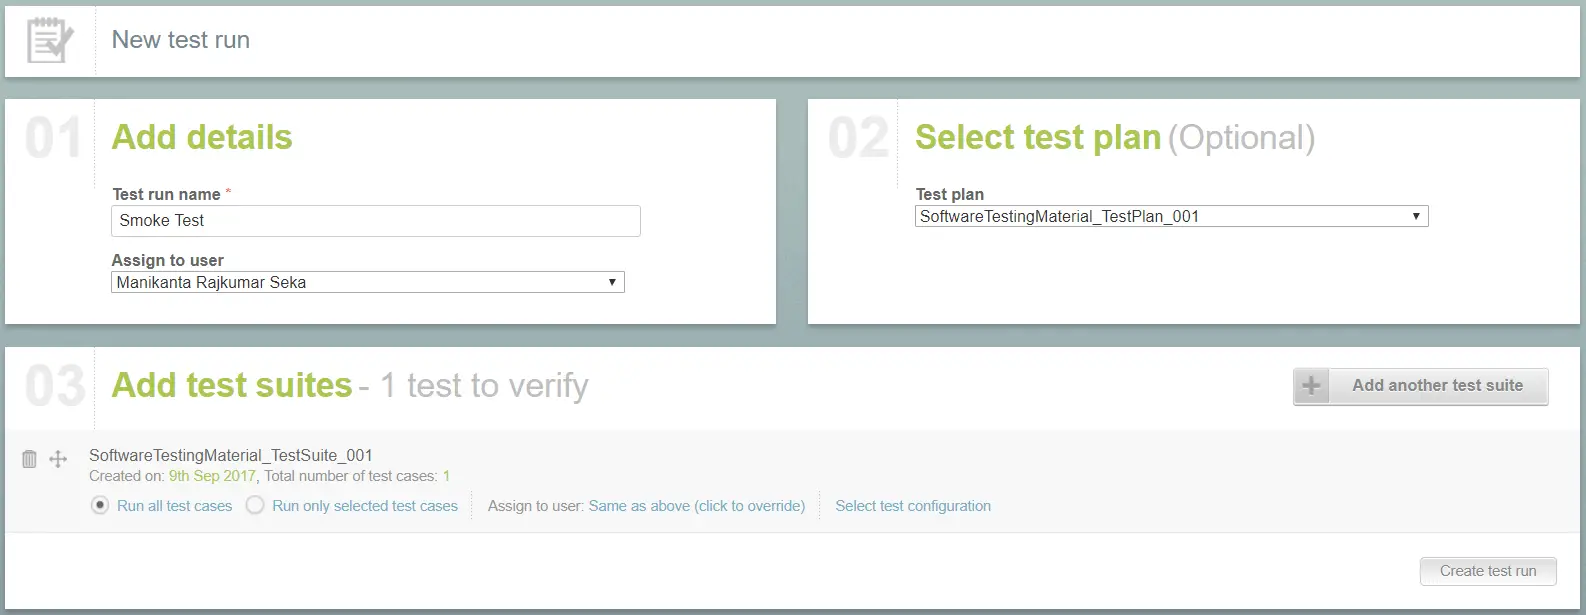
Step 2: Enter ‘Test run name’ and choose to which user you want to assign this from the dropdown list. Choose a ‘test plan’ from ‘Test plan’ dropdown list. Also, choose a ‘test suite’ and click on ‘Create test run’ button.
You will be redirected to another window where your test cases will be available to run.
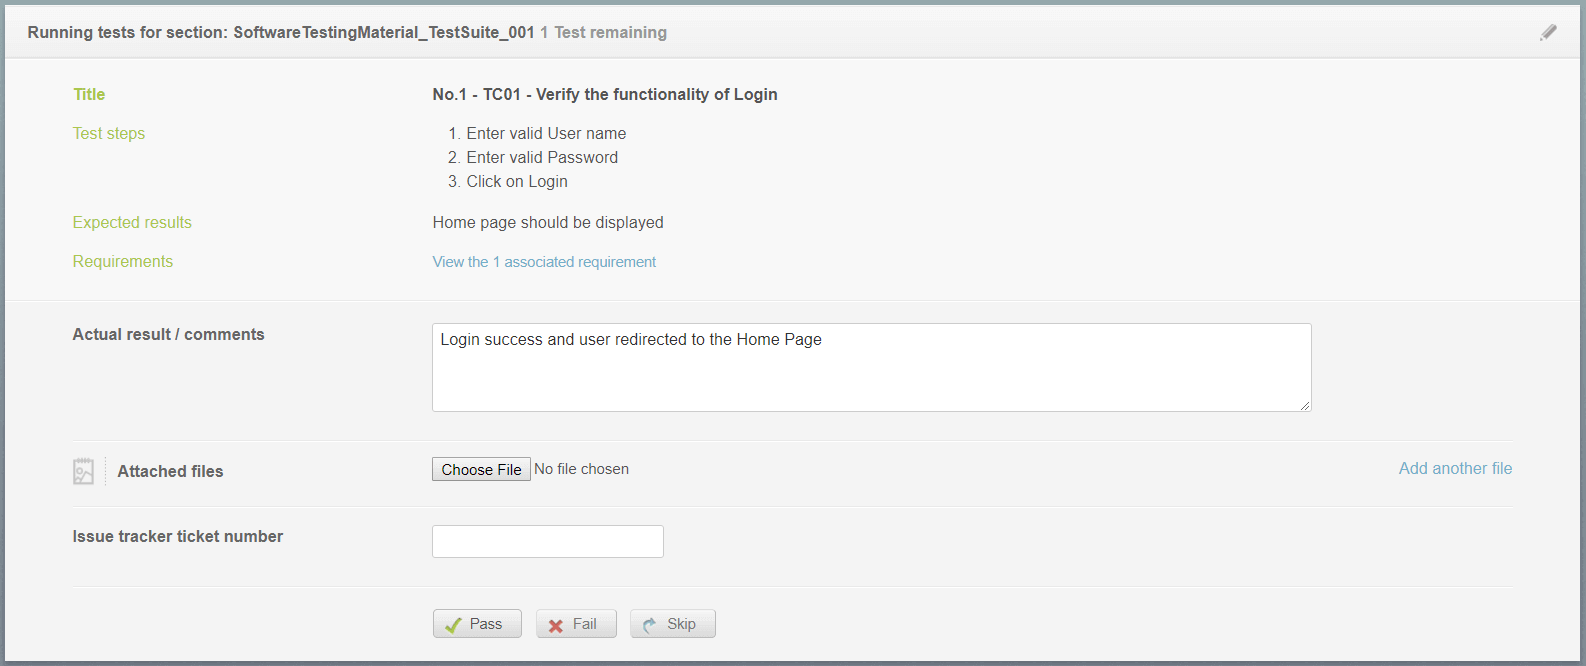
Step 3: Click on ‘Run tests assigned to you’ button to run the test cases
Step 4: If the actual result is same as the expected result then you could change the status of the result as ‘Pass’. You could choose any of the three status ‘pass’, ‘fail’ and ‘skip’
How to Generate Reports
Finally, we have executed the test cases, so now our next step is to generate the reports.
Step 1: Click on ‘Test Run’ menu and select the option ‘Test Reports’ which is in the right side corner of the page
Step 2: Choose your preferred dates and generate your report
Integration TestLodge with Issue Trackers
TestLodge allows you to integrate with leading issue tracking tools such as JIRA, Mantis, Bugzilla, YouTrack, Redmine, GitHub, FogBugz and much more. Once you have connected with your chosen tool, TestLodge provides the ability to have tickets automatically created when a test fails, along with pulling back the ticket statues from the issue tracker and updating tickets when you verify any fixes. You can view the list of supported issue trackers on TestLodge website.
Must Read: TestLodge Integration with JIRA
Conclusion:
I am concluding this “TestLodge Test Management Tutorial” here. I felt that it is one of the more self-exploratory Test Management Tools in the current market. TestLodge is a simple, productive and efficient tool which provides an easy to use interface making your life straight forward. Using TestLodge allows you to concentrate more on testing the application instead of spending time on maintaining your test artifacts. So here is your turn to try it out.








I find it a good tool. Thanks Raj
Interesting, I will try this
Yep, you should give a try. Also, let us know your experience after having hands-on experience.
sure.
Hi,
Is there any Open Source Test Management Tools in market.
Hi Manikanta, try TestLink. We will provide a tutorial of TestLink ASAP