How To Write First Appium Program
In the previous article of this Appium tutorial series, we have seen How To Connect Mobile Device To Different OS. Now in this article, we will see our first Appium program.
First Appium Program : (Calculator Application)
Writing your first Appium program must be for sure exciting.
But before you start to delve into the same, you need to have some common steps in your mind.
We can see below the flow of the steps that you need to follow in order to write your first Appium program.
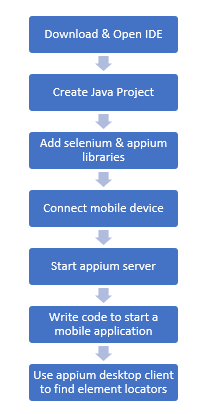
We will deal with each of the steps individually here,
Step 1: To Download Eclipse or any other IDE for Java
For the first step, it is very clear that we need to have an IDE (integrated development environment) so that we can start the development of test scripts.
One of the most popular choices is Eclipse, however, you can choose any IDE as per your preference.
Step 2: To Create a Java project
The second step is to create a Java Project, but in practical use, you would want to create a Maven Project.
This is due to its several added benefits such as not worrying about manually configuring various dependencies, libraries that will be required to support your project.
To do the same, open your IDE, say for example you are using Eclipse, start creating a new Java Project by following the below stated,
Go to File -> Go to new -> Go to Others -> Search for Maven -> Select Maven Project ->Click Next
Once you are done with the above step, you will land on the below page,
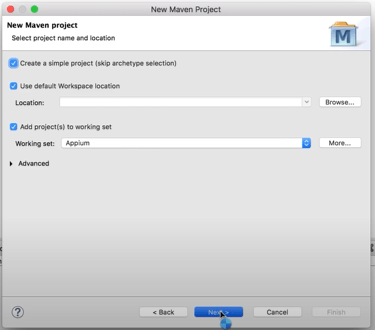
As shown in the image, click on the three select options and enter a working set name of your own and click on ‘Next’.
Post this, you will be required to give additional information to the Maven Project as seen below,
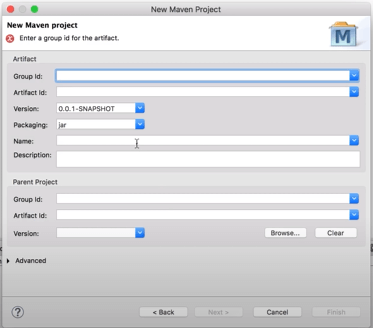
Here, under the artifact section, enter the details as follows and click on ‘Finish’:
Group Id: Any Tests Name (as per your project)
Description: As per your preference
Group ID: As per your preference
Artifact ID: As per your preference
Once you have completed the same, you will find your Maven project reflecting in the Package Explorer on the left-hand side panel of the Eclipse.
Additionally, if you expand the project, you will find that Eclipse has created all the relevant subfolders within the project.
Step 3: To Add libraries
As we know, we need to add a couple of libraries that would help our test framework to execute the test cases and the same can be done with the help of the Maven Project’s pom.xml file.
Check the below screenshot, here you will find the pom.xml file within the maven project that we would be creating in the earlier steps.
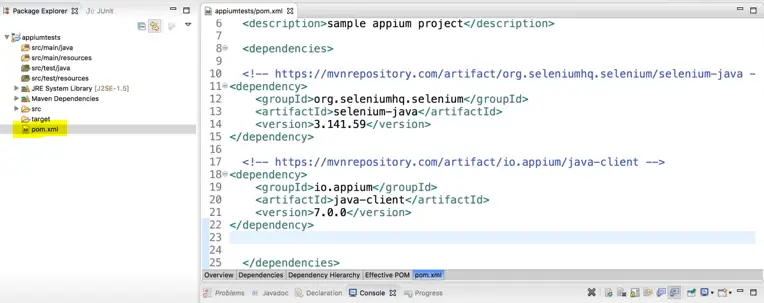
Inside the same, we need to add dependencies which are in other words the libraries that we would need to execute our test cases.
We need to visit → https://mvnrepository.com/ which is also called the Maven central repository so that we can copy the most stable version of the libraries and use it.
In order to run our first test case, we would need the following dependencies,
- Selenium
- Appium Java Client
After incorporating these libraries into our pom.xml file, we would need to save and clean the project, we would get the Maven dependencies folder in the project.
Step 4: To Connect the device
Under this step, you can connect your mobile device using a USB cable to your computer system and then go to the command line or terminal and run the command as “adb device”.
After this, the command line prompts with the list of devices that it detects to be connected as seen in the below screenshot.
![]()
For more details on this step, please refer to the earlier articles in this series.
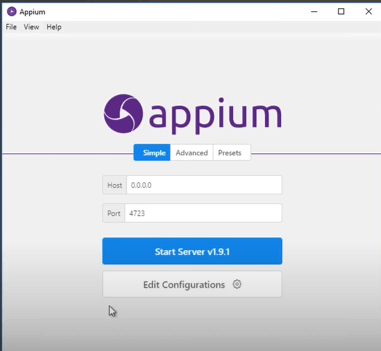
Step 5: To Start Appium server
In order to start the Appium server, you can either use the command line or the Appium desktop client.
If you want to use the command line, simply run the command: “appium” and hit enter.
Let’s say we want to start the Appium server using the Appium desktop client, we can do so by clicking the button, ‘Start Server v1.9.1’ as seen below,
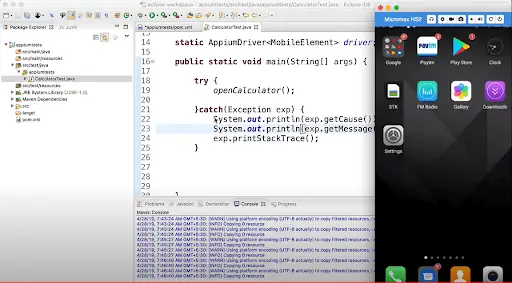
Step 6: To add code to start automation on a mobile device
Now we will finally start with the coding part.
Let’s take an example of testing a calculator application and follow the steps,
- Open the folder src/test/java and create a new java class file within it
- Next will be adding the desired capabilities, which is a concept explained in the earlier articles.
It is a type of key-value combination information, which tells the Appium about our device and our application.
Information about the device and the application can be such as deviceName, udid, platformName, platformVersion and appPackage, appActivity. - Import the necessary libraries such as Appium driver and selenium driver.
The program for the calculator is as follows,
package SystemApps;
import java.net.MalformedURLException;
import java.net.URL;
import org.openqa.selenium.By;
import org.openqa.selenium.WebElement;
import org.openqa.selenium.remote.DesiredCapabilities;
import io.appium.java_client.android.AndroidDriver;
import io.appium.java_client.remote.MobileCapabilityType;
public class Calculator {

public static void main(String[] args) throws MalformedURLException, InterruptedException {

DesiredCapabilities dc = new DesiredCapabilities();

dc.setCapability(MobileCapabilityType.AUTOMATION_NAME, "Appium");
dc.setCapability(MobileCapabilityType.DEVICE_NAME, "Android");
//find from your mobile device, by going to the setting option and then to the “about Phone” option
dc.setCapability(MobileCapabilityType.PLATFORM_NAME, "Android");
dc.setCapability(MobileCapabilityType.PLATFORM_VERSION, "5.1");
dc.setCapability("appPackage", "com.android.calculator2");
//to get this, go to the playstore, check for apk info app and install it, use it to find the app package for the application under test.
dc.setCapability("appActivity", "com.android.calculator2.Calculator");
//using the same app apk info, you can find the appActivity too

URL url = new URL("http://127.0.0.1:4723/wd/hub");
//here the “http://127.0.0.1:” is your IP on the system, and port “4723” that you can see from the appium server

AndroidDriver driver = new AndroidDriver(url, dc);

System.out.println(“Application started”);

}

}
Step 7: To use Appium desktop client to locate the elements and to Run and validate
In the above program, we just saw the application had started.

As we go further we would also want to do calculations and later validate the result.
For these functions, we would need to locate the particular mobile elements.
This can be done by either using the Appium Desktop Inspector or by using UI Automator Viewer.